
 Product Experts Available Now!
Call 1-800-940-8924


Thank you! Your comment has been submitted successfully. You should be able to view your question/comment here within a few days.
Error submitting comment. Please try again momentarily.


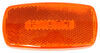
Old incandescent bulbs fade fast and draw more power than they should. This Piranha LED trailer light uses six amber diodes that shine brighter while using just 0.03 amps at 12V. You get crisp visibility and efficiency in one, with no brittle filaments or bulb swaps to worry about. The LEDs last up to 50 times longer than traditional bulbs, so once it’s mounted, you can count on it to keep lighting the way for the long haul.
No need for a separate reflector here. The built-in reflex design handles both lighting and reflection duties, keeping your trailer legal and visible without extra parts or clutter. The integrated reflector meets DOT requirements and keeps things clean while still catching light from other vehicles when parked or in low light.
Mounting this light is straightforward and tidy. The surface-mount design lays flat against your trailer with standard 3" hole spacing, making it easy to line up with existing mounts. A simple 2-wire pigtail setup—one lead and one ground—handles the wiring without fuss. It measures 4-1/8" long, 2" wide, and 1-1/16" thick, so it fits snugly without sticking out or catching on anything.
When you want a clearance or side marker light that covers its zone well, the P2 rating delivers. This light’s 90-degree beam pattern gives strong visibility straight on and at angles up to 45 degrees from centerline. It’s ideal for marking edges clearly and helping others spot your trailer even in low-light conditions.

Videos are provided as a guide only. Refer to manufacturer installation instructions and specs for complete information.
What's up everybody, it's AJ with etrailer.com. Today we're gonna be checking out these Piranha Side Marker Lights from Peterson. They're gonna be LED and you're getting two different colors. We have the amber one here and then the red one here. Another reason why we have two different ones is they are side marker lights, so they're gonna go on the side of your rig. We got the amber one here towards the front.
And as we come back to the back, that's usually where we put our red ones. So you can see, we have the same one back here, just red. And this is usually where they're located on the back of our rigs. You have both options. They're both gonna be LED and it's gonna be a good replacement especially if you have old incandescent ones that either burned out or broken, these are gonna burn way, or they're gonna shine way brighter than the other ones and last longer.
Let's check it out. One thing I wanna point out is that this is gonna be a two-wire system. So it's a side marker light. If you need to replace your tail light, that's a different thing altogether. It's gonna have more than two wires just because you have your brake lights, your taillights and your blinkers in here.
That's gonna have more wires. These are just side marker so you really only have a power and a ground here. All right, now we're gonna pop off the cover. The lens is gonna be made out of an acrylic. This is the amber one.
So that's gonna be the side marker here towards the front. We have our six diodes and six LEDs right here. Gonna be far more efficient than our incandescent ones. They're not gonna burn out as quickly and they're gonna be really bright. So you already saw that we had them on and it's midday. You can see them just fine. They're gonna be even brighter when it's night. Something else to point out while the lenses off is the mounting holes are gonna be three inches apart. So that's just something you wanna keep in mind. Make sure that matches up with the holes you already have if you're replacing an existing light, you don't wanna make any more holes in your rig than you have to. Now as far as install goes, it's pretty simple. You got the two mounting holes. If you're replacing a light, you can just use your existing hardware 'cause it doesn't come with its own hardware. And you just put it in the exact same spot. You just had to make some connection with the wires. I recommend getting some heat shrink butt connectors, that's gonna make things easier and seal it up. But otherwise, just follow along and see how we did it. We've already removed our old light, that's the one we need to replace, it was busted so that's why we got our new one. So we went ahead and snipped off those wires and disconnected it. I'm gonna come back and strip the wires back to get it ready to install our new one. So let's use the wire strippers. Real easy to do. Now I also have a piece of electrical tape on this one just to keep them separate on which ones they are. You see the wires are the same color but if you trace it back, you can see this one goes to the white wires in there which is gonna be the ground. If you're unsure, I recommend getting a tester and test them out. But since I see that, I know it's okay to hook that one up. There we go, now those are ready for our new light. So I'll grab that down here. We gotta do a little prep on this one too. You see our white wire has a ring terminal on that. We are not gonna need that. So go ahead and just cut that off. Then we have to strip back this one. You see this one's already ready to go. You can just pull that off. Now they're ready to make their connections. Now we're gonna add our heat shrink butt connectors here on this end first, just so I don't have to hold both while I'm trying to attach the light. So just go ahead and insert the wire. It's gonna be the ground side once again. So get the wire in there. Then get our crimpers, and go ahead and crush that down. There we go, it's on there nice and tight. We're gonna do the same thing on this one. Now we're gonna hook up our new light. It's gonna go power to power. Just put that in there. We'll make that connection just like we did all the others. That's good. I'm gonna do the same thing for the ground. With a flat-bladed screwdriver, you can just pop the cover off. It's real easy, just put it in that little gap and twist it. Pops right off. Now we can kinda see what we're working with just a little bit better. Let me grab the screws down here and kinda show you. Now the wires are not centered on the light but there's plenty of room on the backside for those wires to rest. So you don't have to worry about this matching up with that. You can still line up the holes that we're existing because we don't wanna drill any more holes than we have to on our rig. But it'll fit right back in there and I can reuse the screws. So just go ahead and get one of them started. Let me get the screwdriver in my pocket. We got those holes there. Getting it tighten down. Get that one started. I'll do the same thing on the other side and then use the screwdriver. That one and I can tighten this one down. I'm finished tightening that one down. Not too tight, you don't wanna break anything but make sure it's on there, nice and sturdy. Then we can replace the cover. Now we're gonna go ahead and test it, turn on our taillight. Looks like we got them working. So it's gonna be just fine. So you saw how easy that was to install. And it's working just fine. Whether you're replacing a broken one or you just wanna get rid of those incandescent ones, I think the LED light is gonna be the way to go. You're not gonna have to replace it as often as you would if you stay with those incandescents. They're not gonna be as hot and it's gonna burn or it's gonna be a little brighter than the regular ones too. So all in all, I think it's a win. Well, thanks for hanging out and I hope this helped..
Customer Satisfaction Score:
99% were satisfied with this product
1% of customers were not satisfied
Ratings & Reviews


James

8/30/2023
Still shining brite, no problems, good lights
Jeff B.
8/26/2025
Still going strong. No issues.
Info for this part was:
At etrailer we provide the best information available about the products we sell. We take the quality of our information seriously so that you can get the right part the first time. Let us know if anything is missing or if you have any questions.


















Allan
8/18/2023
Perfect. Bright and so far durable.