
To see if this custom-fit item will work for you please tell us what vehicle you'll use it with.
Thank you! Your comment has been submitted successfully. You should be able to view your question/comment here within a few days.
Error submitting comment. Please try again momentarily.


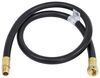
Quickly and easily install a 4-way trailer connector on your vehicle with this custom harness. T-connector plugs directly into existing wiring. Powered converter reduces strain on wiring system and is made using SMT to ensure superior performance.
Features:
Specs:
Installation
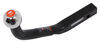
This custom-fit T-connector plugs into your vehicle's wiring harness, which is located behind your tail lights. You will have to remove the trunk floor coverings, rear scuff panel, and tail lights to access this harness. Once you've plugged in the T-connector, run the hot lead up to your car battery. Connect the lead to the included fuse holder, and then connect the fuse holder to the positive terminal on your battery.
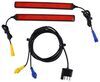
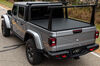
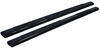
Once installation is complete, the 4-way connector will be stowed in an out-of-the-way location within your cargo area.
It is recommended that you use a small amount of grease on all electrical connections - the plugs on your automobile and the 4-pole connector itself - to help prevent corrosion.
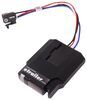
A tail light converter is built into this T-connector. This converter is a circuit-protected, battery-powered unit that bypasses the electrical routes that are used by a basic wiring harness. As a result, there is virtually no draw on your tail light circuits.
Because most trailers run on a two-wire system - wherein the brake and turn signals are carried on one wire - the separate brake and turn signals from your vehicle's three-wire system need to be combined so they are compatible with the wiring system of the trailer. This converter combines the brake and turn signal functions of your automobile so that they run on one wire to properly activate your trailer's tail lights. Note: This will not affect how the tail lights on your vehicle operate.
Curt builds each tail light converter using surface-mount technology (SMT). This method of construction involves soldering electronic components directly to the surface of a printed circuit board. SMT eliminates the need for leads, which are used in older through-hole technology. The result is a circuit board that is smaller yet provides more routing area and that offers superior performance, reliability and durability.
Circuit boards constructed using SMT have been shown to perform better under rough conditions with excessive vibration than those made using the through-hole method. And where would vibration be more likely to occur than in towing applications? Curt converters also produce less heat, leading to increased durability and longer life. In addition, lower levels of resistance ensure better performance, especially for parts that operate at higher frequencies.
Each Curt circuit board is made using high-quality components that are pieced together in the most technologically savvy fashion, leading to greater predictability and reliability in functioning.

California residents: click here
Videos are provided as a guide only. Refer to manufacturer installation instructions and specs for complete information.
Today on our 2017 Chevrolet Volt, you're going to be taking a look at, I'm going to show you how to install, the CURT T-Connector Vehicle Wiring Harness with 4-Pole Flat Trailer Connector. This is what our wiring looks like when it's installed. You can see it's going to live inside of the vehicle. When you're ready to use it, you just want to make sure, you want to over top this rubber seal inaudible 00:00:19 from any connection points. Take out as much as you need, close your hatch, hook it up to your trailer.When you're done using it, simply roll it up. You can either store it right back in your back hatch area or lift your floor coverings up and store it right down in a compartment.
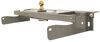
That way, it's out of the way. This wiring kit is going to give us all the proper lighting functions to safely tow our trailer, all turn signals, your brake lights and your running lights. It's also going to give us a nice dust cap. It's going to help keep any dirt and debris from getting on our connection points.What's nice about this is you're going to have a converter box that's going to mount right here on your driver's side. What the converter box is going to do, it's going to protect your factory wiring in your vehicle from any backfeed from your trailer if your trailer has a wiring issue.To begin our installation, in the back of the vehicle, we're going to take out all of our floor coverings.
We're going to need to remove all of our foam. We're going to have some plastic fasteners. You're going to have one here and you're going to have one right over here. I'll just pop those up. We can loosen that, we'll just lift it out like this.
We'll just set this aside for now.Next, we're going to remove our scuff panel, going to have a piece right here in the center that will need to come off. We're going to pull out on the bottom just like that, let's set this aside. Next, we need to loosen this panel. You're going to have a little plastic cover here on your tie down loop. We'll pop that off just like that.
Then, this one here, this one just unscrews. You can do that same thing on the other side of the vehicle. Once you get those two off, you're just going to pull out on your panel. It'll pop it loose.Next, we're going to take a T15 Torx bit. We're going to have a bolt here and a bolt here we need to remove. This is on the outside of our tail lights. We're going to have a Phillips head screw right there. Then, we're going to gently pull our light back. It might be a good idea to take a plastic trim panel tool, if you have one, and stick it right here in this corner, and down here in the corner light, and kind of gently start to pry it out. There's a fastener right up here that your light fits around. These pins go inside these rubber grommets.Now, we'll remove our tail light. We're going to pull up this red tab and then push down on the black one just like that. We're going to repeat that process on the other side of the vehicle. Behind our tail light, we're going to remove this grommet. Then, we'll take our plugs with our yellow wire, red and brown. We're also going to send the ground wire through too. Where we took the grommet out, we're going to pass it from the inside out just like that.What I'm going to do is I'm just going to slice it right in half. Then, we'll take our wires, feed them right under there like that, get our grommet back in place just like that. Going to go ahead and ground my wire with my self-tapping screw. I'm going to put it right here inside this housing, just want to make sure it's on metal, not on any plastic. I'm going to take some dielectric grease, going to put it on my connections here, help keep any moisture build up, help keep them from corroding. We'll connect our new plug and do the same thing here.We'll take the RTD silicone that comes in our kit and make sure we cover this here inaudible 00:05:19 help keep any type of fumes or anything like that from getting inside the vehicle. We're going to reinstall our tail light. Next, we need to mount our converter box. You need to find somewhere flat to mount it. Take our two-sided tape and going to stick it on your box.Wherever you decide to mount it, just make sure it's clean. There's not a whole bunch of dirt or dust or anything, because we want it to stick good. Other side peeled off, stick it down like that inaudible 00:06:18 down here, make sure our panel is going to slide in good. Now, we can reinstall our side panel.Then, you're going to inaudible 00:06:22 your green wire across over to your passenger side and repeat the same process with installing your wires behind the tail light. This comes pre-assembled for a Volt. We're going to go right here to the battery in the back. We're going to take our wire, going to go right through this front edge here, pull it out, slide over like this with our cap.I'm going to take this wire, feed it up like that, going to slide this right back down into place just like that. Once you've made your connection, you can install your fuse. Then, we can test it out, make sure everything's working correctly.Now, we'll test out our wiring using part number I26. Left turn, right turn, brake lights, running lights. Once you've tested it, you know everything's working correctly, you can reinstall your floor coverings.That'll do it for a look at and installation of the CURT T-Connector Vehicle Wiring Harness with 4-Pole Flat Trailer Connector on our 2017 Chevrolet Volt.

Wiring harness was easy to install with the help of youtube videos from etrailer
I watched and rewatched several sections of your installation video. Though some said they installed the product in 45 minutes, it took me about 120 minutes not rushing.
I used plastic bicycle tire levers to help remove the tail light assemblies and the rubber wiring grommets.
It is important to cut the grommet so the wires are below where the grommet ring contacts the metal. The cut ends up something like an L.
I also found the power wire route more easily with the battery cover off.
I also enlarged a hole in the styrofoam base to feed the 4 pole connector through instead of along the edge where it would be pinched.
I also used a 1/16 drill for starting ground wire screw. After getting screw started, it screwed in quickly. I would suggest after getting it started, to use a screwdriver in order to not over tighten and strip.
Well, this was a piece of cake to install. The hardest part was removing the taillamps. Aside from that it was very straightforward. The video instructions were incredibly helpful. This was my third hitch from etrailer.com so I've done this before. I especially appreciated the hint to use a strap to support the muffler since you have to detach the muffler support from the body while you mount the hitch.
Of course, seeing as there was an inch of mud on the top side of my belly panel and plenty of additional grime on the bumper beam and newly exposed sheet metal once I had everything removed, I did spend some additional time cleaning it all up, but that was just my OCD.
In the end, the hitch is neatly installed and tucked out of the way under the rear facia. My bike rack mounts up to it nice and neat and I am very happy with the way this turned out!
Very well put together kit, professional quality connections and connectors and it includes everything you need except the tools (you do need a Torx T15 bit). Even included a bit of sealant to reglue the grommets which you slice open. The instructions are fairly well put together as well although they do gloss over some steps, they presume that you are fairly comfortable doing things like popping apart clipped together plastic trim panels and that you're comfortable picking your own proper spots for a 12V and ground connection. It also says to disconnect the battery under the hood when the battery is actually in the back! (You probably don't have to do that step anyway if you're reasonably careful making the 12V connection) I read online about how the right side taillight connection is very difficult if you have a premium trim with a subwoofer, however I didn't have much difficulty with that. The trick is that you don't really have access for a hand to reach the rear of the tail light grommet. But you can pull the grommet out carefully from the front (outside) and you have enough access from the inside to snake the wire through even with the subwoofer creating an obstacle.
Nice adapter. I really like the connector setup - no pinching through insulated wires with those cheesy snap on splices. Good instructions and excellent video. However the driver side wiring was way too short to route as shown in the video. It was barely long enough to exit at the rear of the side cover. Another foot of the cable would be much easier to deal with. I also forgot to get sealant but was pleasantly surprised to find a small tube with the kit!
Bought for a '16 Volt. Nice complete PnP kit, especially if you've installed a generic kit in the past.
Three things: one, the instructions should mention that you should push the grommet into the vehicle, not try to pull it out. The diameter is bigger on the inside, so it's easier if you push it. Two, cutting the grommet should be a little more clear in the instructions.
Third, the instructions make no mention of a subwoofer. If you have a subwoofer in the Premium pkg or order the stereo upgrade, you'll have a subwoofer in the back right quarter. It impedes access to the right taillight. It was night time when I installed the kit, so I had no one to call when I ran into this problem. I removed the two nuts holding the sub, but their must have been a 3rd nut I couldn't see. I was still able to wiggle the sub just enough that I could get my hand behind it and do the wiring necessary, but it was really HARD!
4 stars, docked one for no mention of the subwoofer issue. Although I have to say George at etrailer got my order out fast! Thanks!
Other than that it was a breeze!
Received quickly and packaged in the hitch box.
Well packed within a sturdy safe box.
The Curt T-Connector wiring harness was perfect for my car! I installed it the same time as I did the Eco hitch.
Thanks etrailer!

Super easy to install and worked great.
The product itself is great
The so-called Chevrolet volt installation instructions were terrible
They should not even be included
Just direct people to the online video which is very good
Simple installation! excellant installation instructions.
The kit was well-organized, had everything (apart from tools) that was needed, and the instructions were clear and complete. I was able to install it without difficulty, and it's worked like a charm.
Plug and play this works great
Easy install
Easy to install and works well. I just hope in the long terme this won't drain my battery :)

Brooke M.
6/10/2022
Normal, run of the mill use of the wiring harness will not drain your battery.
Fantastic customer service.
Qwik install, easy to read instructions
easy install on 2018 volt

Rinley

10/24/2022
wiring used about 20 times this year and no problems connecting. it looks like new.
Great service! I ordered late Friday and had it Tuesday in Anchorage Alaska!
Easy to install, works great!
Wonderful ! !
The video description on YouTube is very well made wish make life easier
1. VERY FAST service.
2. EXTREMELY HELPFUL websource.
THANK YOU VERY MUCH!!!
Do you have a question about this Custom Fit Vehicle Wiring?
Info for this part was:
At etrailer we provide the best information available about the products we sell. We take the quality of our information seriously so that you can get the right part the first time. Let us know if anything is missing or if you have any questions.


Darin
7/8/2024
Still working great, no issues so far!