
To see if this custom-fit item will work for you please tell us what vehicle you'll use it with.
Use this truck bed spreader to de-ice multiple parking lots and roads with your 1-ton truck. Auger automatically reverses to clear clogs. 14" Diameter spinner casts material up to 30' and can be adjusted by the in-cab controller.
Features:
Specs:
Melt ice and snow away for your residents or customers with this SaltDogg electric salt spreader. The spreader has a 2-cu yd capacity and casts material 5' to 30', making it perfect for de-icing multiple parking lots and residential streets. Contractors and facility managers won't need to refuel or service a gas engine because the operation is electric. The quiet motors also won't wake up residents while you're de-icing roads late at night or early in the morning. Its powerful auger and vibrator provide a smooth, consistent flow for bulk salt, calcium chloride, or 50/50 salt-and-sand mixes.
First, assemble the hopper and install it in your bed, securing it in place with the 4 included ratcheting tie-downs. Decide what type of de-icing agent you'll be using and adjust the chute accordingly.
Lay the steel screen on top of the hopper to help filter out big chunks when you load your material. Then pour in your material. To protect the contents inside the hopper, cover it with the included, fitted tarp.
The slanted walls and baffle in the hopper help to channel the material down into the trough. Underneath the baffle is a rotating auger that breaks apart any large clumps and pushes the material down the length of the trough.
Meanwhile, the vibrator agitates the material to help move it towards the chute. Once the granulated agent passes into the chute, it's sent onto the rotating spinner where it gets dispersed.
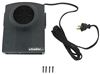
You can control these functions from the comfort of your cab with the variable-speed controller. Turn the spreader on with the power switch, and then use the 2 dials to adjust the speed of the auger and the spinner. A number next to each dial will indicate the speed setting that you're on. Dial the auger up higher if a strong rotation is needed to break apart large chunks of material. Dial the spinner higher to cast your material a greater distance. If there is moisture in the hopper that causes the salt or salt-and-sand mix to stick together, turn the vibrator switch on to help crumble the material up and move it down the chute.
This salt spreader uses 2 independent, 12-volt motors to power the vibrator, auger, and spinner. These electric motors run quieter than gas motors, and they also require less maintenance.
A 1/2-horsepower motor powers the vibrator and the auger. If the spreader ever gets jammed, the auger will automatically reverse for a few seconds to help clear the clog. This should easily break apart any clumped material. But if, after 3 attempts, it doesn't, the controller will clearly display a "J" to let you know that there's a jam that cannot be cleared by the auger. In this unlikely event, you'll have to turn off the power and remove the blockage manually.
The 14" spinner is powered by its own 1/4-horsepower motor and can spread salt or salt/sand mixes in a 5' to 30' radius. To withstand the corrosive effects of the salt, the spinner is made out of a durable polyurethane, and its shield is made out of rustproof stainless steel.
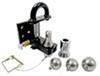
To prevent damage to the spreader and controller, a 120-amp circuit breaker is included. This breaker will shut down power to the SaltDogg if an overload of current passes through the machine. It also has a push-to-trip button to manually trip the circuit breaker.
The temperature outside, the size of a storm, and the location of a job may all play a role in your decision of what type of de-icing agent to use. Different materials have different weights, and a greater windup is needed to throw heavy granules the same distance as light granules. Because of this, you'll want heavier material to land as close to the center of the spinner as possible.
For this reason, the spinner can be set in one of 3 positions, closer to or further from the chute. Use the mounting holes closest to the hopper for lighter materials like calcium chloride. Use the center mounting holes for sodium chloride (standard bulk salt) or material of the same weight. Use the mounting holes farthest from your vehicle for 50/50 salt-and-sand mixes or other heavy substances. Note: Do not put sand alone in this hopper. Sand by itself packs down and won't come out of the opening smoothly or spread evenly.
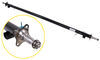
You can easily adjust the direction of the spread pattern to go to either side or directly behind your vehicle by positioning the deflector shield. Just loosen the thumbscrews on the back of the chute, slide the shield to the desired position, and retighten the hardware. This gives you the flexibility to cast your material where you want it, so you can get the job done as efficiently as possible.
You won't have to stop often to refill while de-icing a parking lot because the patented double-wall hopper on this spreader has a 2-cu yd capacity. It's also constructed of durable polyethylene and has a stainless steel frame, both of which make it extremely resistant to corrosion and impacts.
A stainless steel baffle partially covers the opening of the trough, which helps to reduce stress on the auger by optimizing material flow to decrease the risk of jamming.
This SaltDogg spreader will work with 1-ton trucks that have at least a 6-1/2' bed. If your vehicle is particularly tall, you may want to consider the SaltDogg spreader with an extended chute (337SHPE2000X) instead.
To mount the spreader in your vehicle, first remove your tailgate. Then lift the spreader, using a forklift or a crane, and slide it into your bed. Secure it to your vehicle with the 4 included ratcheting tie-downs, which hook onto the anchor points built into the hopper as well as available anchoring points in your truck bed. Check with your vehicle manufacturer to determine the best place to secure your load.
Mount the controller in your cab and plug it into the included power cable. Attach the power cable directly to your car battery for power - this setup completely bypasses your vehicle's wiring. Then plug the main wiring harness into the controller and route it back to the spreader where you will plug it into each 12V motor.
To keep the salt spreader lubricated throughout a long winter season, a remote auger bearing grease kit is included. It is recommended that you lubricate the bearing with automotive-grade grease after every 7 to 10 hours of operation.
When the SaltDogg is not in use, be sure to empty any unused material because salt or salt/sand mixes can freeze or solidify and cause the spreader to jam.
Remove the chute and spinner assembly for easy cleaning. Wash out the entire spreader and rinse off the external surfaces to help protect it from any type of corrosion.
 Alternate Instructions
California residents: click here
Videos are provided as a guide only. Refer to manufacturer installation instructions and specs for complete information.
Hi, this is Scott with etrailer. Today we're taking a look at and installing our SaltDogg spreader for our 2019 Ford F-250 50 Super Duty. Our SaltDogg spreader we have in our truck today is gonna be our two cubic yard option. What this one's gonna do is gonna give contractors or property owners the ability to salt their lot or their roads or driveways, stuff like that. To keep their customers safer, this is a really nice setup. This is something that's removable.
You can put it in and outta your bed. Can be a little tricky to take it in and out, but you put it in the beginning of winter and run it till winter's over and you're good to go. Another cool thing about this one is it's all electric and it comes with everything you need so you can start spreading salt right away. Installation isn't really too bad. The hardest part with this one was to put this thing in.
It did take a little thinkin' to get it done, but we just used a forklifts and a couple straps and got it right in. The setup we have on here today comes with our spreader, comes out of our chute. This is gonna be adjustable so we can adjust our plate where we want it to throw. We can move this from around, from side to side. So if we want it to shoot to the left or to the right, we can adjust that.
This is also gonna shoot stuff out to about 30 foot. You can set it up to where it'll shoot it out that far. So it has a really nice casting pattern, so you're getting a lot done in a short amount of time. This back here is quick detachable, so we can unhook our wires here and we can pull both these pins out, lock 'em out and pop this right off. So that makes it really easy to deal with.
It's gonna be electric so it's gonna be all plugged in to our system that comes with it. So everything's included. All you really have to do is just build little frame that fits up in the front of the bed and everything else comes with it. You just install it and hook it all up. The control box we have here does everything we need from the tip of our fingers. We have it set up really cool. We ended up running our wires up through the bottom of the seat and up to our floor here, and also our power line ran through the dash and came up and mounts right here. So what this allowed us to do is set this up to where we don't have it permanently mounted in the truck. So this may be used by our neighbor for maybe three months of the year or so. So we wanted to set it up to where he'd be able to remove this and not have it sitting on top of his dash all the time. So what we ended up doing is set it up where he can hide his wires when he is not using it, all he has to do is unplug these and hide 'em under his seat and hide this one right up under his dash. Another cool thing we did for this for him is ended up setting it up on a piece of two-by-four. So what we did here is this is gonna allow him to pull this out with the box and everything attached after he unplugs it and put this away so he can use it at a later time. This setup will also come with heavy duty straps that loops attached to right here on the side of our big hopper. And what we did is we just crossed them up and pulled them down pretty snug, and we did that on both sides. So that's nice that it comes with those as well. Really nice setup. I kinda like the idea that it comes with everything you need to get spreading some salt around. Now we're gonna go ahead and get a little bit of salt in here so we can show you guys how this thing works. And it does come with this grate on top and its main purpose is to actually do this, stop the big chunks, and that way, go ahead and do this with them and get 'em broke up so they're already broken up before they get down into the hopper itself. One of the cool features this has is it's gonna have a vibration feature. What that's gonna do is have it set up to where it's gonna help your salt not stick to the sides of your hopper. So say you're not getting a whole lot of spread, you can hit your vibrate button. What that's gonna do is shake the sides of the hopper and get your salt to run down into the bottom of the auger. Now, we'll go ahead and give this a try. We have it powered up. We'll get our spinner going now and we'll turn on our auger. Now we have the pause option on so we can stop spreading and leave our settings where they're at. And now we can hit our pause button again and it will resume spreading. Now, with both of our settings turned up on nine, you can see how wide of a pattern it actually threw. We've got corner of the curb over here and it shot clear up over here into where the parking spots. You can see this way how far it went out and how evenly it spread it out. Now that we have our hopper almost empty, what I want to do is I want to get almost all of it out of there because at the end, once we get it all done and everything's out of there, what you want to do every time is you want to get all that salt out of there with water. So you wanna rinse it out that way, 'cause that any moisture that gets in there with it will end up turning that salt to just a big chunk of rock. So what I'm gonna do is I'm gonna turn on my auger all the way and I'm gonna crank up my spinner and I'm gonna go ahead and hit the vibrator function and we're gonna try and get that all out of there. To start our installation, we're gonna want to unplug our tailgate that is powered. So we have two plugs underneath here that run to it. We're gonna need to get those unplugged. And if you look up, you're gonna have this wire harness that runs up into your tailgate through this hole. You're gonna have two plugs. You're gonna have this smaller one here, and then the one next to it is this bigger one, just gonna push in this tab and you're probably gonna have to push in and pull out. Sometimes these get a lot of dirt and stuff in 'em so it makes it a little difficult. But just keep working with it and you will get it. And this will do this other big one here and pop those out. And just feed your wire up. With our tailgate open, just want to lift up a little bit. And with your cable, pull out this tab and push it up through, and do that on both sides. Now we're gonna have this slotted area on our tailgate hinge on the bottom on our passenger side. We just wanna bring it up to where it comes in the pin to that opening. Now we can lift up and pull our tailgate away. Now to get your spreader into your truck, this can be pretty tricky. We used a forklift from our city to get it in there. You may need to use some kind of hoist system or get a bunch of your buddies and help you lift it in. One thing we did is we just got it sitting in there loosely right now, and we did add our spreader attachment on. What we need to do is get it where this end of our plate lines up with our bumper here and then we're gonna need to take some measurements to the front, and we'll need to get a frame system set up up there where we can put it in front of our spreader, that way it keeps it from sliding forward. The first measurement we're gonna need is from the end of our bed right here to the end of our spreader. Next measurement you're gonna need is your bed width. After we took our measurements, this is the box that we made and this is gonna go in the front of our bed, and what it's gonna do is keep our salt spreader from sliding forward and running into the back of the bed. This is gonna be really nice. We have it built real good, and this is with treated wood so it's gonna last a long time. Now you can see where we have our box back here in place and we do have part of it that goes up under the front of our spreader. What that's gonna do is help stabilize it side to side. And what we did, we also went ahead and put our straps on. So the ones we put on first, we crisscross them. So we ran our large strap from the back and we ran it up to the front. Those we inchesre the first ones we put on. So we allowed this to pull back into this and tighten everything up. And then we went ahead and ran our straps from the front, here, and crisscrossed over there and went up down to the back over there. We went ahead and got those tightened down to where they're really good and tight on both sides. Now, we have our main wiring harness that's gonna run to the back of our spreader. We're gonna take these and we're gonna run these up underneath and we're gonna follow a existing wiring harness underneath. So we'll go ahead and get that started now and we'll show you where we ran our wires. For our lines leading to our spreader, we ran 'em right behind the bumper and we tied into the factory wiring and came across the back of our bumper. Came across, we ran it along the edge of the frame where we come here. If you look right there, we ran it up over away from all of our suspension components, up and over onto the frame, following our factory wiring. We came up across above a crossmember, and ended up coming right to here. We ended up coming over all the way down our frame and we shot over underneath of our seat right over here where we found the grommet. We popped out the grommet and popped our connector up and through and managed to get our line to come out to this point. Now, our neighbor wants us to set it up where he has the control box right where it comes out underneath of his armrest. So when they're sitting there, they can run the controls with their arm on the armrest. So what I'm gonna do is set this up to where this line can come up to our control box here. And when he doesn't want this box in the way, we have this mounted to a board where it's just sitting underneath. So what he can do when he is not using his salt spreader, all he has to do is pull this board out and unplugged his two connecting wires right here and he can remove this whole system outta the way until he needs it again. Then he can just pop his board in with his box on it and his two control panels here and he's good to go. Now for running our power wire, what we ended up doing is having to go through the dash on this one and just run it up and over our transmission tunnel here. What happened was is as we ran this underneath and we ran it out with the wire for our control box, and we ran 'em out together, when we ran it all the way up to the battery over on the passenger side, we ended up being short by about two to three feet. So what we ended up having to do is pull all that back out and then we found a spot in a grommet in the dash and ended up running it from there and then across our firewall and up to the battery and we can show you that now. Now we found a grommet right over here on the driver's side and we came out, come up over the brake booster, ran up, and we run all the way through the top of the firewall over and then crossed and we ran to our included relay that we screwed onto the front there and then ran the rest of our power lead here and ran our negative cable to our negative post on our battery. With everything hooked up, we'll do a check, and we do have power to our box. And we do have everything lit, so everything looks good. We'll check our spinner. And that's on setting four. I can hear it back there running. We have our auger. That's what's gonna pull our salt into our spreader. That's working. And we'll check the vibrator, that works. And we have a pause button, and that works as well. And there we go. That'll do it for the install with everything working. And that was a look at our SaltDogg spreader for our 2019 Ford F-250 Super Duty. I'm Scott with etrailer. Thanks for watching.
Info for this part was:
At etrailer.com we provide the best information available about the products we sell. We take the quality of our information seriously so that you can get the right part the first time. Let us know if anything is missing or if you have any questions.


Thank you! Your comment has been submitted successfully. You should be able to view your question/comment here within a few days.
Error submitting comment. Please try again momentarily.