


You're at a SmartSolar controller during setup and don't want to pull out a phone to check status. This pluggable LCD display connects to the front with no wiring after removing the rubber seal, so you see system data instantly.
When you're standing at the charge controller during setup or troubleshooting, stopping to grab a phone or open another interface slows the whole job down. This pluggable LCD display puts system information right on the front of the controller instead. The display connects directly after removing the protective rubber seal, so the readout is right where you're already working. You can walk up to the unit, check what it's doing, and keep moving without adding another device to the process.
Some add-on monitoring gear turns a simple check into another install project with wiring, routing, and setup to sort out first. This display cuts that out with a direct connection at the front of the controller. The dataset confirms it installs by plugging in after the protective rubber seal is removed, with no additional wiring or configuration. You spend less time building out the display side of the system and get straight to checking settings and status.
Installation and system changes go smoother when the information you need is right where the hardware is mounted, not on a separate screen across the shop or in your pocket. This SmartSolar control display mounts at the controller itself, giving you a fixed on-unit interface instead of pushing every interaction to another device. Because it's a pluggable LCD display built for direct front connection, the controller and display stay physically tied together during setup work. You can check the screen while you're already at the wiring and hardware, which keeps adjustments more direct and cuts down on back-and-forth.
Adding a physical display only works if it doesn't become another bulky part crowding the install area. This unit keeps the footprint compact at 4-1/2" wide x 2" tall x 3/4" thick, so you're adding a dedicated readout without turning the front of the controller into a large control panel. Its small form keeps the display close to the equipment instead of pushing you toward a separate remote screen. You get a built-in viewing point that's easier to work around when space is tight.

Videos are provided as a guide only. Refer to manufacturer installation instructions and specs for complete information.
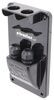
Hi, everybody, Andy here with etrailer. Let's take a quick look at this Victron pluggable display for your SmartSolar MPPT solar charge controller. So you can think of this as a small built-in screen that you can add to certain Victron SmartSolar MPPT charge controllers. So you're gonna be able to see what's going on with your solar system right at the controller. So once this is plugged in, the display is going to show you real-time info like battery voltage, charging current, solar power, and daily energy production. So you're gonna be able to also scroll through historical data so you can see how the system has been performing over time.
Now, installation cannot be any simpler and I do happen to have a solar charge controller here, an MPPT one from Victron. And I just wanted to give you a brief demonstration of how simple this is going to be to install. So let me give you an overhead view here, line this up so you can see. So you're going to remove this rubber cover. I've already removed the two screws there, so this will go a little bit quicker.
And so once you have that removed, you see the plug there and then you just take your display and you just line that plug up, push it in, and then you're gonna be good to go just like that. So this is going to allow you to navigate through menus, check system status and adjust basic settings all without needing a phone, a laptop or a Bluetooth connection. So this is gonna be especially useful if your controller is mounted somewhere that's easy to access, like an RV compartment, marine electrical locker, or utility area. And if you notice here, you can remove these plugs right there. And then once you have this plugged in, this does come with two little screws here and then you can run those screws through the holes there, the mounting holes.
And then that will be a permanent fixture there on that controller with those screws. There's also some 3M adhesive strips on the back as well that you could use to mount it that way. So it's gonna be very simple to install and to use. Now, it is important to note that this display is only going to work with the Victron SmartSolar MPPT charge controllers that support that plug in display. This will not work with all Victron products or with the BlueSolar models that lack the display port.
Let me get my ruler here and go over some quick measurements with you. So I hope you can see our width is right at 4.5 inches. Our height is right at two inches and the thickness without that port sticking out, this is gonna be sticking out at about 3/4 of an inch from your controller. So this is gonna be ideal if you are wanting quick local visibility and control of your smart controller system without having to rely on an app or a remote device, and it couldn't be any simpler to get this installed. Do you happen to have any other questions about this or anything that we have here at etrailer, don't hesitate to reach out. We wanna make sure that you're getting exactly what you need. Well, again, my name is Andy, thank you for joining me.
Info for this part was:
At etrailer we provide the best information available about the products we sell. We take the quality of our information seriously so that you can get the right part the first time. Let us know if anything is missing or if you have any questions.


Thank you! Your comment has been submitted successfully. You should be able to view your question/comment here within a few days.
Error submitting comment. Please try again momentarily.