


 Arrives before Christmas
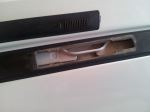
This fit kit lets you mount Thule Rapid Podium-style feet to your vehicle with factory roof-rack tracks. The fit kit includes pads, hardware, and tools necessary for installation.
Features:
Specs:

California residents: click here
Videos are provided as a guide only. Refer to manufacturer installation instructions and specs for complete information.
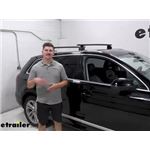
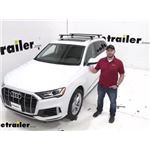
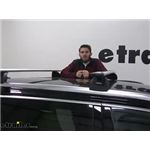
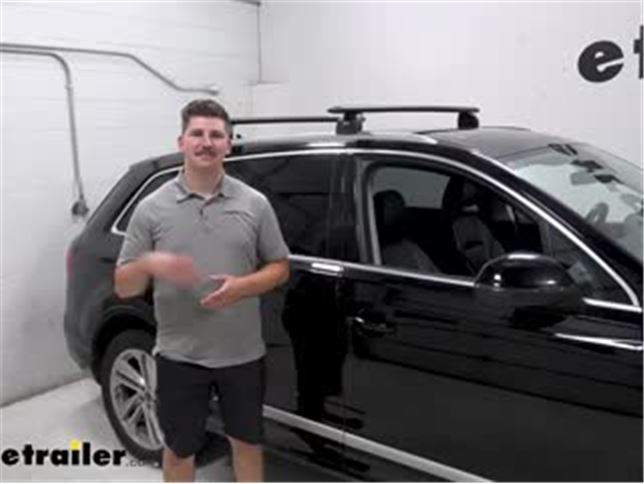
Hi everyone. Aiden here with etrailer.com. Today, we're gonna be taking a look at this Thule Roof Rack on our 2021 Audi Q7. Now this roof rack is designed to work with our flush rails with fixed mounting points. What I mean by flush rails is this raised silver portion right here. If they we're raised rails, we would have a gap underneath there and if it we're a naked roof then there would be no rail at all.
These flush rails are gonna stick up just a little bit here and have fixed points where we can thread in and mount our roof rack. If you're unsure if this is the right kit for you just be sure to plug in your vehicle's information to our fit guide on our website and you can find the right kit for your vehicle. So this kit is going to come with the Thule Wingbar Evo Crossbars. You can see they've got this nice aerodynamic shape where they're thicker in the front and taper off towards the back. That'll help with your wind noise and just help them be more aerodynamic.
On the end caps here we can pop them up and open like this to reveal the T slot on top. It's got a really nice integrated weather stripping there that will just kind of separate whenever you add an accessory in there, so you don't have to trim anything or make any cuts or modifications. You just slide in your accessory and it's good to go. You've got that weather stripping in there to keep things nice and quiet, and you can just close that cap up whenever you're ready to hit the road. Now these bars do come in black or silver so you can get them to match your vehicle.
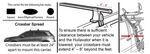
We've got the black ones on there right now and I do think it's a great match for our Audi here today. They are gonna have a 220 pound weight capacity but the towers, the legs here, they do have a 165 pound weight capacity. So we do wanna abide by that lower rated component but it is nice to know that these bars up top are built really strong. Each of the cross bars are gonna be 53 inches long from end to end. So just keep that in mind with your accessories if you do want to put something like a box or a basket and maybe have some room left over on the other side for something like a bike rack.
As far as the height you have, you have three and a half inches from the roof to the bottom of the crossbar here and then four and a half inches from the roof to the top of the crossbar. So it's not a whole lot of height added but whenever you do put an accessory on top of that, that's gonna add some more height. So just keep in mind, all that distance that you watch out for your clearance in places like with your garage or any low clearance parking garages. Now the feet that come with this roof rack here are going to give you fixed attachment points and get a really good hold on that crossbar there. They've got these plastic cores that are included, so you can just use your hands or screwdriver to twist that open, pop that off and you have access to the bolts that are getting this all attached. You can swap that plastic core out for a locking core, but that is sold separately, so if you do want that security aspect be sure to check those out on our site as well. And the final piece of our puzzle here is the fit kit. That's this rubber pad that sits on top of the flush rail here and serves as the attachment point between our leg and the roof. That's going to be custom fit for around the edge of our flush rail here, keeping down any gaps for wind noise and getting that good strong hold onto the vehicle utilizing the fixed mounting points on the flush rail here. Now, because it uses those fixed mounting points it's going to be really easy to install. You don't have to measure out anything to figure out the proper positioning of the bars and everything pretty much is just ready to go. Let's check out that process now. We're gonna start our install off coming to the top of our flush rails here and we can see this small rectangular cutout. What we wanna do is press in on the front of that. It'll start to lift up slightly enough for us to get a fingernail or something in there and lift it up like that revealing some threaded holes on the inside. Then we can come to that threaded hole and we can take our threaded bolt here. We've got a small collar around it. That's gonna be face down with the portion with our Allen key up top. So we can drop that in, find where that threaded hole is and start to just get it threaded in by hand here it'll feel like kind of grab and we can take this included sleeve, drop that over top and use the Allen key to tighten this down the rest of the way. We don't need this crazy tight, so don't over torque it. Right about there should be good, fair amount of resistance and its firmly in place. At this point, we come down to our table here and do some assembly before going back to the roof. We're gonna start by taking the fit kit here. We've got these large rubber pads and what we wanna do is figure out the correct orientation. So you can see there's a little lip right here. That's gonna be towards the outside of the vehicle and it's gonna slope down towards the outside of the vehicle too. And then this little notch cut out on the inside, that'll be for the inside of the vehicle. We can then take these metal plates that also come with the fit kit. There's a portion with one hole and a portion with two. The portion with one hole will line up right here on the rubber pad and you can just slot that in place like this. It'll kind of grab into that rubber pad. Right about there, you see it's got some tabs that'll line up underneath, mostly secure and for now we can set this to the side. We can then pop off the end cap for our crossbar. We can then take our tower, pop off that end cap and we've got two holes right here that line up with this threaded bar on the other side. Those two holes will line up with the two holes on the metal plate here. We'll take our included screws, pass those through and just get those threaded in by hand to that bar on the towers. You can see that started there. We'll do the other one as well. Leave this loose because as you tighten these down, that's going to actually draw this portion down tighter and we need it loose to fit into the bottom channel of our crossbar here. With that end cap off, we can make sure that the towers and the correct orientation with those threads facing the outside, slide that in, pop the end cap back on and repeat that process for the other side. Now we can get the crossbar onto the roof. Everything is still loose so we can adjust it once it's on the roof and these center holes right here, the circular ones, those are gonna line up with those threaded studs that we installed before. And one of these rectangular slots will house that existing part from the vehicle that we just popped up cuz those don't actually come off. We want the thicker portion of our crossbar towards the front of the vehicle and we can carefully get that lifted up. And I always like to get that outer one lined up first, if I'm able, just like that, then I can get this one over here, slot it in correctly, right there. You can see everything contours nicely around the race rail there and this threaded portion is poking up through the tower. Now from here, we can add a lock washer and this nut to those threads that'll hold that tower down onto the flush rail. Run it down by hand first and you can use either the included tool or just a 10-millimeter wrench to get that tightened down. The 10-millimeter wrench will be quicker, especially if you have a ratcheting one, but that tool is included if you need it. Once that's been done on the other side, everything is secure to the roof, but our crossbar on top is still loose. You can adjust that side to side so it's nice and centered and when you've got it where you're happy, you can take your other included Allen wrench and tighten up those two bolts that we left loose earlier. And that will tighten down the crossbar to the towers so it stays still. Do that evenly and do that on both sides. Now we can take our plastic end cap for our towers. You can just slide that in to place right there and then I like to use a flat bladed screwdriver to turn that plastic lock there. You can do it by hand. It's just a little bit easier with that screwdriver. And then on the inside of the crossbar underneath here we can just slide that track out to cover the exposed portion of that track below. That'll just cut down on our wind noise. We can repeat that on the other side and then we're ready to hit the road. And that'll complete our look at this Thule Roof Rack here on our 2021 Audi Q7. Thanks for watching..

Do you have a question about this Accessories and Part?
Info for this part was:
At etrailer.com we provide the best information available about the products we sell. We take the quality of our information seriously so that you can get the right part the first time. Let us know if anything is missing or if you have any questions.


Thank you! Your comment has been submitted successfully. You should be able to view your question/comment here within a few days.
Error submitting comment. Please try again momentarily.