
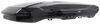
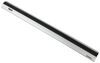
Thule WingBar Edge Roof Rack for Flush Rails - Aluminum - Silver - Qty 2


To see if this custom-fit item will work for you please tell us what vehicle you'll use it with.


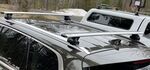
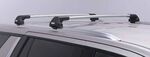
This aerodynamic Thule roof rack mounts flush on your roof for a sleek, factory look. Crossbars with split rubber strips in top channels work with channel-mount and clamp-on accessories. Installs to flush rails on your vehicle's roof.
Features:
Specs:
 Alternate Instructions
California residents: click here
Videos are provided as a guide only. Refer to manufacturer installation instructions and specs for complete information.
How's it going, Trailblazer owners Today, we're gonna take a look at the Thule WingBar Evo Flush Mounted Silver and see how well it fits on our 2025 Trailblazer LT. Now, if you already have a Trailblazer, it's quite likely you're using this guy for flat towing. So this is gonna allow you to get more gear out for your adventure, as well as being able to have access to it while you're out and about. So let's take a closer look at our roof rack and see what it does for us. Being a Trailblazer owner, you already know that you don't have the most amount of space as far as cargo, and that's on your day to day. So if you multiply that with just going on an adventure with your whole crew, or even more so, flat towing and getting ready to get out there and make those memories, this allows you to get those things out there on the road with you.
And not to mention, my weekend warrior people who are putting bike carriers, kayak carriers, snowboard carriers, all types of carriers on top of the Trailblazer. Now, this guy is gonna give you plenty of space. You have 30 1/2 inch as far as the usable space on the top, as well as a half inch channel that's gonna allow you to use T-slot accessories. Now, what's really special about it is the way that the WingBar is designed. It's designed very similar to a wing like the name implies, and it cuts through the air a lot better, reducing the wind noise.
A thing that I noticed during the installation is, now, you see this gap under here Now, it's nice and sturdy, and I'm not concerned about it coming loose. However, that little channel in here will cause a whistle when you're going at higher speeds. So on the Trailblazer, this is just how it fits, and that's what I'm here to show you, so you'll know and make that best call. Now, as far as being able to hold up on the roof, this guy is rated right at 165. However, you wanna follow what Chevy says to you as far as what the capacity on your roof is.
So let's grab some measurements real quick. Let's see, with the fixed mounting points, that puts us right at 24 1/2 inches as far as the space in between the bars. And then going underneath, as far as your wrap around, you're right at 4 1/2 inches. So that's gonna work with just about any rooftop accessory just like I listed off earlier. And actually, it'd be pretty cool if you show us how you're gonna use your WingBars, because I think, firstly, matching it up with the black, with the gray, with the silver, this guy right here looks super nice.
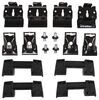
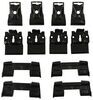
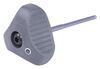
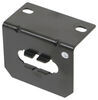
I wanna see how it looks on your car. Add a photo below, and, you know, we'll just love having that interaction with you. In general, when it comes to these types of installations, only thing you really need is a tape measure. However, on this Trailblazer, having the raised rails with the fixed mounting points, only thing you really need is just the kit and everything that it comes with it. So go ahead, sit back, enjoy this, because I'm about to put you to work. So I already installed the rear bar on our Trailblazer. To get an idea as far as how the assembly goes, super easy, you're gonna remove those pre-filled holes that are on your raised rails. They come with plastic plugs, you can keep them for another date, but most people are just gonna leave their thing installed once it goes up. You're gonna use your clamp base bracket, along with the two bolts here and the security hex key that comes along with it. So now, we're gonna go ahead and just align our bracket with the holes right here on our raised rail. And I just kinda positioned everything a little bit forward as far as that oval shape inside of our bracket. So once I get the first guy in, I hold it in place while I get the second one fastened down, and I'll tighten it up with my tool. Now that we have our base clamp already installed, this is gonna give our foot pad something to grab onto. So I'm gonna show you how we're going to assemble that. We're gonna start with our foot. And then, each one of these pieces are labeled alphabetically. So you're gonna have part A, that goes in first. Part B, the foot pad, this is actually the padded portion that keeps from making contact with any of the metal or treated surfaces. And then, part C. This is gonna slide over right here. You can kinda see the groove that lets you know which way to face it. And then, we're gonna put in our two-sided bolt. (bolt clinking) Now, from here, we're gonna go ahead and take this end, and we're gonna insert it into our WingBar. So you can see right here how it should go in. We're gonna go ahead and get this guy oriented where the flap here is pointed towards the rear. And I'm just gonna slide this guy on. Now, right here on the end, you have a little plastic piece. This is gonna kinda work as a retention clip. And if you can get it pushed down with your finger or a tool, it'll allow your bar to slide into place. (bar thudding) There we go. So now, I'm just gonna reach across and place my foot pad on my bracket there. I'm just gonna make sure I have it positioned over here on the passenger's side. Now, I'll go over to the driver's side and make sure my feet are gripping like they should. And now, I'm gonna do the same thing. And I'm just gonna go hand tight right now, just to make sure everything is good. And I'll check out the front to make sure my bar is symmetrical. So now, you're gonna use your included torque wrench, and you just tighten until it talks. (torque wrench clicking) And now, we know that we are at the four newtons that's recommended from Thule. So I'm just gonna go to the other side and do the exact same thing. So just being aware of the positioning of your end caps, you're just gonna slide these guys right on. And then, you're good to go. So basically, you just increased your cargo area on your Trailblazer for your adventures. Now, when people ask me, "Hey, Ed, what do you think about this roof rack or that roof rack" Usually, what I point out is just gonna be the quality of the materials. Thule does a great job of selecting materials. You have the extruded aluminum that's gonna hold up no matter where your environment is. So if you're in the desert in the Southwest or you're in the wintertime in the Northeast, you don't have to worry about it failing on you. And just, in general, Thule is a solid brand, and they always drop some pretty quality products. So again, this is Ed with etrailer.com, taking a look at the Thule WingBar Edge. Have a great day.


Do you have a question about this Roof Rack?
Info for this part was:
At etrailer we provide the best information available about the products we sell. We take the quality of our information seriously so that you can get the right part the first time. Let us know if anything is missing or if you have any questions.


Thank you! Your comment has been submitted successfully. You should be able to view your question/comment here within a few days.
Error submitting comment. Please try again momentarily.