
To see if this custom-fit item will work for you please tell us what vehicle you'll use it with.


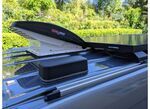
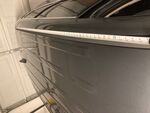
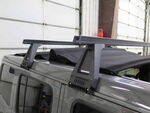
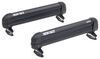
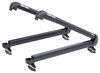
This aerodynamic roof rack gives you the freedom to haul gear and cargo on your vehicle. Full-length aluminum crossbars offer plenty of space for channel mount and clamp-on accessories. Installs to fixed mounting points on your vehicle's roof.
Features:
Specs:
 Alternate Instructions
California residents: click here
Videos are provided as a guide only. Refer to manufacturer installation instructions and specs for complete information.
Randy: Hey guys, it's Randy here at etrailer. Today we've got a 2019 Ram Promaster 2500. We're going to be adding a Rhino Rack Roof Rack system to it. Now, the fit kits and everything we're going to talk about today, these are designed to work with the aero bars, which is what we're working on today. I think this is going to be more of your camping, out dooring, boon docking type setup. These will also work with the Rhino Rack 2500 HD bars, or the heavy duty bars.
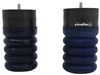
That's going to be more for your construction, your ladders, your piping, wood, things like that.Now, whether you're using the heavy duty bars, or the aero bars, this is going to do an excellent job of freeing up some space inside the vehicle, or giving you room for those longer, larger items that maybe we can't get inside. Also, if you're into camping out of your van, you know a lot of people will convert these over to use for camping and RV'ing and stuff like that, this is going to give you a lot more storage area. If you've got stuff in there, items in there to make it easy to live, this is going to allow you to get those outdoor accessories wherever you need them.Now the foot packs themselves are very sturdy and resilient. They're reinforced internally, so they're going to give a superior strength. We also won't have to worry about sun fade.
We won't have to worry about cracking. A lot of times when roof racks get installed, they just kind of stay on the vehicle. A lot of people don't like taking them on and off. That's really important so the quality will remain and it'll look good.Now one thing you will want to ensure is when you're using a roof rack system, whether two or three, don't exceed the capacity of the roof of your vehicle. It should be readily available in your owner's manual.
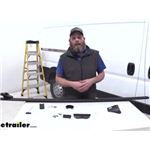
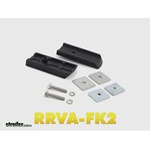
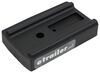
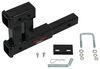
If it's not there, just contact your dealer and figure it out.Now before we get going with our installation process, let's talk about the different components that we have here, and what we're going to need to do the installation. This is our RLTP fit kit, so it's going to have the foot pack. Two come in a box, we've got one for each side. It's going to have the bracketry to allow us to connect to the stud that sticks up on top of our Promaster. We're going to have the hardware, and all the hardware is going to be a safety type, or a security type with that little tab sticking up in the middle.
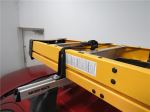
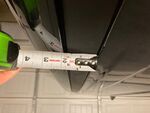
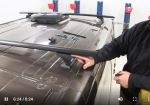
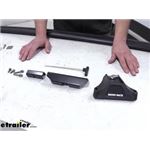
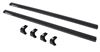
It's going to help to prevent theft, and we've got our tightening tool. Now this kit's going to be specific to the Promaster, and this is designed to work with the 2500 Heavy Duty Roof Rack Crossbar, so if that's what you want to use, you're done.In our case, since we want to go with the aero style crossbar, this is a Rhino Rack, Vortex Aero Crossbar, we're going to need the RLTP adapter kit. That's going to be right here. This is just one side of it, of course there is going to be one for the other side as well, and you're going to need one kit per crossbar, so if you're doing two crossbars, you need two kits, you're going to do three or four, you're going to need three or four. But to get that attached, just going to remove the bolt here that holds our keeper on there, it's pretty straightforward, just turn it to the left, loosen it up. All right. Now we can set this aside.We won't need this unless we're going to be using those heavy-duty crossbars. We're going to take this part of our adapter kit, you can see the part that sticks down there is going to go right through that hole. See how that's going to click together Now we'll take our bolt with the lock washer on it, and we're going to slide our square washer on. That will then just come up through the hole, we'll take this portion . This is going to be our T slot adapter, so this portion will actually slide into our crossbar, then we can get it tightened down. So we flip the crossbar over, you'll see we have the slot here on the underside. Going to take this portion, it's going to slide right in just like that. And now I'm going to take most of the slack out of my bolt here. I still want these to move in and out a little bit, but I don't want them to be super loose, so something like that looks good. We'll take our cap, and at this point we're ready to put that right on the end. Now that cap's going to come with your crossbar and so will the key to lock it. Place that on, and get it locked on.Now that's going to take care of the construction or how we put together a crossbar, now let's go look at our connection point up on the roof. Now, here you can see the connection point for the roof rack systems on your Promaster. This happens to be the rear passenger side corner. We do have four of these, there's going to be one located directly across from this one on the driver's side, and the one forward's going to be just about where your sliding door meets the back of your van right up on the roof line. That's why our two brackets are going to come into play here. We want to take the smaller one, this gets slid right underneath that. We're going to push it in, so that gives us our anchor point there. Now, we're going to take the larger one, and we want these two tabs to then go under that, that we just added. See how that goes.Now, in our kit, we're going to have four of these smaller safety screws, or bolts, whatever you want to call them. Want to be sure you put on a flat washer and a lock washer, and then if we lift up, we'll get our holes aligned here. We're actually going to thread these right down into that smaller bracket that we attached. We want to square this up, meaning we want it to be running inline with the roof line of our van, and then we can use our included tool. I like to snug both of them down, and then we'll tighten them. Now, these don't have to be all that tight. Check your instructions, it's going to give you the torque rating in which you need to use. Of course, you want to be sure your lock washer's sandwiched all the way down, but overall it doesn't take a whole lot of tension.Also, on the bottom of this larger clamp that we have here, it's fully rubber coated, so at the point in which it connects to the van, you can see once it's secure we don't have to worry about it moving around. But we also don't have to worry about it scratching any of our paint. All right, now that's the process that we're going to complete at all the three remaining points, and it's exactly the same. This bracket's going to stay the same, just like the inside bracket and hardware.Now with these in place, it's time to get our crossbar put in position. You'll notice on the bottom of our foot packs here, there's a tab. We've got one located right here, and one located on the other side. Those need to go in the rectangular shaped holes on our clips. We'll get that done over on our driver's side. Slide this in, so it lines up here on our passenger side. And now what I like to do is go side to side. I want to check from this foot pack connection point here, to the end of the bar. I like to make sure it's even on both sides. Now, once we have that equal on both sides, we're going to grab a 10 millimeter socket so we can tighten down that bolt that came with our adapter kit. I'm going to take the slack out of it first. Then I'll make sure I've got it squared up properly, and we'll tighten that down. Just like the base clips, we don't need these to be overly tight, so watch your instructions and don't tighten them up more than what it calls for.Now we want to do that on both sides, and the nice thing to know is that you're only going to have to do that the first time. Each time after that, if you leave your foot pack attached to your crossbar, you won't have to make that adjustment. Then we'll take our longer screws that come with our kit, it's going to go down and through. This one also has a lock washer and flat washer on it, and we want those to thread in, just like these threaded into that lower clip, these are going to thread into the upper clip. We can use the provided tool, and torque those down appropriately. Go over to the other side, put these two screws in there, that's all there is to it. It's going to be ready for use.Now for the removal process, we can leave our base clips attached, we can leave our outer clip attached here. To remove and replace the roof rack system, really we'll just have to take out these two screws on each crossbar that we want to remove, we have to do two here, and then two on that other side.Now that takes care of the installation process. As you can see, it's pretty straight forward.
Strong, good appearance and functional.
Easy to install and works good.
Great product that is easy to install. Product arrived on time. Thank you!
Legs are great, just wish I had the bars I ordered at the same time but were AWOL when the legs were delivered.

Quality products. Customer support top notch!
Customer Service was awesome....and super fast.
Desi was awesome in helping us build the perfect mount for our roof top tent set up.
Perfect product for my aero bars and great customer service getting it to me ASAP before a big trip -
Do you have a question about this Roof Rack?
Info for this part was:
At etrailer.com we provide the best information available about the products we sell. We take the quality of our information seriously so that you can get the right part the first time. Let us know if anything is missing or if you have any questions.


Thank you! Your comment has been submitted successfully. You should be able to view your question/comment here within a few days.
Error submitting comment. Please try again momentarily.