
Summer Starts Here - Save up to 70%
To see if this custom-fit item will work for you please tell us what vehicle you'll use it with.


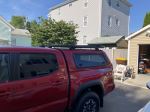
These heavy-duty, aluminum crossbars work with Rhino-Rack legs to create a sturdy roof rack. The square bars include built-in C-channels for mounting Rhino-Rack heavy-duty, contractor-grade accessories.
Features:
Rhino-Rack HD Crossbars - Silver - Qty 2:Videos are provided as a guide only. Refer to manufacturer installation instructions and specs for complete information.
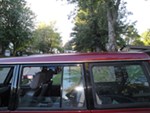
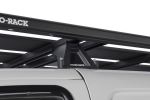
Hey everyone, it's Evangeline here at etrailer, and today, we're taking a look at our track mounted RLTP Rhino-Rack legs. These are gonna be low profile but also adjustable towers for your Rhino-Rack system where you use the RC or RTC tracks. These are heavy duty towers where you have a glass reinforced nylon construction where it's lightweight, but also designed to hold weight. Another thing to this is that it's two inches tall, so measuring from the track to the top of the tower, this is gonna have your crossbar sink two inches above your vehicle. Low profile does not mean zero clearance, though. Of course your actual clearance will be dependent on where you install your tracks on your vehicle, and what type of vehicle you have.
But having that two inches of height, give or take an inch for your vehicle, is gonna be helpful for most types of accessories, especially those that have clamps that go around your bar, or if you have channel mount accessories, the amount of clearance doesn't matter whatsoever. So something to be mindful of is if you want a low profile look, you want something that's sleek, and you're not mounting things with U bolts and wing nuts, having these low profile towers are gonna be a good path to go. Please remember that these on their own are designed to be used with Rhino-Rack heavy duty crossbars. If you want to use your Vortex arrow bars, you are gonna have to get the appropriate adapter. These are not the only towers that Rhino-Rack has that works with their RT and RTC tracks.
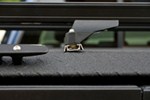
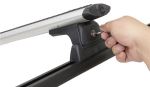
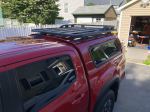
What makes these specific towers different from the others is how they mount to the tracks, so each tower has two bolts, and if you needed to adjust the towers and slide them side to side, then you only have to loosen those bolts. Compared to some other towers, where you have to take off the whole system to move the bases, this is gonna be a much faster method. Now with it being fast when it comes to security, these are also security bolts and require your Rhino-Rack Allen key in order to loosen or hand tighten the towers. But once you have these loose, you can then slide this back and forth to get the best fit for your different types of accessories. And once you've picked your spot, it's simply a matter of tightening them back down again.
While the RLTP towers are gonna be great for most situations, if you do need that extra height, take a look at the RLTF towers instead. Exact same design, but they are gonna sit at three inches of height versus the two inches that this one has. And then if you have, say, fixed mounting points or other types of tower-based systems, then definitely use our fit guide here at etrailer. Put in your year, make, model, and then we will suggest the kit that is going to fit your vehicle. These towers are going to be the base of your system, very straightforward, very easy to use, pretty easy to understand.
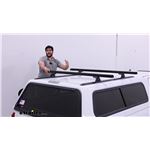
How they shine compared to the other towers is in the process of installation. So if you're curious about that process, well, stick around, and I'll show you how I got these towers on this truck. So before installing your roof rack towers, you first need to make sure you have the right base for it. So this is gonna fit into your RT or RT-style rails. So you can see we already have it installed on our truck. This will create that base, and that channel that will allow you to slide your roof rack back and forth to get the best fit on your vehicle. Now that installation is gonna be found on the Rails page, especially since there's different methods of installing, depending on what type of rails you do get. After your tracks are installed, you can then install your crossbar and your towers. A lot of what you're going to need is gonna be included with your kit except for some tools. So I have a five-eighth inch wrench, preferably a ratchet wrench or crescent wrench-style. And then I have my tape measure just to make sure everything's lined up to where I need it to be, and everything is even. So with all that in place, you are also gonna have to bring your crossbar appropriate to your vehicle size. So we're gonna get that onto our towers first. There's a rubber piece included with your tower, so go ahead and insert those. They'll be pushed into the top channel. Once that's inserted, you can then flip the tower or the crossbar over, and install the tower. If you have heavy duty bars, then you don't need to get any adapter pieces or set that up. You simply loosen that top rectangular plate or block. You're gonna put it into your crossbar, and then turn the bolt, which will tighten that block in that channel. Hand tighten to the point where this will not come off of your crossbar, but you'll still be able to slide it back and forth to make adjustments once it's on your roof. Getting this on your roof will be easier if you have a second person to help guide your towers, but the perks of this style is that they have tabs in the towers that will fit into your tracks, and then that will help you hold your spot as you adjust for spacing from crossbar to crossbar, as well as spacing of length the bar on each side. How far apart you want this depends on your accessories. So a good compromise for a lot of accessories is to put this about 32 inches apart. You'll measure from the front of one crossbar to the front of the other. Slide your towers until it matches that measurement on both sides. Secure the towers with these hex nuts. These are gonna have to slide into your track system. On one side of the tracks, there is gonna be an opening that you can just fit these into. On the other side, there might not be an opening, but you can slide the end cap out to make space for these nuts. Lifting up on the crossbar, we're then going to slide these nuts in the general direction of where they need to go. You're gonna wanna fit on the outside of those tabs, and if in doubt, further away is better than closer inside. Now we're also gonna place these wedges. So the direction you should have this is a tall part of the wedge facing the inside of the vehicle and the tapered end facing out. This allows for a level surface of your tower, even if you have a sloped or curved roof. With this being such a low profile design, you are gonna need those wedges to bounce things out. Finally, secure your towers with your bolts. So you're gonna have your bolts, and you're gonna have your split washer, and then your flat washer. These are gonna come in from the top of the tower. Go ahead and fit that through the wedge, and then thread it onto that nut underneath. If you have everything lined up, you should have that threaded in no time, meaning to wobble your tower around a little bit in order to catch that thread. Once both sides are threaded, go ahead and double check your measurements for crossbar spread before you tighten down using the included Rhino-Rack Security tool. Tighten down until that split washer flattens out on both sides. With the towers in place, you can then adjust your crossbar length. Now this will depend on your vehicle and the spacing, but make sure the space is even on both sides. I like to measure from the tower to the end of the crossbar. Once it's there, you can then secure your crossbar using your five-eighths inch wrench. After I tighten down all the crossbars in the towers, I like to give them a good shake test to double check that everything is secure. But other than that, that's it for the install process. You're now ready to load up your roof rack system with accessories and cargo, and hit the road. And this right here was a look at our Rhino-Rack track mounted RLTP towers, and you saw it at etrailer.com.
Average Customer Rating: 4.7 out of 5 stars (10 Customer Reviews)
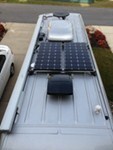
These heavy-duty, aluminum crossbars work with Rhino-Rack legs to create a sturdy roof rack. The square bars include built-in C-channels for mounting Rhino-Rack heavy-duty, contractor-grade accessories.These are the perfect racks for a low profile mounting of solar panels on my Sprinter van.

This works great. Very strong and reliable. Holds my ladders with ease. I’ve had it loaded down and done 80mph on the highway no problem.
Installation was easy and I haven't had any issues. I had originally ordered a wrong part, but the person I spoke with at etrailer made it very easy to correct this and get the parts I needed. The next time I need something from my truck, I'll be checking here first.
I purchased this because I needed 11" brackets and I only needed two to add to my existing setup. Other manufacturers (I could only find one) only sold packs of four at a ridiculously high price. My Rhino Rack mounts and bar arrived within a few days of my order and appear very sturdy and well made. I bought them to add a third support for an awning and a solar shower on the roof of my van. I think I found the perfect solution.
Love the roof rack! Works great for ka yaks!
Perfect product for my aero bars and great customer service getting it to me ASAP before a big trip -
Needed to lower my heavy duty Rhino Rack Did the job quickly and easily . Would have given 5 stars but seams a little less solid than original feet .
Desi was awesome in helping us build the perfect mount for our roof top tent set up.
Customer Service was awesome....and super fast.
Strong, good appearance and functional.
I got my racks in a timely manner and had them installed on my Van in less than two hours. The instructions were a bit confusing (Didn't really match what was in the box) but I was able to figure out what to do. I have a THOR RIZE G18 camper van that is built on a 2023 Dodge RAM Promaster 1500. The brackets fit the mounting points on the roof. Since it is 9 feet to the roof (You can't walk on this roof) it took a while to move around to the four locations to place the towers. The awning also prevented sliding the bars side to side, so I had to put the towers onto the bar on that side before attaching them to the base. The racks look good and are firmly mounted to the van. Now I have to figure out how to attach my kayaks. (There is an air conditioner in the center and a solar panel also) I plan a two-month trip in June, so I will see how the racks work.
Nice rack system, strong and durable. Used on a Ford e350 to mount solar panels. Only draw back, one of the L brackets that goes under the rain gutter was not bent square enough and this caused the bracket to slide off when tightened. I had to adjust this with a clamp and hammer, no issues since.
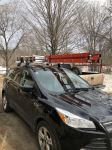
I got the roof rack mounted anyways. Better pics to come when it's all finished!
etrailer was good to work with, however this product was very difficult to install on my 2016 Ford Transit T250 Midroof.
The instructions were very confusing when using with PIONEER PLATFORM (107" X 58") UNASSEMBLED
Part No: 52105F. For example the mounts have no access to
tighten to the van once you put the cross bars on. But you need
To have the cross bars and frame installed fro they needed to be removed. They need to make this more clear on their instructions.
Be prepared to take at least 6 -8 hours of time to do this if you have never done it before.
Very sturdy. Used to mount Heavy Duty Rhino-Rack Crossbars to a RAM Promaster High Roof van.
I’ve had this rhino rack for over 3 years and it’s been excellent on long road trips to the ski slopes. A year after my purchase, I realized that I was missing the plastic coverings that attached to the end of the bars and called their customer service to resolve the missing pieces. I was impressed with their quick response and seamless delivery.
This rack works perfectly on my Nissan Versa for carrying my two Perception Sound 9'6" kayaks. The Rhino-Racks look good to me. The kayaks can rest directly on the rubber pads on the rails, unlike the Yakama racks I had in the past that had bare pipe rails. Also, I expect I can buy parts to adapt this product to a different car without having to buy new towers. I am sorry there are not hooks or loops to attach bungees when carrying lumber. They are noisy in the wind, but less so when carrying the kayaks.
Do you have a question about this Roof Rack?
Info for this part was:
At etrailer.com we provide the best information available about the products we sell. We take the quality of our information seriously so that you can get the right part the first time. Let us know if anything is missing or if you have any questions.


Thank you! Your comment has been submitted successfully. You should be able to view your question/comment here within a few days.
Error submitting comment. Please try again momentarily.