
Summer Starts Here - Save up to 70%
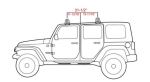
To see if this custom-fit item will work for you please tell us what vehicle you'll use it with.
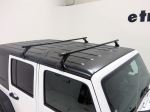
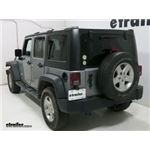
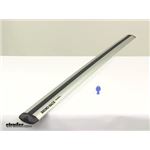
Aerodynamic, aluminum crossbars let you build an aftermarket roof rack for your vehicle. Full-length bars provide plenty of space for carriers and accessories. Vortex strips in C-channels reduce wind noise. Theft-deterring plastic locks included.
Features:
Rhino-Rack Vortex Aero Crossbars - Silver - Qty 3:Videos are provided as a guide only. Refer to manufacturer installation instructions and specs for complete information.
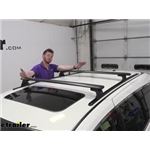
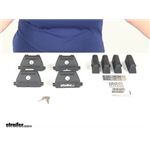
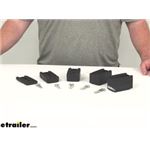
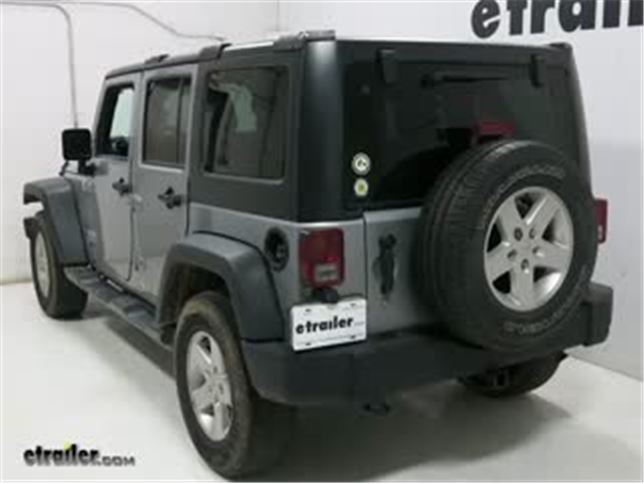
Speaker 1: Today, on our 2015 Jeep Wrangler Unlimited, we're going to be installing the Rhino Rack Backbone roof rack mounting system, part number RRRJKB1. Basically, what the Backbone system does is it reinforces the structure of your Jeep's hardtop to allow you carry more weight on your roof without interfering with the removal of your freedom panels. To do this, it has internal brackets installed around the window frames to bear the weight.It has six platforms, which can be used to mount up to three Rhino Rack heavy duty or Vortex Aero Crossbars, as well as the fit kits for them, which are sold separately. They have a black powder coat finish to give them a long life in the elements. It compliments the look of your vehicle, as well. All the mounting hardware required is included with this kit.
There is some drilling required.Now that we've gone over some of the features of the roof rack system, let's go ahead and show you how it installs. Now, our first step is we're going to have to go to our Jeep and remove our hardtop and set it onto a location where we can work on it easily. Now that we've removed the hardtop to the Jeep, our next step is to assemble the support struts for the rear. They are labeled. These are going to be your bases on either side.
You can tell with these screw caps here. They are going to be left or right. Just pay attention to that when you assemble it. We're also going to have our support arms here, also labeled left and right. You need two of those for each of these bases.
Let's go ahead and get started.I'm going to set these on the Jeep just for now to get the idea of what's the front and what's the rear. I'm lining up the wholes properly. It looks like the end with the angle to it here, that's going to be going towards the front of the vehicle. We have our bases set down where we would see it along the vehicle here.The next step is to take our brackets here and install them onto our bases. We'll take our M8x20 hex screw here.
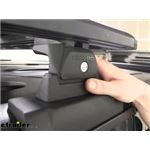
We'll place a lock washer and a flat washer. Then we'll take our bracket and make our installation. We must always make sure that the circular hole at the bottom is the one that gets installed to the base, not the elongated hole at the top. We're going to be using that later. We'll start with our rear. You just want to get these finger tight for now. We'll use our Allen tool here, which is provided with the kit. We'll do this for the other side as well.Next, we'll attach our top bracket. These are also labeled left or right hand. These have screws built into them already. Lock washers here. We'll just leave that loosely installed for now. We'll repeat this for our other top brackets as well.These can be kind of difficult to thread in at first because they're painted over. With our supports done, now we can move on to our actual hardtop and put our top brackets into place, as well. You want to line these up with the edge here. You're going to notice that you can see a little bit of the top side here. You also want to make sure that the bottom edge lines up with the top portion of this channel on the hardtop. You need an extra set of hands. We'll mark centers of our holes. Then we'll move on to the middle portion.Next, we'll take our center bracket. This is going to line up with the edge of our rain gutter here. Line that up. Again, make sure we're at the upper lip of this channel here. Again, we'll get our extra set of hands to make the markings in our holes.Next, we'll take our template page, which is provided with the instructions. We'll set it in the gutter. All the ways you can see here. Line it up with the edge of the front and fold it back. These are the two points we want to mark here. Instead of using a marker, we're going to be using a punch to make these locations visible. With that done, we can repeat this process on the other side. Then we can start our drilling. We're going to start with an 1/8 inch bit on all of our pairs of holes on both sides. Then we'll more to a 1/4 inch bit for our two rearmost connections. Then for the front, we'll be using a step bit.Now, with the front portion here, there are two layers. Just be sure you get through both of them.Now, we can move to our 1/4 inch bit. These are only going to be for the rear-most and for our center portions.Next, we can move on to our step drill bit. Now, when doing this, you want to go to 18mm on the top for that portion. Then we go underneath and we'll drill out to a 16mm hole portion. Since this is nice and easy to drill through, you don't have to put a lot of pressure when you make these holes. Just let the step bit drill do its job. Always be sure to wear your safety goggles when you're doing this because you're going to have a lot of dust coming down.We'll test it out. Everything seems to be working okay. Now we can move on to our next steps.Next, we can start installing our foam pads onto our brackets. We'll start with our front most ones, flipping them upside down like you see here. Then taking our pads, popping out the centers. These are adhesive on the bottom, so they'll stick in place, and inserting them like so. You do this for both sides, or for both brackets, I should say.Next, we'll move to our center brackets. We'll use the longer strips here, placing them. Finally, we go to our rearmost.Now that we're underneath the hardtop, we'll put those support struts that we put together earlier and set them into place on these two points on the inside. Line them up. Set them on those two points. Then, you can start adjusting it to fit around the drilled holes that we've had installed earlier.Next, we'll put our brackets into place, pushing our screws through. We do this for the rear and the middle portions. Then we'll line them up with our brackets on the inside and start making our connection.Now, with them in place, you can lift up our brackets here, install them over the screws, and put on our flat washers and our lock nuts. We'll just get them finger tight for now. We'll repeat this for our other brackets as well.Now we can start tightening our brackets down to the support brackets we just installed. We'll have someone on the outside with the Allen key holding these in place while we go to the inside with a ratchet and tighten it down.Next, take our 1/4 inch drill bit and drill our final hole in the top rear brackets and to secure now. We'll use the bracket as a template. We'll do this on both sides.Now we can install our bolts in the holes we just drilled all the way through on both sides. Then connect them on the other side with the lock nut and washer.All right. Our next step is to take our included Allen key and then our ratchet. We'll have someone hold it from the top while we tighten this portion down. All right. We'll repeat this process for the other side as well.Now we can start tightening down our stabilizer brackets that we installed earlier. Now we can repeat this for our other locations. We'll take our final brackets, set those into place down both sides. Then we'll go underneath and install our brackets there, as well as our hardware to keep these in place. The brackets we're going to be installing are going to be here and here. We'll also be needing to put a pad on the bottoms of them. Then into place on the bottom like so. Then we'll have our screws, lock washers, and regular washers to attach to our brackets that we just put through. We'll repeat this for the other side.Next, we'll come through the center of the vehicle and we'll unwrap this portion here, pull back the inaudible 00:10:27 of the straps, unzip it, so we can get to these three bolts here. Next, we want to remove these and put our bracket into place. Now we can set our bracket in place right now. Just use that same existing hardware. All right. Now we can zip this back up and repeat this for the other side.Now that we have everything installed, we can go ahead and set our cover back onto our Jeep.Now with our hardtop reinstalled, we're ready to install our Roof Rack system and hit the road.There you have it for the Rhino-Rack Backbone roof rack mounting system on our 2015 Jeep Wrangler Unlimited.
Average Customer Rating: 4.8 out of 5 stars (166 Customer Reviews)
Aerodynamic, aluminum crossbars let you build an aftermarket roof rack for your vehicle. Full-length bars provide plenty of space for carriers and accessories. Vortex strips in C-channels reduce wind noise. Theft-deterring plastic locks included.Wow! It's a real well made and engineered product and was delivered fast. I got it so I could remove it due to garage door clearance... It is heavy duty enough to carry our boat and 2 kayaks. The key lock, pivot system and removal system were well thought out and so easy.
Overall I like the rack. Aero bars are quiet, rubber grip strip on top is nice. Product is high quality. My only gripe is the mounting feet and it’s fit on the Mercedes Metris. Each foot is only able to utilize one bolt hole on the factory placed mounts. Using 2 per foot would be much better like in most other applications I imagine. But once it’s all assembled and installed (which is very easy) it seems fine. Height spacer blocks are perfect, bars are all on the same plane. Looks good too! etrailer also has real people working customer support who answer the phone and help you out. I highly recommend the rack and buying from etrailer!

The rubber molding easily compressed and served no purpose other than to fall into the channel and thus shred the aluminum gunnels on my expensive Kevlar canoe. I contacted Rhino rack and they were quick to dismiss my information with zero concern or questions. This is a product easily made better with modest changes to improve. Too bad customer service doesn’t exist…
Really has come in handy as I installed this over my truck bed on top of a retractable bed cover that came with T -tracks. I can load the truck bed with smaller items and use the roof racks to hold a Thule box or just strap on heavy and larger items. Great product.
I think these look better than the OEM rack that I ended up installing...however, using them would have required drilling my roof and putting rivets in. I went to 3 shops that refused to do so because they didn't want to be responsible for any leaks.
great product. sturdy easy to install and held my thule cargo box (also an etrailer purchase), really well! Fit perfest in my 2002 Excursion roof rack factory rails and easily adjusted. One note for excursion owners is to mount the front leg of the rack more directly over the rear door vs moving it up towards the front. I was tempted to move it as far forward as I could so I could stand in the rear door opening to access the inside/contents of the box and the weight of the box and contents actually bowed the roof steel in and out while driving, causing a popping noise, once i moved it back a little it was fine. Also making note that I have one of the biggest boxes you can buy so weight was at a max for the roof/roof rack for me YMMV depending on what you have on top of the crossbars. overall good solid product and the cost savings for the Rhino rack vs other brands is a BIG plus for me.
Quick, A+ thanks
All good. Needed hardware to track mount a third Vortex bar. Etrailer had the best price.
good price and prompt delivery
Purchased the Rhino Quick Mount Legs and Vortex-Aero bars, to mount on our Retrax XR Pro Tonneau cover. As always buying from trailer is easy, Terri N make the experience much better, from order to delivery. Terri ensured compatibility with existing hardware, and that everything needed is included.
The Rhino system is an easy install, the fit of the T-slot plate style nuts was tight, eliminating the damage that can occur with loose fitting slot inserts. Assembly can be completed on or off vehicle, as long as all accessories are fitted first. If done off vehicle, accurate measurements will be needed for the base fitment.
We paired the Rhino system with 1up USA bike racks, and a Yakima box.
These are excellent! Check out my YouTube channel, Road and Reel, to see how I used the to carry 4 bikes above my Retrax Tonneau cover.
Great quality product and a breeze to install. I like that they are simple to install and remove as my needs change.
I bought these racks for my Ford Transit and I couldn't be happier with the racks or the service from trailer. The rhino racks added a nice touch to an awkward looking van with its great looks and perfect functionality. Reading reviews about other racks making howling noises while driving made me a little hesitant , but am pleased to say, no noise whatsoever. I've added a basket to the racks and everything has worked perfectly. We do a lot of traveling,(2 adults,4 kids, 3 dogs) and the racks have provided exactly what we needed. Thanks etrailer for the best price and great service
Works awesome and was the best solution for carrying bicycles while towing travel trailer
I needed a crossbar over my Retrax tonneau and the Rhino-Rack Quick Mount is just what I needed. The etrailer videos for this product showed me exactly how to install it and it was very smooth and easy. Thanks!
I purchased a used gray topper for my Tundra, repainted it to match my truck, and purchased from you the mounts and rails to put on top of it. The entire project was GREAT, and the and rails have just topped it off (see what I did there?) with a great look and very functional utility to add some long storage capability to a very short-bed truck. Thank you so much, it was expensive, but the quality is fantastic and the look is very sharp!
Overall I like the rack. Aero bars are quiet, rubber grip strip on top is nice. Product is high quality. My only gripe is the mounting feet and it’s fit on the Mercedes Metris. Each foot is only able to utilize one bolt hole on the factory placed mounts. Using 2 per foot would be much better like in most other applications I imagine. But once it’s all assembled and installed it seems fine. Height spacer blocks are perfect, bars are all on the same plane. Looks good too! Etrailer also has real people working customer support who answer the phone and help you out. I highly recommend the rack and buying from etrailer!
Everything came just as expected.
Strong, looks great, and super easy to remove & re-install cross rails.
2022 Ford Maverick with a Rhino Rack on a retrax xr tonneau...love em both. THANKS etrailer.
I like the Rhino Rack RTV track because is allows Vortex Aero cross bars to be easily moved and removed. However the appropriately sized rectangular track nuts (M6 24x21x5 part No. N057) used to mount items to the rack are no longer available or manufactured. Consequently RTV track cannot be easily used to secure additional items. Rhino Rack is unable to offer a solution other than returning the wrong sized track nuts so I will manufacture my own attachment nuts. After drilling 18 holes in the roof of my new car and installing the RTV track and cross bars, the lack of compatible nuts was a big disappointment. The product should not be sold if components are not available.
It’s hard to rate because I haven’t owned for long but to far so good. Pretty easy to assemble and looks as if it will work. From what I understand it will add about 4 inches to the top of the vehicle, but that will allow for room to work underneath the rack once put on, and this item will also allow for easy removal of racks if you do not want them to stay on year round.
Best price on the part. Fast shipping. The install video made it a breeze. Rhino rack was a little lazy with the written directions and stamping all the parts. The etrailer video for 2015 JKU was needed.
Awesome customer service! Professional people. Ill be honest, sent incomplete product first time. Made a phone call, took care of me. Carol C, hands down only reason I will continue to purchase from etrailer. Been a customer for years, work in customer service myself, so feel real good when someone can fix and make happy there customers!
Great racks. Just used to mount our car top carrier and traveled 10,751 across the US and back. Speeds were often at 75 mph + and rack performed flawlessly.

Do you have a question about this Roof Rack?
Info for this part was:
At etrailer.com we provide the best information available about the products we sell. We take the quality of our information seriously so that you can get the right part the first time. Let us know if anything is missing or if you have any questions.


Thank you! Your comment has been submitted successfully. You should be able to view your question/comment here within a few days.
Error submitting comment. Please try again momentarily.