
To see if this custom-fit item will work for you please tell us what vehicle you'll use it with.
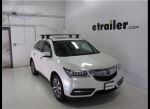
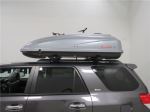
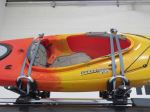
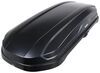
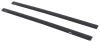
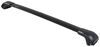
This sleek, aerodynamic roof rack provides space to carry gear on your vehicle. Crossbars with push-down rubber strips in top channels work with channel-mount and clamp-on accessories. Installs to raised rails on your vehicle's roof.
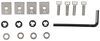
Features:
Specs:

Videos are provided as a guide only. Refer to manufacturer installation instructions and specs for complete information.
Hi, Matt with etrailer. If you're looking for a roof rack that's just gonna be really easy to take on and off your roof because if you're taking a lot of trips, you don't wanna leave it up there and you want something that's gonna have a lot of features just built into it, then the Inno roof rack is gonna be a great option for you. So let's check it out. Now what I like about a roof rack is this is gonna essentially double the amount of space that you can carry on your vehicle. And what I mean by that is it's gonna be utilizing the footprint of a vehicle instead of adding to the back half of it, which is something I like a lot because if you have any extra long items like a kayak or skis, putting 'em on your roof is probably just gonna be the better option in general rather than trying to pull a trailer or have a large cargo carrier behind you because it's just gonna take up a lot more space when you're on the road. And if you already have this space, you might as well use it, especially with this having raised rails and raised rails are just at the end of the day, really easy to use, to take off and put on when you do have a roof rack.
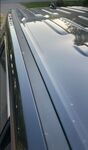
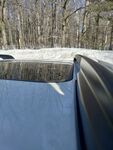
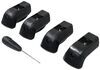
Now this does have some really neat integrated features, so if you wanna take a closer look at those features, we'll start with the crossbars and then go into the towers. With the crossbars, these are gonna be 60 inches in length, so it'll be plenty of space for you to put most accessories up here. So even if you wanted to pair a larger roof box and a kayak carrier up here, you'll have the space to do that. Now when we look at the very top of this, we're gonna notice we have this built-in weather strip. I like that because you don't have to worry about cutting that down to size and that's gonna help keep any debris from getting in here, making sure it's easier to put on those T channel accessories.
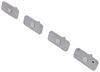
And it's also gonna prevent any wind noise from really entering that channel there. It's also gonna be an aero shape. So that's gonna kind of play into that wind noise hoping keep noise down. And if we look below that, we're gonna see how our tower's gonna attach to this. The tower is what kind of makes this whole kit unique because we're gonna have these built in locks.
So we're gonna have that security already on here. And what I like about these a lot is that we have these tabs here and these tabs are what you use to tighten them the strap into place. And I like this a lot because you don't have to worry about carrying any extra tools on hand or even losing them. That's nice as it's all built in. Now the one thing is it is kind of close.
So if it's a colder day or if you're kind of just struggling to get close to that, you might struggle with it a little bit, but I think in most cases I don't really find too many issues with them. And then that rubber strap that wraps all the way around, I like this because we're getting full coverage on these rails. Not to mention that our tower kind of almost aligns in the shape with our raised rail. So honestly I think these towers are a great fit for our roof today. Now let's get a few measurements just to see how this is gonna sit on top of our roof. First one I'd like to get is from the distance underneath your crossbars. And this is gonna be just a little bit under three inches. Now if you do have some type of sunroof that expands up, the one we have today doesn't. But if you do, just watch out if you have any more bulky types of clamps. If that's the case, then I'd recommend sticking to using your T channel accessories 'cause you won't have to worry about any clearance, but talk about the top of our crossbar. Let's get the total height this adds, we go from our raised rails. That's gonna be adding a little bit over two inches so it's not gonna be a whole lot. It is important though when you're adding the total height of a vehicle, add your crossbars, and then anything that's sitting on top of that as well, just so you know what areas you can make it under, a spot to really think about would be a garage. And the last measurement to get is gonna be our overhang. And right now we're sitting at around three inches, which is gonna be great if you have any items that you want closer to the edge of your vehicle. So that's be anything like a bike rack, ski carriers, anything that's gonna be a little bit awkward to grab when you're taking it on and off. But if you don't really have any items like that, maybe you got more a box of sorts and you want it more centered up on your roof, then this might not benefit you as much. And you want might want something with more of a flush look to it. Inno actually does have some roof racks like that or the tower or the crossbar is gonna go right into the tower is gonna kind of give it a little bit more of an OEM look. In my opinion, I think this is a solid option and honestly probably gonna be one of my top picks for the Expedition. The reason being is 'cause some of the more premium roof racks out there are great for a lot of different types of roofs, but you really don't need it for this type of roof because our roof today is relatively flat and there's not too many changes to 'em. And that's where some of the more premium ones really come in hand. So I think this one's gonna do just fine and it's gonna come down to what type of look do you want Do you want that more OEM flush look or do you want that overhang so you can really maximize what you can put on top of your roof Me, I lean towards the overhang a little bit more, but that's just my own personal preference. But if you are curious about how this is gonna be like to install on your roof, 'cause I said earlier it's really quick and easy to do, then just stay tuned and we'll walk you through the process. So getting started, I like to layer all my parts. So right now you'll notice I already have my front crossbar installed on the roof. It's gonna be the same process for either one. So closest to me we're gonna have the crossbar itself and we're gonna have the towers on either side. With those towers, they're gonna have your end caps and you're gonna have the keys to lock 'em into place. And I also recommend just grabbing a tape measure so you can square everything off. And from here it's not a lot to it. We're gonna flip this over and you'll notice right here, there's this little tab. I'm gonna press in on there. That'll release my end cap, put that off. I'm gonna grab our tower and the way you're gonna put this on, it's a little bit different. When I come over here, this is where we're kind of prepped and ready to go. You're gonna notice we have the slot that's open. Typically when you initially get it, it's gonna look more like this. You won't have any open spaces. And the way we're going to adjust this is by pressing on that rubber square, pushing it in 'til we have an open space here and we're gonna put these metal tabs into that space just like this. And then to lock it into place, I'm just gonna push it back just like that. Now just make sure you have this in the right orientation where that opening here is furthest away or on the outside side of your crossbar. And then we're gonna repeat that on the other side. And from here we're just gonna put this on our roof. If you have a frame, it'll help too, but you can do it by yourself. The big thing is just taking your time, and this doesn't have to be perfect when you first put it up here, just lightly setting it on there just so you don't scratch anything. And with it in place, just roughly afterwards, we can make our adjustments. Those adjustments are gonna consist of three parts. The first one is gonna be wrapping your strap around your raised rails, just like that. If you can, try to secure that down if you can. There's gonna be a little hand knob on the back of there that you can loosen up. I'll show you that a little bit closer later on with them both in place. Then we can make sure each tower is gonna be aligned with one another. And what I mean by that can be squared off. The way that I like to do that is by finding a point on my roof that's gonna be the same on either side. A lot of times you're gonna have this section here that attaches your rail to your roof and it's gonna have this kind of bar or platform that extends. I'll just find that point and measure where my tower is sitting roughly and I'm gonna get that number and make sure it's the same on the other side. And that's when I square it off, making sure it's even. And then the final thing I'm gonna do is checking my overhang. 'Cause right now we can push this back and forth and make sure that we're gonna have the same amount on either side. What you can just do is measure that. Once you measure on one side, you'll just check the other side and then just adjust from there. And from here we can tighten this down all the way. So here's that knob I was talking about earlier, that you can really adjust that strap. And what I like is, you know, you don't have to deal with any tools. Now it can be a little bit tricky sometimes if it's a tighter spot. Also something to think about is when it's really cold outside and your hands are getting a little numb, this might be a little bit hard to adjust but just something to think about. The way I also recommend doing this is tightening either side a little bit, going back and forth just so you don't over tighten one side and you get an uneven fit. But when this is tightened completely, then I'm gonna grab our end cap, wanna make sure that's already unlocked and just kind of push it in place and then lock it up. And from here we're just gonna grab our end cap and put that on. Now really you don't have to take these off for the installation, I just find it a little bit easier to work with this just in case you need to push this tower all the way out at some point. But then I have to give it a good shake test, make sure it feels really secure. And if it does, then you can load it up and take it out for a ride. But that'll be just a look at some of the features and the installation of our Inno roof rack on our 2024 Ford Expedition. Now if you're gonna be using this and kidding it out, just let us know what your experience is like. Let us see what you're hauling it with. But again, I'm Matt, thanks for watching.
Ratings & Reviews


Info for this part was:
At etrailer we provide the best information available about the products we sell. We take the quality of our information seriously so that you can get the right part the first time.


Thank you! Your comment has been submitted successfully. You should be able to view your question/comment here within a few days.
Error submitting comment. Please try again momentarily.