

 Arrives before Christmas

Videos are provided as a guide only. Refer to manufacturer installation instructions and specs for complete information.
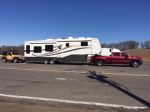
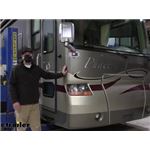
Hey everybody, Ryan here at etrailer. Today on our 2006 Tiffin Phaeton Motorhome, we're gonna be showing you how to install the RVS 4 Camera Observation System. But before we do that, why don't we check it out and make sure that this could be the right kit for you. So here inside of the motorhome, we can kinda talk about our system. Usually we'd go outside and try to get on the road and show you how this works. But today, we have a couple of projects going on with this, so it's unable to be driven currently.
So we're gonna do our best here to explain everything. I think it should work out pretty good. But with that said, driving a motorhome or anything of size actually is a little more nerve wrecking than just your regular car. There's a lot going on, you gotta pay a lot more attention and be a little bit safer. And so anything that you can do to kind of add a safety feature or make you little bit more confident whenever you're driving, is definitely well worth it, at least in my opinion.
And I feel like a system like this is gonna be able to do that. It's gonna give you some better angles, you're gonna be able to see what's going on a lot better. Not to mention two, since you put the cameras anywhere you want really, but ideally you're gonna have one in the back, right And that makes it really easy whenever you're backing up to a parking spot or any tight area, just to have a better view directly behind you. And what's cool too is flat towing vehicles is getting super popular nowadays, so I'm sure you all have seen it, you got a motorhome or coach going down the road and you have the personal vehicle getting towed behind it. Well, a lot of times, especially your motorhome of this size, you can't really see that towed vehicle.
It's just a lot more narrow. And so having a camera back there is gonna allow you to go down the road and kinda keep an eye on things, especially when you're flat towing, that's one more aspect of something that you're gonna have to worry about. And so having a way to kinda keep an eye on that can definitely kind of put your mind at ease. And if you do see an issue you can stop, get it fixed, and continue on with your trip. So now just to actually check out the monitor, little more what's going on with it.
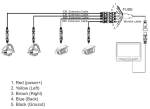
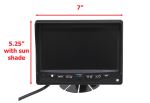
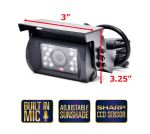
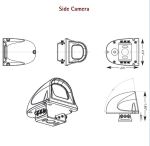
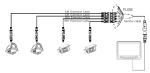
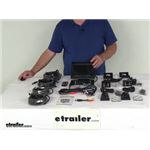
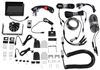
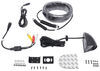
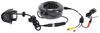
So you're gonna be able to have hook up four cameras. Okay, so, usually do your each side, one in the back, you could do one in the front. That fourth camera is kind of completely customizable. Some people do two cameras in the back, one up high, one down low, some people do it on their side, by their front door or their side door rather, to see if people come and go in. The choice is yours. Our customer today just said, "Give me the three, the two sides and one on the back, "and that'll be more than enough." So we have the back display now, we're in our garage so we can see our garage door. A couple things I actually do, I like about the monitor, it has this sun shade on it. And that's a big issue with a lot of gadgets like this that we've done in the past, whether it be camera systems or tyre pressure monitors system, anything that has a screen, a lot of times the glare just kills it, you know And so the shade should definitely help out, the image quality is actually pretty decent. It kinda surprised me of the quality 'cause a lot of times these type of things, they're just not the greatest and this one's actually been pretty decent. Honestly, I was relatively impressed with it. The screen is big, so you shouldn't really have any issues seeing it, even sitting back a few feet and be able to see what's going on. And there's a lot of different things you can do. So you can kind of scroll through your images manually. So we have the back right here, we have our driver's side looking back. So this is kinda like, if you we're looking into your rear view mirror almost, this is what you would see. You can cover a lot more ground with this so it gives you a pretty wide angle. So that should really help with blind spots, especially if your towing a vehicle or a trailer be behind you, sometimes it's just hard to judge. So you can see a car all the way back there and give you the more confidence when you make a lane change or if someone's cruising in your blind spot, whatever. I'll close our door in a minute here, but we have our door open, and so we see the camera just getting a good shot of that, but that's our passenger side, the same deal. And then channel one, that was our blank screen. So if you we're to have your other camera plugged in, it would display that image. But we have a split screen, we have both side views, our driver's side, passenger side, rear in both sides. So it really does a lot. I mean, you can kinda go through this. You have them all in quartered sections, so you can really go through this and figure out which one you like. And again, in channel one that's where we don't have a camera. So if you plug on and display that. You go through a bunch of settings, you could adjust the volume because this does have audio on the back camera. So if you we're to kind of have someone guiding you in to a parking spot or something, it'll pick up on their audio. If they're trying to talk to you, if they say go left or right, you could hear it through here. So that's pretty cool. And then, just pretty standard stuff. You can adjust the brightness of your screen and everything else like that. So pretty neat, and that should definitely make things a little bit easier on you whenever you're going down the road. There's a couple different ways you can actually hook the system up. So you can hook it up to where your cameras are powered on all the time, and to change 'em you just have to manually go in, and push a button to give you that different view, or you can hook up the cameras to a trigger wire. So three out of the four cameras you can do this with. Generally, you do your side cameras and then your back camera. And so, right now we have the back, let's say if we're making a left turn or making a lane change, hit our blinker, whenever you hit the blinker, it gives you that view. And so that's pretty cool. You check your mirrors, check that, and make your turn. Whenever you click it off, there is a slight delay, which I kind of like because you turn your blinker off sometimes you still want to get over another lane or whatever, and it kinda hangs around. So after a second it goes back to normal, to your normal rear view there. Same thing with the right turn, hit your right blinker, I've closed our door and you can see what's going on on. So pretty neat. Like I said, I wish we had the opportunity to start this thing up and show you a little bit more, but I also wired it up in a way to where, when it's running, when you put it in reverse, it'll show the back. And then when you do that, it actually gives you a grid. You can turn the grid off if you want to, but there'll be a grid that comes out and kind of helps you back to the spot. It kind of gives you an idea, something to go off of how much distance you got, actually, behind your motorhome. So I just wanted to kind of show the cameras. So the side cameras, this is what they're gonna look like, actually pretty nice. I was pretty surprised when I picked it up, they're really heavy. The housing is metal, probably aluminium, if I had to guess, and there is your lens. So they do have some infra lights around it to help in those low light conditions at night time. When the sun's going down and everything else, it'll still be able to see. There are a couple different ways you can mount these up. So I decided to do the flush mount way. They give you some really good sticky tape that you can apply to the surface, and then I just used some screws too, just to why not. And I think it looks pretty good, but they also give you some brackets too that you can use and get more complete adjustability with this. However, if you're using 'em to kind of seat on the side, this is more than good enough for sure. But with these systems, people do a lot of different things with them. So at least you have that hardware and the option to set it up a little bit differently if that's what you're trying to do. In the camera here in the back, this is what it looks like. In our case, we already had a camera there from the factory, but it was inoperative and we're actually able to make that little area work, it turned out pretty good. But just to take a better look at the back camera, we'll get two, like I said, as a four camera kit, obviously one of 'em is up there, the one that we're not using, this is it. And kinda like what we talked about. So this is going to all the brackets I gave you, you're gonna have a lot of adjustability in terms of pointing the camera where you want it. They give you a little visor here that you can put on too to help with the sun and the glare like we kind of talked about earlier. In our case, the way the camera was positioned already didn't really need to use this, just because of the angle of it. But like I said, you definitely got the option. So let's say if you wanted to maybe just mount this one up in the middle of the back of your motorhome for whatever reason, you could bolt it up and then use this visor to keep the sun right out or the wind. So, nice touch and it's one of those things that you're happy that they include. If you need it, excellent, if not, no big deal. So when it comes to other camera systems, there's a lot of them available on the market. And honestly, from my experience, they're all really close. They're all about the same, just to kinda compare generically to, let's say, wireless systems. So the wireless systems are really nice because they're a lot easier to install. You don't have to run wires and tap into stuff. But on the same note, just like anything wireless, sometimes you run into some connectivity issues and things like like that. So it could get frustrated from time to time trying to figure that out if it happens. The good thing about this system though, it's all wired. So although you gotta go through the trouble of doing it once, everything's hardwired, and you're not gonna have to run into those potential wireless connectivity issues. So, the trade offs there, and we kind of have to figure out what you prefer. But speaking of running those wires and everything, as far as the installation goes, it's definitely time consuming, not so much that it's really confusing or anything like that, it just takes so much time. You really have to think things through on where you wanna mount things, and if you can to run 'em through there, and having the wire and getting it all done like that. So it's something to think about, and definitely my advice would be think it through, plan it out how you want it, see if it can be done first and go from there. You might have to make some changes along the way and kind of make a compromise in some spots, but kind of it is what it is. As long as you stay focused, you should be able to get it done. If you wanna see how we hooked up ours, feel free to stick around we'll go ahead and do that together now. To begin your installation, you're gonna be here inside of the motorhome. And before we even get started, I wanna mention, every one of these installs are gonna be a little bit different, just depending on how you want your camera set up, where you wanna mount it, how you want them to work, the layout of your motorhome and so on. So just use all this information as a guide, essentially, to help get you going in the right direction. But with that said, the first thing that I like to do is figure out where I wanna put our monitor screen. That way we know have something to work off of, where we need to run our wires to and from, and things of that nature. So the kit comes with quite a few different mounts. You can choose whichever one works best for your particular situation. So we put our monitor right here. Our customer actually gave us a suction cup mount, that way you could put it on the window and mount it up like so, so we kind of modified a few things to make this work. It doesn't come with a suction cup mount. But like I said before, it has a lot of other mounts, one's where you can mount a flush in your dash. There is a swivel mount similar to this, but it's got sticky tape on it, a bunch of different ways, so use whatever's best. From there, so you're gonna have this wire coming off from the monitor and a main cable, right One of the main cable is gonna look like that, a bunch of pins in there, you're gonna plug this in and only plug in one way too, so don't try to force it if it's not going, I'm gonna find where it goes. That's gonna plug in. And in our case, under this cable, runs underneath of our dash and out through the opening here. Okay, so I can I kind of got a cluster of wires here, but these are all gonna get hooked up to different things, so we'll go ahead and kinda talk about that now. So here's the end of our connector plug that we plugged into our monitor. These ends are eventually gonna go to our cameras. So I already have a couple of 'em hooked up, but we'll get to that in a moment. Where we can focus on now is all these wires that are coming off. And like I said, there's a lot of different ways you can hook these up. You can power up the cameras so they're on all the time, or you can trigger them. We chose to do the trigger method. So that way, let's say, if you're going down the road and you turn on your left blinker, the left camera's gonna come on or the right camera, you put it in reverse, the backup's gonna come on. Also, if you do it this way too, you can go on your monitor and make you see whatever image you're trying to see. That makes sense too. But with that said, you're gonna have a handful of wires. You're gonna have a red wire, this is your power source. So I hooked up that to a 12 volt power source. You can go right to the battery, but your monitor's gonna stay on all the time. So you'll have to manually power it off. Or what I did, was went to a keyed ignition power. So whenever you turn the key on, it has power, and then the monitor comes on. When you turn the motorhome off, it loses power and shuts it down. So that's what I did. And I'll show you the connector plug that I hooked into here in a second, I just want to explain what's what. Your brown wire, it's gonna be labeled channel four. That's gonna be for your right turn. All right, so the passenger's side, yellow is channel three, so that'll be your left turn. We're gonna have a black wire, which is ground. So pretty straightforward there. And then the blue wire, channel two, that's gonna be your reverse light signal. So whenever you put the motorhome in reverse, power's set to come up to it and run it through this blue wire. So with that said, I'll show you where I hooked all these into. So what I tapped into is this harness that goes into, essentially, our gauge cluster. There's a little light bar at the top that kinda tells you what's going on. You can see your blinkers flashing and display some messages, wait to start, and all that type of thing. The left turn signal is the thinner diameter yellow wire, the right turn signal is the thinner diameter green wire. And I know these are tricky to see, so just kind of bear with us, it's just really difficult these tight spaces. The 12 volt power wire is gonna be a pinkish color wire. And then your ground wire is gonna be black. The reverse light signal, we are gonna have to acquire from a different location. We'll get to that later on. But the way I tied it into these, is I simply just use some quick splice connectors that you put around the wire, put the new wire in, and pinch this little metal piece down, and that makes a connection. Those are something you are gonna have to pick up separately, they don't come with the kit, but in this case, that's the best method or the easiest method that I found use. So that's what I did. So at this point, you can mount up your front cameras. So I already have the passenger side one done, I will show you how to do the other side. I just wanna give you an idea what this is gonna look like. Again, this is gonna depend on how you want everything set up. This is probably a pretty popular way to do things, but you are gonna have to drill a hole and think about a few steps ahead before you do this, you wanna look behind everything, make sure you're clear, you don't want to drill a hole and just pray and hope that you have an opening to work with and everything, so think about everything. If you wanna mention, the cameras are side specific. So there'll be a sticker on the backside of 'em, telling you which way is up and what side is which, so pay attention to that. And, yeah, they give you some sticky tape, it works really good. You can also use some screws and conjunction with it, but this is how it turned out. Why don't we go ahead and go inside, and I'll show you where the wire comes out and what we plugged into. So the wire is gonna run over to where all of our connectors are. So, I ran ours underneath our dash pad. It'd be virtually impossible to see on camera, so just use your imagination. Changes are pretty good, you might have to take some stuff apart to get that wire over here, but here's the end of it. And this is where it came out and now we can plug it in. So since our harness here, the brown colored harness it's for the right or passenger side. We can hook it up. Again, these all go together only one way, push 'em in. It's a little set, doing that there. You can screw that down like that, and there's a little cover too, Kind of a sleeve that you can push over this, and this will just help keep everything protected and help keep it together and things like that. So here on the driver's side, we can get it set up. We're gonna get our camera ready. Like I said before, pay attention to the orientation of the camera, you want it to be on the right side, but clean off the surface real well with some rubbing alcohol, and then I put on a sticky tape, going to get that, put it in place, and then you can get ready to get 'em mounted up. So like I said, you are gonna have to drill a hole. What I suggest doing, find that spot, look under your dash, where there's an opening, whatever, make sure you're clear and you can drill a hole. So it's not a bad idea to put some painters tape on here. And I used the hole saw, I believe it is a three quarter inch, and was able to punch through everything. And with that done, we can take our end, push that all the way through, and there is a grommet on here. You can slide back and forth, kind of odd though, cause if you we're to put it flat and obviously the camera when it set flush, but there are some brackets that come with this. I think you can use that grommet with those, but it's kind of a multi-layer deal inside of here. So I'll kinda just push that in there and believe it or not, it should help seal it up a little bit. Actually, it looks like it's working pretty good. So I'm gonna get this all the way in here, kind off get it ready where I want it. In our case, I put it up flush against this trim piece here. So I already cleaned off the surface. Peel off our sticky tape, make sure it looks square. Looks pretty good to me, we'll push it tight. And this tape works really well actually, but to be on the safe side, we'll probably come back and put a couple screws in it too, just to kinda double secure it. So, if you remember where we had our camera and then we pushed a wire through the side of the motorhome, through the hole that we drilled, here's where it came out. And so the one connector end connected to one of the bundle wires. You get a bunch of these, I think four of them. Obviously, you are gonna use a short one. We don't really need to extend the wires or anything, but you have to use the bundle to pair the two connectors together. So that's what I did, plugged it into there. This other end of the bundle of wire, I'll connect to the yellow connector since that is the driver's side channel. So once that's done, we'll put our sleeve over it and that'll wrap up that camera over there. Now here at the back of the motorhome, we can get this camera in. Now, in our case, we originally had an OEM camera in here, but it was junk, it didn't work anymore, so I really wanted to utilize this pocket that was already here. And so we had this factory bracket, our old camera was in, took that out, bolted up our new camera. And obviously you wanna position it in a way that is gonna be best suited. You're gonna have this connector here that comes off the back camera, set that aside. This works the same as all the other ones. So you're gonna take the long bundle of wire, I think it's a 30 meter bundle, connect it there, put your sleeve on it, and then you're just gonna take that big bundle of wire and drop it down through this opening. That wire's eventually gonna get ran all the way to the front, up into the dash. So, exciting stuff. But once we have that connection made, we can just drop this back down in there and resecure it, the opposite way. So, everyone's gonna be a little bit different like I said. In our case, since I built this flush together, I actually had a kind of a cover deal that you can modify and get it to look pretty good, so that's what I'm gonna do. So we still at the back, and if you can imagine that wire being dropped all the way down, and if we open up our compartment back here to our engine area, the wire come down right through here. So there it is and I just zip tied it up. Whenever you're routing wires, you wanna do your best to avoid any hot moving parts. And so I just dropped it down, and then, I actually brought it over to the passenger side of the motorhome 'cause it's just a little more ideal running it through this engine area. So right when you get to about this area, you can just kind of take it easy for a second. And while we're doing this, you also want to run your reverse light signal. If that's the way you wanna hook up your camera to where when you put it in reverse, it'll turn on automatically the backup camera. So that's what we did. Lemme show you what we did, how to get that hooked up, and then we can get our wires routed up to the front. So here's how we tapped in. So we have our tail light. This bulb here is our reverse light, light bulb. And so it went from a white wire to a factory green wire. I cut that in half. This red wire here is a new wire that we're gonna use to run all the way up there. You will have to get your wiring separately if you wanna do it this way, 'cause it doesn't come with it. And obviously quite a bit our motorhome's pretty big but you're gonna strip back the ends of the insulation, twists two wires together, put them in the butt connector and recomplete the circuit. That red wire's gonna drop right down where we left the other wire hanging, that way we can run 'em both up to the front at the same time. So underneath of our coach here, you can see that camera wire and our red reverse light wire, and you're gonna want to run these all the way up to the front. Now, everything's gonna vary a little bit, depending on your model and motorhome and things like that. It's just so difficult to actually see, and get our camera coming up here and show you what's going on, but like I said before, avoid any hot and moving parts. A lot of times what you can do, is once you get past the engine area, it's pretty flat and open on the bottom, sometimes there'll be some square frame rails that you can run your wire through. Regardless what you do, just make sure it's safe, secure and everything else. And once you get all the way up into the front area, then you can push it up, find a way, usually under the dash they'll be a grommet or an opening or where other wires are running, where you can push it up into the dashboard area and get everything hooked up. Now back inside of our motorhome, our reverse light wire and our video cable wire came up inside here through the dash or everything else's. The camera gets hooked up to the blue connector channel two. And this is actually our reverse light wire. Originally I know the color was red. I fell short of wire though, so I had to extend it and just change it to white, not really a huge deal, just what I had laying around, and connected it to our blue channel two trigger wire here. So I feel like now it would be a great opportunity just to kind of quickly test our camera system, make sure it's working properly since we have everything all hooked up that way. Before we bundle up all of our wires and clean everything up, if there's any issues you can get it fixed. With that said, this is a four camera system. Our customer only wanted three cameras. That fourth one you could put in the front or on the side, or wherever you want, it would hook up the same way, but we're not gonna worry about that one today. But with that said, we'll key on our ignition. And we do have a power light indicating to us that this is ready to activate, so go ahead and turn that on, and we have some of our channels here. So there's the back, the driver's side, all three. So we have a bunch of different use here. So there's the back, driver's side, and this is the passenger's side, we have our door open to get in. So that's just a good view the door. But I wanna check our trigger wires too, so I'll hit our left turn signal. We should see the driver's side camera come on, which it does. We'll try our right turn signal. We should see a view of the door, which we do, and I'm not gonna test our reverse signal just yet, we actually have the air system in this coach taken apart at the moment but our chances are really good. These triggers are working, that one is too, you'd simply test it the same way. Start it up, put it in reverse, and make sure the backup camera comes on. But, now that we verified everything's working, feeling pretty confident with this, we go ahead, kind of bundle up all of our wires, and get it all put back together and looking clean again. And that'll finish up our look at and our installation of the RVS 4 Camera Observation System, on our 2006 Tiffin Phaeton Motorhome..


GREAT JOB
marty is awesome. thanks
Lots of product options excellent website and fast parts delivery.
WHAT A JOY DOING BUSINESS WITH THIS COMPANY, EASY ORDERING, RECEIVED EVERYTHING I ORDERED IN A VERY TIMELY MATTER.
Finally got monitor install hook camera up this a good outfit work good thanks Tom for knowledge and service you provide thanks
The camera systems we purchase have been easy to install and use.
Product as advertised. Service excelled fantastic!
Works very well day or night
Great system, installed this for one of my customers
Haven’t used the camera system yet but it was fast on delivery. The cameras and components look like they are made very well. Customer service dept. works well for the consumer. Thanks and I will give a review when installed.
Quick shipping, easy order process, ordered the same product from another vendor who promised next day delivery and did not hold up to their end. Do not order from Truckid or Carid. Product fits perfectly in Isuzu. Will order again.
Thanks
Product and pricing excellence is what etrailer is all about. They bakc it all up with great customer support. thanks etrailer.
Exactly what I needed for our venerable 2003 Jayco travel trailer. 3D printed a very neat unit that holds the display and fits into a “sunglasses pocket” on the top of the dashboard of our Chevy Colorado pickup.
I have done business with etrailer for over 5 years. In every case I have found their pricing to be fair and their customer service to be excellent.
Recieved my etrailer order yesterday. Received it very quickly, I ordered two items,
a back-up camera system and sensor set-up. Very pleases with what I have seen of it. Will install it this weekend, can't wait.
superior upgrade for us. would have been 5 star but the installation and usage instructions are almost worthless. 8^)

Do you have a question about this RV Camera System?
Info for this part was:
At etrailer.com we provide the best information available about the products we sell. We take the quality of our information seriously so that you can get the right part the first time. Let us know if anything is missing or if you have any questions.


Thank you! Your comment has been submitted successfully. You should be able to view your question/comment here within a few days.
Error submitting comment. Please try again momentarily.