
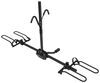
Yakima SightLine FX Roof Rack for Flush Rails - JetStream Crossbars - Aluminum - Black - Qty 2


To see if this custom-fit item will work for you please tell us what vehicle you'll use it with.


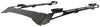
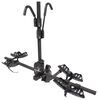
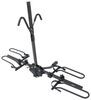
This aerodynamic, flush-mount roof rack lets you carry gear and cargo on your vehicle while maintaining a clean, factory look. Crossbars work with channel-mount and clamp-on accessories. Installs to flush rails on your vehicle's roof.
Features:
Specs:
 Alternate Instructions
California residents: click here
Videos are provided as a guide only. Refer to manufacturer installation instructions and specs for complete information.
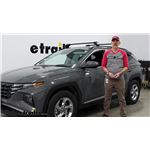
Hello neighbor, this is Curt with etrailer, and today we're gonna take a look at the Yakima SightLine FX roof rack system on our 2024 Hyundai Tucson. Now if you've had any experience with this roof rack, or if you have any questions about that, go ahead and leave them on the comments below. We'd love to take your questions and your stories, share them with our other neighbors in order to help them make the best decision for themselves. Now, when planning your next journey in your Hyundai Tucson, you may actually find yourself in a situation where you either have cargo that's just too big for the vehicle, or cargo that you don't desire to ride with, or you've got a full car full of passengers and you just need more room for everybody's stuff. That is where a roof rack system is gonna come in really, really handy. It's a way to get extra storage on your journey without using your hitch and interfering with your hatchback.
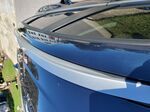
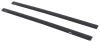
It's not all that tall of the vehicle, so getting stuff in and out from the roof shouldn't be any issue for you really at all either. It's also a FlushBar system, and it has an aero crossbar style. That means they're a little bit more of a blade shape, and it's really gonna help with mileage and noise reduction when you're going down the road. You are able to use clamp mount accessories that go around the bar, and there is a T-channel located in the top so that you could use T-channel accessories as well. So here is that T-track and weather strip up on the top of the bar that I had mentioned.
Now with an overhanging crossbar system, you access the T-tracks through the end of the bar and slide everything over that way. Because this is flush, and the ends of the bars are cut off by our towers, you're going to put your T-slotted accessories down here in the middle. You'll depress down on the weather stripping and then slide it into place wherever you wanna put it. Now that is a great system because you don't have to cut or trim any of this weather stripping in order to use those accessories, and that way you don't create gaps up here in the weather stripping, which could create a lot of noise for you as you're driving down the road. And while we're up here, let's take a look at exactly how these attach to our rails.
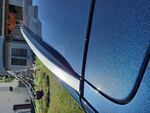
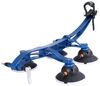
There is gonna be a rubber foot pad underneath that's gonna help protect the top of your rails from any sort of damage. And it's gonna go on by this clamp system that's located in the front and back of our tower. It's gonna grab underneath the lip here, and the lip in the back, and ensure that it's on here securely. There is a rubber padding on the inside of this bracket, also there to not damage anything on your rails. Now per the instructions from Yakima, during the installation, which we are gonna show you in just a moment, they have us set these up in a very specific location.
So we have a 32-inch crossbar spread the way we have it set up. You're going to have a little bit more bar space on the front bar than you do on the back, and that is because the rails on the Tucson will taper from the back and get wider as they get to the front. So on your back crossbar, you're going to have 32 3/4 inches of usable bar space. On the front bar we're looking at 34 3/4 inches of usable bar space. Now where this is placed at, if you have a sunroof on your vehicle, this will likely interfere with it. So just so you're aware, you've got about 2 3/4 inches from the bottom of the bar to the roof. On the front bar, you've got about three inches on the back bar. Now we also might have to take into consideration this antenna located in the back. Now the antenna is also 2 3/4 inches tall. So the bottom of this bar would actually clear that. So if you have roof-mounted accessories, as long as they don't drop really below the bottom of the bar when they're mounted, if they go back a little bit, you should be able to clear that antenna with no problem. So with all that, these bars are gonna provide you with a 165 pound weight capacity. Now it's always a good idea to double check your owner's manual. Be sure of your vehicle's roof capacity. If it's lower than 165, you are gonna have to use that number as far as your load capacity. So with all that done, after we took a look at all the features and everything, and how it measures up on our Tucson, let's take a look at exactly how we got this installed. Now as we begin our installation process, we first have to start with assembling our towers. There is a foot pad and two clips that need to be added to the towers in order to have them grab onto the rails. The end result is going to look like this where you have these here that are gonna grab and come back, footpad in between. And there's a few tools that are needed for this. Yakima does provide you with a specialty tool and their own measuring tape, however, we're using ours today. And if you have a flathead laying around, you'll wanna keep that handy as well. So the first step in the installation process is going to be adding our rubber foot pad. What you wanna make sure of is that the cutout portion of it is facing the outside. These clips right here are gonna be placed at the end of this here. And all you're gonna really do is just snap it down into place just like so. And then once we've got that on, we're gonna go ahead and remove our tower cover. And we're also gonna remove this portion right here. Now this is where your key core is going to be. Now they provide us at this moment with this kind of plastic piece that you can open with a flathead. However, using Yakima's SKS, or Same Key System, you can order matching lock cores for each of your towers, and you can get them keyed alike to any Yakima accessories that you have as well. So we're gonna go ahead and get this removed. And this'll lift off of one side and come over a tab over here on this side. So we're gonna set that aside for the moment. And now that we've got this open, there's these little retention clips that we're gonna release here on the inside. We've got this bolt coming out right here that we're gonna back off a bit, because one of our claws is gonna be grabbing right inside there. Now that we've backed that bolt off, we can get our clip in. Now you wanna make sure you grab your R15 clip. You're gonna slide it between these bars and make sure that this open centerpiece here is going over that. And then there's two tabs at the bottom you're gonna hook into as well. Once you have all that done, we're gonna go ahead and take our retention clips and get them back into place. And that's gonna hold it there for us while we put on our outer clip. Now our outer clip is gonna go in really pretty much the same way. We're gonna remove our retention clip. We're gonna get this slipped over that bolt, there we go, and get it hooked onto that tab underneath there. Once that's there, we're gonna replace our retention clip there to hold it in spot. And now we have an assembled tower here, same as the other. We just simply need to replace our covers that we had on before. Now you don't have to do this right now. I kinda like to do it to keep everything in place while we put it up on our roof. Now before we get this up on the roof, let's talk a little bit about crossbar placement. Yakima does provide a chart of measurements of where these should be optimally placed up on your roof. They are indicated by these different codes here. This indicating the front half of the vehicle, this indicating the second half or the back crossbar. Now these measurements, there is a chart on Yakima's website that tells you what M1 and M2 and all of that means. But if you follow along here, we'll show you exactly where to place your crossbars. Now, we already have our first set of bars installed. You need to have those installed already in order to determine the placement of your second bar. Now, what this chart indicates, as far as placement of the front bar, is that your crossbar needs to be spread to 39 inches. That measurement is gonna be taken from this bolt here to the same bolt over on the other side. So 39 inches center to center for the front bar. It also is telling us to place that front bar, the front of the tower should measure 13 inches from the top of the glass of your windshield to the front of that tower. So at a 39-inch spread, 13 inches back from the windshield, we've got the front bar installed. Where they're asking us to place the second bar is going to be 32 inches center of the front tower to the center of the second tower. And they're asking our spread to be 36 1/8 inches. And that is again from this bolt to this bolt. So we're gonna go ahead and measure our second bar here to 36 1/8. Very good. And a good way to make sure that the bar itself is centered is to take a measurement of basically what's left over of this bottom tab. Make sure that measurement is equal to that same kinda cutout area on the other side, and you'll know that your crossbar is centered. Once you have that into position, take your Yakima tool, and you're gonna tighten down each tower until you hear an audible click. (tool clicking) This is a torque tool that they provide you. If you hear that click, you know that everything is tightened down exactly the way it's supposed to be. Now that we've got everything prepped on the second bar, we'll go ahead and get it up on the roof. We just wanna make sure that the inside of the clip is on the inside of the rail, outside on the outside. And I do suggest you kind of get up in your door, like I am here, just to make sure that you don't put yourself in a position where you could scratch up or damage anything on your roof. Okay, so center of front tower to center of the back tower should be 32 inches. We've got it right where we need it. We're gonna double check the other side too. You wanna have, make sure you have the same measurement here as you do on the other side, because you really wanna guarantee that these bars are gonna be perpendicular with the rails. And the only way to really do that accurately is to take that measurement. So now that we've got it placed where we need it, we're gonna go ahead and get our flathead and remove this cover, and we will tighten down our brackets here onto the rail and hopefully have it really nice and secured to the top of the vehicle. So we're gonna take our Yakima tool and we're going right here, and we're gonna start tightening that down. Just to keep things even, I do like to kind of tighten down a bit on one side, kind of compress it a little bit just to ensure that that's gonna go around the top of the rail. So once I've got this in a spot where it's really feeling a little bit tighter and it's settling in, I'm gonna go ahead and before I torque it down completely, I just wanna tighten down the other side a bit as well. So we've jumped back and forth a little bit, tightening everything down incrementally. We've got everything positioned exactly as we want it. We've already gone to the passenger side and torque that down. We're gonna do it. Go ahead and do the same here on our driver's side. (tool clicking) Perfect. And now we're able to replace our covers. So we'll start with the cover with the core. Again, we're gonna slip it over this tab over here on the right hand side and bring it around right there. Once we've got that in position, we'll go ahead and take our flathead and get that locked in. All right, that's in a good place. We'll go ahead and put our cover on it. And just do one last check, make sure everything's up here nice and solid, the bar's not moving anywhere side to side, the feet aren't moving anywhere front to back. It's on there really good. Now we're ready to get our gear loaded up and head out on our adventure. So there was a look at the installation. Nothing that's too terribly frightening, or anything like that. It might take a little patience in getting it up there correctly, but once it's up there, it looks really, really good. I think a flush crossbar system like this provides a little bit more of a factory look, a bit of a cleaner look. There are overhang options for you, if you desire to take a look at those here on etrailer.com. But really I think this is a great roof rack system for you and your Hyundai Tucson. So there's a look at the Yakima SightLine FX Roof Rack System. I'm Curt with etrailer. Thanks for stopping by.

Order was easy to place and delivered in less than a week as promised. The sales advice was perfect fit despite multiple pieces having been ordered. Used the rack once and very sturdy
These REALLY need instructions! I can't imagine their function.
Straight forward installation
My only complaint is the time it took to get my order. I understand this was out of your hands and dependent on supply problems.
The SightClips with bases were very easy to use with my Yakima Ridgeline Roof Towers. When the towers are loosened and off of the vehicle the clips can come off, but it is really no big deal. I just take the off when not using the rack. When I put the the rack back on I only put the inner clips on before putting the rack on the roof. Then I add the outer clips and snug everything down. It is much easier that way.
Extremely happy with this product. High quality and well made. They are working well.
Great products. Great service!

This roof rack has served me well over the year, currently has Thule snowboard rack/ will switch to a box in the future. it was pretty easy to install and is very sturdy.
Spot on. Customer service, communication, shipping all of it. Perfect.
Delivered what was promised. Thank you
One quick phone call and Gwendolyn figured out exactly what I needed for our new car to use my old Yakima rack.
Do you have a question about this Roof Rack?
Info for this part was:
At etrailer we provide the best information available about the products we sell. We take the quality of our information seriously so that you can get the right part the first time. Let us know if anything is missing or if you have any questions.


Thank you! Your comment has been submitted successfully. You should be able to view your question/comment here within a few days.
Error submitting comment. Please try again momentarily.