

 Arrives before Christmas
 To see if this custom-fit item will work for you please tell us what vehicle you'll use it with.


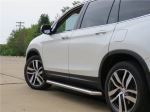
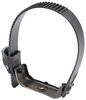
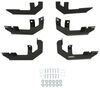
These 5" wide steps with rounded ends mount close to your Honda Pilot for a streamlined look. Full-length plastic pads create non-skid surfaces. Constructed of rustproof aluminum with polished stainless steel trim. Custom installation kit included.
Features:
Specs:

California residents: click here
Videos are provided as a guide only. Refer to manufacturer installation instructions and specs for complete information.
Speaker 1: Today, on this 2016 Honda Pilot, we'll be having a look at and showing you how to install the Aries AeroTread Running Boards with Custom Installation Kit. Part number AA2051029. Here's what our running boards look like installed. Now, the reason you're going to want a set of running boards for your vehicle is not only do they add a stylish look to it, but they also make it a lot easier for you to get in and out of it as well.These run the full length of your passenger compartment, so it makes it easy for your back seat passengers to get in too. We have this nice plastic step surface, which is 5" deep from the very back of it to the very front of it, which makes a wide path for your foot to make contact with. So you don't have to worry about slipping and falling as you're getting in and out of the vehicle.
The outer construction is a polished stainless steel, which gives us a nice look. The inner construction is a lightweight aluminum, so it's very strong and rust resistant.One unique feature about these running boards, which I personally haven't seen in others, is that there is a weather strip seal that goes between the running board itself and the body of the vehicle. This will help keep out any mud, dirt, or snow from getting trapped in between the running board and the body of your vehicle, which could cause rust over the course of time. These running boards feature a 500 pound capacity, so they offer more than enough weight capacity for anybody to get in and out of your vehicle.The mounting brackets that come with your running boards are specific to your vehicle. They are an easy no-drill application that'll simply bolt to the existing holes already in your vehicle.
Also, they are constructed of a powder-coated carbon steel, so they're extremely rust-resistant and very strong. Now, if you aren't a fan of the polished stainless steel look, that's not a problem. We do offer these with a matte black finish as well.To begin our install, we're going to be working on our rocker panel. We'll be on the driver's side, the passenger side will be the exact same way. Okay, we're underneath the vehicle now, looking at the inside and to the rocker panel.
We're looking at the rear mounting location right now. We'll have two well nuts, one that goes in horizontally, and one that goes in vertically. This is where our installation hardware will go. We'll have a metric bolt with a lock washer on it and a flat washer. All of the mounting hardware is exactly the same, so just keep that in mind.
Take the bracket, and see how it's going to line up with those holes with the shape that it has, and we'll just loosely thread in both of our bolts. This way, we can adjust it later.Okay, perfect. Now, just forward of the rear one, we'll have our middle one. This one is a little bit different. We have a vertical bolt, and then one that comes in at about a 45 degree angle. Now, at the very front, we'll have two well nuts that are vertical. So we'll use this bracket here and we'll get our bolts started. Okay, with all three of our brackets now loosely started, we can set our running board on top of it.We're looking at the bottom of our running board right now. Notice our bolts are pre-installed in these channels. All we'll have to do is slide them near our brackets so they'll line up. Once we have it lined up, we can take our running board and we'll slide it onto the brackets with the bolts going through the brackets. Now, you can see how our brackets have these slots, so it does make it a little easier, especially on the inner one. You can just kind of slide it through the slot like that, and drop your outer one through the hole.Okay, with our bolts poking through our brackets now, place on a flat washer, a lock washer, then we'll thread on a nut. Again, we don't need to have these tight for the time being. Just loose enough so we can maneuver the running board around as necessary. We want to make sure we do this at all locations. Now, using a 13mm socket, we can begin the process of tightening down our hardware. We'll begin with the bolts that secure the brackets to the body of the vehicle first. Now, we're going to go ahead and ensure that our running board is centered on the vehicle. You can either move it side-to-side, you can because of the slots where the bolts go through in the board, and if you need to pull in or out, you can because the brackets are slotted. We have it where we need it right now, so we can tighten our hardware.Now, we'll just make sure everything is nice and snug. With our driver's side now installed, we'll go ahead and repeat the same process for the passenger's side. That'll complete our look at and show you how to install the Aries AeroTread Running Boards with Custom Installation Kit, part number AA2051029, on this 2016 Honda Pilot.


These installed easily and look great!
Got both items put on car yesterday. Both fit great and look even better.
They were easy to install and look good too.
We got them today and everything looks wonderful It will be a few days before he can get them on...very happy with the look....
bought on a few different ovcasions ...A+ store ...10star thank u
Greg makes my job so easy!
I just call, tell him what I’m looking for and he takes care of the rest!
Hats off to you Greg!
Sam
Do you have a question about this Nerf Bars - Running Board?
Info for this part was:
At etrailer.com we provide the best information available about the products we sell. We take the quality of our information seriously so that you can get the right part the first time. Let us know if anything is missing or if you have any questions.


Thank you! Your comment has been submitted successfully. You should be able to view your question/comment here within a few days.
Error submitting comment. Please try again momentarily.