
To see if this custom-fit item will work for you please tell us what vehicle you'll use it with.
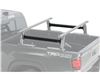
Your truck needs to be ready for more than one job a day. This rack carries long cargo overhead so your truck bed stays usable for tools, bins, and bags. And you can adjust the height as the load changes and stop reshuffling before you hit the road.
Your truck works best when it's ready for whatever the day brings, not locked into one job. This rack is built to move long gear overhead so the bed stays open for tools, bins, and bags you want within easy reach. Instead of reshuffling loads or choosing between work and weekend plans, this setup can carry lumber or kayaks, regardless of when you're doing it. You set it once, get familiar with it, and spend less time solving logistics before you roll out.
Different loads call for different setups, and this rack is designed to adjust based on what you're hauling. The height changes easily so you can run it low for bikes or a rooftop tent, then raise it when you need clearance for kayaks, ladders, or longer gear that won't fit in the bed. The rack uses lightweight yet tough aluminum uprights and crossbars that provide the strength needed to support heavy loads, whether the rack is set low or raised. Plus, you can mount clamp-on accessories around the bars or use the upper and lower T-tracks to install channel-mount accessories. And each bar has built-in tie-down points on each end for ratchet or cinch straps.
The system includes the crossbars, uprights, mounting kit, hardware, and a ratcheting wrench, so it's ready to install out of the box. The uprights clamp directly to your truck's bed rails using the included mounting kit, then the crossbars attach to the uprights to complete the setup. The included ratcheting wrench lets you tighten everything to the proper torque without guessing, and its design clears tight angles so nothing gets in the way as you work. The process stays straightforward from start to finish, with no trial-and-error adjustments.
 Alternate Instructions
California residents: click here
Videos are provided as a guide only. Refer to manufacturer installation instructions and specs for complete information.
Hello, neighbor, this is Curt with etrailer, and today we're taking a look at the Thule Xscape ladder rack. We're gonna see how it fits and how it installs on our 2024 Chevy Colorado. So the bed space of a Colorado can be a bit limited with certain things when compared to one of the larger trucks that's out there on the market, and that's where something like a ladder rack can come in really, really handy. So anything that you are carrying that's longer than the bed, say, lumber and ladders, of course, if we're talking about heading to work or doing a project. If we're talking about recreational, there are things that could go up here like a kayak or a canoe, some of those longer fly rod holders that are out there, skis and snowboards, there are bike racks, cargo carriers, all kinds of things that you could put up here, including rooftop tents, which are very, very popular with owners of trucks like the Colorado. So with all those different options that you have up there, having a ladder rack like this is gonna come in really, really handy.
First and foremost, what's gonna set this apart is it is height-adjustable. So from where it's at right now, which is gonna be about 17 inches above your bed rail, we can actually get another 10 inches out of this to go well over the cab of the truck. Now, where it's sitting right now, the very top of our bar comes to about the same height as our cab does all the way in the back, but it domes a bit. So as you get to the middle of the cab, it actually ends up being higher than this. So if you had a load that you wanted extended out over the cab or needed to extend over the cab, you would wanna raise these up.
Now, at the same time, we've also got a weight capacity on these of 500 pounds in their lowest position. If you're gonna raise it up at all, you are gonna decrease that weight capacity down to 300 pounds. So bear that in mind. Now, as far as our bars go, they are gonna accept your clamp-mounted accessories as well as any T-track accessories. So on this bar here, we put in the weather stripping.
If you don't use the T-track, the weather stripping here is gonna do a lot to help reduce some of that noise while you're out there on the road. But truth be told, when it comes to a ladder rack, people don't worry about that as much as they do when it comes to a roof rack. The noise being made back here when you're driving it isn't as important as the noise coming from right above your head. So whether you opt to use it or not, if you do use it and you want to use the T-slot accessories, what you're gonna need to do is kind of section squares of this out so that you could drop those accessories in and still fill in the gaps with the rest of your weather stripping. So the things that we could put in here not aren't just gonna be like your, you know, accessories like cargo carriers and things like that.
There are also load stops available from Thule that you can use up here for those work things. So like if you've got a lot of lumber or a ladder that you need, you can use the load stops to get it tied down and get it to your destination securely. The other thing too is at the end of each bar, we have a tie down anchor as well. So you can use that to assist in tying your load down. Now, as you'll see momentarily, we use a clamp set to get these secured down onto our bed rails. So we can be a little bit limited to how far forward, how far back we can actually get these. So I was able to get my front bars moved up about this far. It's gonna get us right up to the edge of the front stake pocket here. My back bar, I got about this far. It does cover up some of the stake pocket in the back. But because underneath the rail, there's some obstacles and things that we gotta get around. In order to put our clamps on securely, this is really the widest crossbar spread that I could get it to. Now, that crossbar spread is gonna end up being about 40 1/2 inches. And for me, that's fantastic, especially for longer items that need that wider crossbar spread. That's gonna be perfect for your lumber, for your ladders, even for a lot of the rooftop tents that are available out there, or a longer kayak or canoe, that's gonna be perfect. We do have the ability to clamp these in closer together though if needed. Now, installation is actually a pretty easy task when it comes to this ladder rack. It's all powder-coated aluminum, so the parts are relatively lightweight for the most part, and they're gonna provide you with any tools that you need, minus your own measuring tape. So stick around, I'll show you exactly how we got this on the bed of our Colorado. Now, our installation is going to begin with our towers. Now, as you can see, we've already got our front bar put on. We put the driver's side on the rear here. We're gonna show you how to install the passenger's side. Now, all of these install really the same way. The thing that you wanna make sure of though is that when you're setting these up, the foot of it, this section and this support here, should be facing the inside. They should be facing each other. So just bear that in mind that. And you want the angle of it to be facing toward the middle of the truck bed. So as long as you get 'em all in the right place, they're really gonna install the same on every side. So what we're gonna do is we're gonna take our DTT tower here, we're gonna take our bed rail kit, and we've got this L-shaped rubber pad. That's gonna slip right in here. You could see all these little knobs and nibs, they're gonna go into these assorted holes here on the back. Now, these two in the middle, these round ones, I would start with those honestly because they tend to be the hardest ones to get in there flush. If you need to use a little bit of soapy water on it, go right ahead. But we're just gonna get those into place. Like I said, I pop those middle two in first and then work my way around the edges, like so. So the next thing that we're gonna get prepped is our clamps here. So what we'll have are these little rubber pads. You can see there's kind of a, it's mitered a little bit on the corner there, just like it is on our clamp. These, very easily, they're just gonna slip right over, just like that. So we'll do that on both of our clamps. Okay, so the way that these are going to work is this, this side here that we put the rubber pad on is gonna go up and underneath your bed rail, just like that. Now, one of the things I would suggest doing is just kind of, you know, maneuvering it around. There are some different like little attachments and spots under here where this isn't gonna lay flush. So you wanna find a space in here that's wide enough for that to lay down perfectly flat. And as we get back here toward the tailgate, there's a little pocket right back here that we can get it into. I'm trying to set this up for the maximum crossbar spread. So I want this bar to be as close to the tailgate as I can get it, and it's looking like this area right here is where it's gonna need to go. So I'm gonna take my tower here, I'm gonna get it down in place to where I would like it to be. It's gonna be close to this area here. And I'm just gonna get that clamp back underneath. Now, with it underneath like that, I can look through this slot and I can see right down in there and get that bolt hole that's at the top of my clamp. So I'm gonna take one of my bolts, along with a washer, and I'm gonna drop that in. And I am, just to start, I'm just gonna get that threaded and get it started. I don't want to tighten it completely just yet. I want to make sure that these are slightly maneuverable. Reason being, we really need to guarantee that these towers are directly across from each other. So we don't end up with our crossbar being wonky or offset or anything like that. We wanna make sure that we're carrying safely as we go. So I'm gonna get this kind of snug down a bit before moving on to my other clamp, which is gonna go into this slot right here. So now with both my bolts set, remember we didn't tighten them down all the way. We've got it to where we can maneuver it a bit forward and a bit back with these big slotted bolt holes. Again, I'm trying to get this to the maximum crossbar spread that I can. So I wanna move this one all the way back to the end of that. And because I don't really like having my bolt so close together, this front one, I've got more room to maneuver. I'm gonna slide that all the way to the front and just get a good, you know, spread on the grab for that right there. I just think it's gonna give us some better support. Once I do that, I'm gonna take the tool that was provided by Thule, and I'm gonna use that to get these tightened down. Now, I do have a suggestion. There are torque specs for every bolt on the Xscape. Different spots have different specs. So what I would do with this tool is just get it tightened down as much as you can. Double-check your instructions to make sure you're in the right spot and get the bolt's torqued down accordingly. (ratchet cranking) Now, when you're preparing your crossbar for installation, you are gonna have some end caps that do need to get installed on either end of the crossbar. However, this open channel on the bottom of it is what's going to feed through this block here up at the top of your tower. So you gotta leave one side open. So we're gonna go ahead and install the end cap on this end, feed it across our towers before installing the other end. So we're gonna take one of our end caps. We have right here. You're gonna find these short bolts and these little clips in your kit as well. And what you'll need to do is take one of these clips, and there's kind of a more protruding end here. We're gonna make sure that that protruding end is down here in this cavity. So we're just gonna slip this over, just like this, and just kinda work it on. It's gonna be pretty snug. There we go. Just pop that into place, just like that. Now, we have a place for our bolt to thread through. We're gonna come over here to the end. I'm just gonna slide that right in. Take one of our bolts, we'll drop that into place. And then using that tool from Thule, we're gonna use that to get this tightened down. Now, if you plan on using your weather stripping, and when it comes to a ladder rack, a lot of people opt to not use it simply because the weather stripping is gonna cut down from noise going across this open channel as you're driving. However, it doesn't tend to be as bothersome for people when it's back at the truck bed rather than on, say, a roof rack and you have the windows open and that's right above your head or coming through your sunroof. It's a lot noisier then. But the way that you would put this in, if you did opt to use it, would be to just basically depress it down into this channel as you go along. And I would do this before putting on your other end cap anyway because you do need to lift it off before you get that down. But the reason I'd say do it before you pop that other end cap on is 'cause as you notice, it's a lot longer than the bar itself. You would want to trim this off right here. If you we inchesre gonna use it, I'd keep this excess handy. The thing is, is if you're using T-slot accessories with a single piece of weather strip like this, depending on where your setup is, you're gonna want to cut this, you know, into segments so you can remove pieces of it to put in a T-slot accessory and then fill in the gaps around it. It's a big reason why when it comes to ladder racks, most people don't end up using the weather stripping because they've got load stops and things like that that they like to be able to adjust on the fly. But if you wanted to use your weather strip, that's how you do it. You just press it down into the channel the whole length, take a scissor or a knife at the end, and cut off the excess. So now it's gonna be time to get our crossbar loaded up onto our support towers here. Now, one of the things that I would definitely do is just to double-check that these are directly across from each other. Pick an anchor point somewhere along the rail, maybe this notch, the end of the rail, the end of the stake pocket, and do a measurement with your tower in the back here. Just double-check that that measurement is the same on both sides of the vehicle. That way we can make sure this bar goes perfectly straight across. But what I'm gonna do is using this T-track that's on the bottom is I'm just gonna feed that up here and feed that block through it. We're gonna continue that over to the other side and get that fed through as well. Now, I should mention this too. When it comes to the height adjustment on the Xscape, I find it a lot easier to make those height adjustments without the bar on it. So if you did plan on using a different height other than the lowest that we have it now, I would do that height adjustment first and then feed the bar through. Reason being is that it's not, once this is on and bolted on and attached really good, it's not as simple as just loosening this up and raising it up and down, and that's because these towers come slanted in. This has to be able to adjust if we move this up to be able to slide closer in as well. It's just not a really easy thing to do if you're by yourself, especially having one side pop up higher and then getting the other side to go while keeping everything in track could be a little bit restrictive. I would honestly remove the bar, do my adjustments, and then reinstall the bar. But if you're good with the height that you're at or whatever height you put it at, once you get the bar on, the next thing you want to do is just grab your measuring tape, and we're gonna take a measurement of how much of the bar is overhanging. What we want to do is make sure that it's going to be the same on both the passenger and the driver's side. So we'll take a measurement, we'll do the other side as well, and we'll just make any adjustments that we need accordingly. Now, I don't have the end cap on the driver's side yet, so I'm just taking my measurement to the end of the bar itself minus the end cap. So I've got my overhang matched up on both the driver and passenger's side. Next thing I'm gonna do is tighten my crossbar down onto my towers here to keep them in place. So I'm gonna use that ratcheting tool from Thule again. And each of my towers has a bolt on either side of it that's gonna tighten this down. If you remember that plate that we slid into the T-slot, that's what's gonna be tightened down. So we're just gonna go ahead and get this tightened up, and I'm gonna do that on all four. Again, there is a torque spec for this as well. So once you get it hand tightened down where you can, go back with your torque wrench and just double-check that. And the last thing that we need to make sure of is that these bolts here that do the height adjustment, those need to be tightened down as well. So same tool, go ahead and get those tightened up. (ratchet cranking) Not that I think it'll like pop up or drop on you, but if it's loose, it rattles quite a bit and it's gonna make for a pretty noisy ride on top of, you know, the fact that it's just more secure and have everything tightened down. But once you get those tightened down really well, those also have another torque spec. So pay attention to that in the instructions. But you should be able to give this a really good shake. Yeah, I got the bed and the truck is moving. Nothing else really. So once all my bolts are double-checked and torqued, the last thing I'm gonna do is put on that other end cap right there, and we're essentially done with our installation. After this, we can get all loaded up, head out on our adventure. So that was really it for the installation. Like I said, it's something that you could do on your own. Not terribly difficult. The parts are pretty lightweight and you could generally do it as long as you have a measuring tape at home to make sure everything's even, should have no issues installing it at all. One of the things that I will say though, when it comes to the fit on the Colorado, like I had mentioned that the top of our bar comes pretty flush with the top of the cab here in the back. As we move forward, it's gonna be sitting lower than that. So if you've got something that needs to extend out over the cab, make sure you lift this up one or two notches. The increments are 1.4 inches for each notch, so you can get some pretty good adjustment out of that. The other thing to keep in mind is sometimes people with trucks like this are gonna get a roof rack on there as well, just give you extra load support going all the way across. If you have a roof rack up there, my suggestion would be you adjust these to the same height as the rack. That way anything longer that you got is gonna have that extra support going over the cab. But generally speaking, this is actually one of the easier ladder rack installs that I've done on a truck here at etrailer. So I would definitely recommend this roof rack, especially with the adjustability. The adjustability in the load capacity and the ease of installation kind of make this a no-brainer for me. But if you still have questions about the Thule Xscape, go ahead and leave those in the comments below. We would love to answer any questions for you. it'll just help you and other neighbors just like you to make the best decision for yourself. Once again, this is Curt with etrailer. Thanks for stopping by.
Info for this part was:
At etrailer we provide the best information available about the products we sell. We take the quality of our information seriously so that you can get the right part the first time. Let us know if anything is missing or if you have any questions.


Thank you! Your comment has been submitted successfully. You should be able to view your question/comment here within a few days.
Error submitting comment. Please try again momentarily.