
To see if this custom-fit item will work for you please tell us what vehicle you'll use it with.


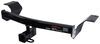
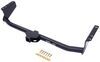
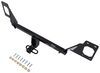
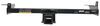
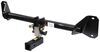
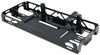
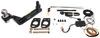
This custom-fit trailer hitch with a hidden cross tube installs behind your vehicle's rear bumper, leaving only the receiver visible beneath it. Aluminum and steel alloy construction is durable and eco-friendly. Powder coat finish resists rust.
Features:
Specs:
The EcoHitch Hidden trailer hitch is designed to be as inconspicuous as possible. The hitch's cross tube bolts onto your vehicle's frame, behind your rear bumper. No drilling or welding is required. Once the hitch is installed, only the receiver will be visible beneath your bumper. This means that your vehicle can maintain its stylish, from-the-factory look, and you won't have to do any major modifications to its body or frame.
With a combination of aerospace-grade aluminum, steel, and stainless steel, each EcoHitch is made of a strong metal alloy that will withstand the test of time. The lightweight alloy is composed of recycled materials. Traditional steel hitch manufacturing can use coal or oil, which can contribute to harmful gas emissions. The EcoHitch's recycled materials limit the carbon footprint during manufacturing, so you get a sturdy trailer hitch while also helping the environment.
This EcoHitch trailer hitch is tested for durability and sturdiness. Using Finite Elemental Analysis (FEA), individual points of stress on the hitch can be detected and remedied. Designers can accurately test the hitch to ensure that it will meet or exceed SAE J684 standards. The EcoHitch Hidden trailer hitch is carefully researched and strength tested for a durable, high-quality hitch that can resist damage while on the road.
At etrailer.com we're committed to the products we sell, and to our customers. Our experienced and knowledgeable staff are available via both phone and email to address your questions and concerns for the lifetime of your hitch. The technicians at etrailer perform hitch installations on a daily basis, making them a valuable resource for do-it-yourselfers. The one-on-one, personal service you'll receive comes straight from an expert in the towing and automotive field. We've installed it, we've wired it and we've towed with it, so whatever your question, we can answer it.
California residents: click here

GREAT Hitch: VERY challenging install.
The hitch is very well designed and manufactured. I really like that's it's stainless-steel so it doesn't rust. It looks great and is barely noticeable on my 2025 Ioniq 5. It bolts directly to the frame. However, getting to the frame is a BIG task. The problem is not with the hitch design; it is a function of how the Ioniq 5 is put together. The hitch manufacturer provides installation instructions and has a video on their company website showing the installation on a 2025 Ioniq 5. They also provide great customer support which was critical in me getting this hitch installed. (etrailer has no installation experience or videos on this hitch yet).
To install the hitch, the entire rear bumper assembly has to be removed. This requires removing wheel well trim and taillights, unclipping the rear bumper assembly from the quarter panels (This was by far the most difficult task), unplugging some electrical connections, removing a frame cross-member, and finally, bolting the hitch to the frame. The lower bumper assembly has to have a 2-3/4" x 4-1/2" notch cut out of it to accommodate the hitch receiver before you reassemble everything.
I'm pretty skilled and experienced in removing body panels and have a number of tools that are designed for this purpose, but this was by far the most challenging project I've encountered. Brute force can cause you to break clips that hold the panels together, so I proceeded with great caution and relied heavily on help from Matt/customer support from the hitch manufacturer.
My advice is to have the hitch professionally installed. If you are adventurous and want to install it yourself, first watch the video on the hitch manufacturers website so you know what you are getting yourself into.
These are fantastic hitches, had one on our 23 Ioniq 5 that looked brand new until the car was totaled. Took me about 2 hours to install, could probably do faster now that I remember how the bumper comes off. Not the easiest install, but the quality is worth it
This is the 4th hitch I have ordered from this company. They are the BEST. Fast delivery, good prices and great customer support.
The hitch arrived promptly. I had it installed by professionals who said it fit perfectly and they ran into no problems installing. I found it more expensive than expected. I don’t really think the cost was justified. Other than that I look forward to putting it to use.
Product is sturdy and very well hidden as advertised. Packing in box was poor, with metal ends sticking out on both sides, though there was no damage.
Do you have a question about this Trailer Hitch?
Info for this part was:
At etrailer we provide the best information available about the products we sell. We take the quality of our information seriously so that you can get the right part the first time. Let us know if anything is missing or if you have any questions.


Thank you! Your comment has been submitted successfully. You should be able to view your question/comment here within a few days.
Error submitting comment. Please try again momentarily.