

To see if this custom-fit item will work for you please tell us what vehicle you'll use it with.

Thank you! Your comment has been submitted successfully. You should be able to view your question/comment here within a few days.
Error submitting comment. Please try again momentarily.
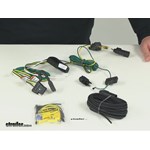
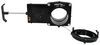
Quickly and easily install a 4-way trailer connector on your Ford Transit T350 with this custom wiring harness. T-One connector plugs directly into existing wiring. Powered ModuLite reduces strain on wiring system.
Features:
Specs:
Installation
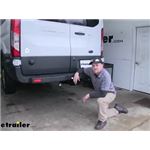
This custom-fit T-One connector plugs into your vehicle's wiring harness, which is located behind the driver's-side and passenger's-side tail lights. You will have to remove the tail light assemblies to access this harness.
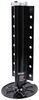
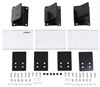
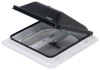
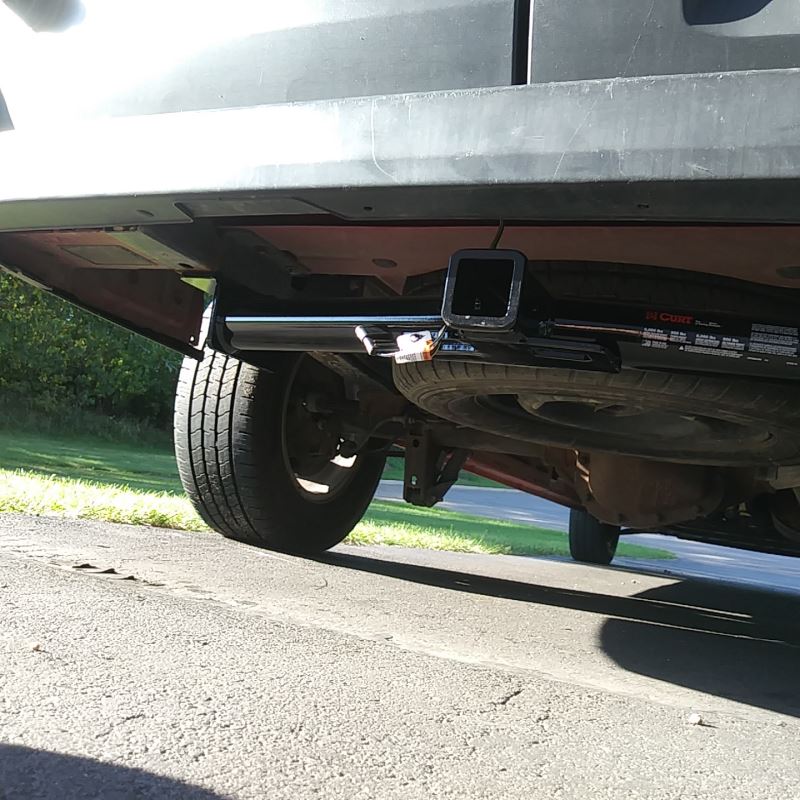
Once you've plugged in the T-connector, run the hot lead up to your car battery. Connect the lead to the included fuse holder, and then connect the fuse holder to the positive terminal on your battery and insert the provided fuse.Once installation is complete, the 4-way flat connector will be stowed beneath your vehicle, near the trailer hitch. A mounting bracket (sold separately) is recommended to keep the connector secure.
It is recommended that you use a small amount of grease on all electrical connections - the plugs on your automobile and the 4-pole connector itself - to help prevent corrosion.
A ModuLite power module is built into this T-One connector. Because most trailers run on a two-wire system - wherein the brake and turn signals are carried on one wire - the separate brake and turn signals from your vehicle's three-wire system need to be combined so they are compatible with the wiring system of your trailer. This power module functions as a tail light converter to combine the brake and turn signal functions of your automobile so that they run on one wire to properly activate your trailer's tail lights. Note: This will not affect how the tail lights on your vehicle operate.
With a ModuLite, your trailer's lights will be powered without overloading your vehicle's electrical system. Because the module draws power directly from your car's battery and bypasses the electrical routes that are used by a basic wiring harness, there is virtually no draw on your tail light circuits.

California residents: click here
Videos are provided as a guide only. Refer to manufacturer installation instructions and specs for complete information.
Ryan: Hey, everybody. Ryan here at etrailer.com. Today on our 2016 Ford Transit-350, we're going to be taking a look at and showing you how to install the Tekonsha T-One Vehicle Wiring Harness with a 4-Pole Flat Trailer Connector. Now this vehicle wiring harness is going to allow your trailer lighting to function properly, so not only are you going to remain safe and legal, giving you that peace of mind, other motorists are also going to appreciate the fact that you're responsible enough to have proper lighting to let them know what you plan on doing while you're going down the road.Now this is going to have a power output for your stop and turn signals of 2.1 amps. For your tail lights, it's going to have a power output of 3.75 amps, so that's going to be plenty of power to run all your basic trailer lighting, if not more. Now it does have a thick and durable dust cap that'll help protect the terminals from the elements.
It can also be used as a hook to secure the wiring itself. Now I would probably recommend a bracket that you can find on etrailer.com that'll help store it closer to the hitch and more out of the way. Now what I really like about these kits is how straightforward and simple they are to install. Let's go ahead and do that together.Let's begin our installation. We're going to have to open up both of our doors and come over here to the driver's side tail light.
Now we're going to remove two T25 Torx bit screws and pull the light out of the housing. Once we have it out, we're going to repeat that same process on the other side; work it around to get it to come out. Once you have it broke free, we're going to disconnect it. To do that, it'll be a single tab right there. You'll push down and pull the two connectors apart.
Then you can slide our light out and just set it off to the side for now.Now before we plug our wiring in, we're going to loosen up our bumper a little bit, because our wiring is actually going to sit behind it. So, we're going to remove these three T25 Torx bit screws. Now we're going to take our new wiring harness. We're going to be working with the yellow wire that has two connectors on the end of it. One of these connectors we'll plug into our factory wiring right here.
Just line it up and you'll push it in, and just pull on it lightly backward to make sure it's fully secured. Now once it is, what we're going do is fish our green wire and our 4-pole wiring here back behind our bumper that we removed the screws from earlier.Now what we're going to do is mount our box. Now I've found that right here in this area is a good spot for that, and it won't interfere with anything. So it's a good idea to get a rag with some rubbing alcohol and just clean that area down, as well as the back of our box. And we can take the included two-sided sticky tape and stick it to our box, peel the other back off. Now what I'm actually going to do is also use a self-tapping screw that's included to help keep it extra secure. At the same time, I'm going to put our ground wire, which will be our white wire here with the ring terminal on it, I'm actually going to put it behind it. That way we can use the same screw for two purposes. So that's going to just hold it together.Now we're going to connect our power wire, which will be this short black wire coming out of our box. What we're going to want to do is take the bundle of large black wire that came with our kit, and we're going to strip one end of it back to expose the wire underneath the insulation. And we're going to take a butt connector, that's included again with the kit, and we're going to connect that to the black wire coming out of the box. I did run the long black power wire through the same opening as the other wires we ran down and through the bumper. However, for a little bit more of a clean and secure look, what I'm going to do is actually remove this T25 Torx bit as well, and feed all the wires behind it like this.Now we can plug our taillight back in. Let's take the open end of our new connector and just clip them together. Since everything is connected over here, you can go ahead and pop your tail light back into place and re-secure it with the two Torx bit screws. Now I went ahead and wrapped up our wiring in some electrical tape, and then I put some plastic wire loom over it just for a cleaner look. With all that done, you can then put our bumper screws back in.Now here's where our wiring dropped down from. The 4-pole wiring just ran along here, and I zip-tied it to these factory brackets on our bumper, just right over here, and then just dropped it down right to our hitch. The green wire followed that. When it started coming down to the hitch, I just kept running it straight along, securing it to the brackets with some zip ties, and then I pushed it up into that opening below our taillight, just like it is on the driver's side. All right, so here's where our green wiring came up through. Now that we have it up, we can connect one end to the factory wiring, and then take our other taillight and plug the other connector into it.With our passenger's side all plugged in, we can go ahead and pop our tail light back into place. And I did the same thing over here to the wire on the passenger's side. I just wrapped it up in some electrical tape and some wire loom for a cleaner look and extra protection.Now our black power wire, I went ahead and ran that to the front of our vehicle. What I did was I just brought it along through here and then I actually dropped it inside of our short black frame rail, and just used my hand to push it all the way forward. And here's where it came out. Now I used some zip ties to secure it and ran it along the inside of our frame rail, just using some zip ties to hold it in place. Now you can do it differently, just make sure you avoid any hot or moving parts. Now when I get up by the engine compartment, what I did was I actually used a piece of nylon tubing to drop down from the hood down towards the bottom here. You can use a coat hanger or something else you may have. And now I'm going to go up front in the engine compartment and pull that to pull our power wire up top.Now this is where our power wire came out. Now we're going to have to connect it to this source right here. So to do that, we're just going to strip some of the insulation back, then we're going to grab a butt connector and crimp that on. And we'll grab our fuse holder out of our kit and cut that wire in half here in the middle. And we're going to strip back the insulation on both ends of this as well. Now one end of it we're going to connect to our power wire. And now for the other end, we're going to be putting on this ring terminal. Now we're going to remove this nut. That'll be a 15 millimeter. Take it off.Now I've found that when we just tried to put our ring terminal on over this plastic here on this case, we want it allow our ring terminal to sit flush against the stud. So what I did was I just used a pair of snips and trimmed out a small opening a little bit past our stud and the plastic. That way our ring terminal can sit over it and sit flush like this. So we're going to hold that in place and then put our nut back on. I also had to trim a little piece off of my cover to get it to close properly. Now once we have that done, what we can do is take our included fuse and pop it into the holder. Now I went ahead and taped up our connection point here just for a little added protection, and used a couple zip ties to secure our wiring down.Now with everything hooked up, we'll go ahead and test everything to make sure it's working properly. So we'll hit our brakes, our left turn, our right turn, and finally our running lights. That'll do it for our look at and installation of the Tekonsha T-One Vehicle Wiring Harness on our 2016 Ford Transit-350.
Average Customer Rating: 4.8 out of 5 stars (189 Customer Reviews)
Quickly and easily install a 4-way trailer connector on your vehicle with this custom wiring harness. T-One connector plugs directly into existing wiring. Powered ModuLite reduces strain on wiring system.Lighting kit was very easy to install. I watched the video first, which was very helpful.
Worked great and easy to install for the most part. Running the power wire is the hardest part having to squirm under the transit do often. Lol I did change one thing from the install vid for my 2016 Transit. I connected the power wire to the second terminal so I didn’t have to modify the cover like the video suggests. It just unclips front and back and then snaps back on. See pix.
Couldn’t get any simpler. I am very pleased with the quality of the product. It arrived as expected with all the items. I watched the installation video and went to work. It took approximately 1hr of crawling under the van but it’s well worth it. Only thing I’m missing is the bracket that mounts the 4way to the hitch. I’ll purchase that and be ready to roll!
Everything was as you advertised. Everything went so smooth even the one armed man could do it in his driveway. Both the trailer hitch and the wiring was great. I am going to do camping and am turning the back of my van into a RV. Will be planning on pulling a utility trailer for all my extra needs. The hitch I chose is a little over kill. But better safe than sorry.

Johnny

4/3/2020
GREAT!
Easy plug n play wiring harness with 4 pole connector. Wires were sufficiently long enough to properly secure along the vehicle frame. Kit comes with zip ties to hold and hide wires. We tapped the ground wire to a tie down bolt to the frame and ran the positive wire to the battery. This was a fairly easy install on our 2018 Transit.

King
8/28/2019
Great! We use it to haul our trailer every weekend.

Good kit. Good instructions. Pretty straight forward install. Only problem: the wire that must be run all the way to the engine compartment for battery power was about a foot or two too short! I wouldn’t buy again just for this reason. What a hassle to have to splice in addition wire and heat shrink. Otherwise works fine.

Jenny N.
7/14/2022
Running the power wire to the battery can be challenging depending on the vehicle. We do have a FAQ that can help. Please see the link below.
Helpful Links
I have had to install several hitches for two of my ford transit vans they don’t come with tow packages. I purchased the electrical connectors and hitches from E-trailer and was able to wire up my Vehicles. they had the right part with easy video instructions great company highly recommend E-trailer.
Everything was delivered fast and top quality. The installation was straight forward and fun. Thanks.
Very helpful ordering service. Lots of knowledge. Ford required $260.00 for a flat 4 wire trailer module harness, E-trailer price was around $50.00 including freight. Shipping time was fast.

Frank
2/16/2020
tremendous
The hitch fit as expected, but two holes needed to be tapped in order for the hitch to fit correctly. The wiring harness suggested worked as it should. I am happy with the hitch so far. My only hesitation from 5/5 stars was having to do additional tapping to get it to fit my vehicle. Luckily I had the necessary tools on hand.
Easy install on my Ford Transit 250, the video was very helpful.
I would recommend getting 18 feet of conduit to route the wires under the van (12 volt black), under the bumper, and in between the doors.
running the wire under the van was the most difficult part (only because I had to crawl under the van), but there is easy routing all along the left(driver's side) frame rail into the engine compartment.

Tony M.
7/5/2016
Still going strong, I have taken my van down some nasty forest roads in AK and AZ and nothing has come undone after the washboards, potholes, mud and rocks!
Product arrived quickly and met specifications as advertised.
Everything fit well and was going just as the installation video showed until I got the power cable to the motor (from underneath the van) and realized it was no where near long enough for my 148WB. Needed at least another 5'. Ended up having to remove the drivers taillight again and fished the cable inside the van from there and ran it right to the battery under the seat.

Sierra K.
7/22/2021
Thank you for your review. The wiring has to be installed exactly as the instructions say or there will not be enough wire. Extra wire purchased will have to be cut and spliced in.
No problems with the wiring harness. All the connectors matched with plenty of wire for service loop.
This was exactly what I needed for my full size transit van - Fairly easy install, but needed the power line to be about 3feet longer. Easiest way would be to put on a lift, but local garage did not have enough height to lift, so crawled my way under & attached power line with rubber tubing on every possible rub line. I may have woven the power line through too many attachment points, but never wanted to go back under to fix. I ended up about 2 feet short of my power source at the front, but heat shrunk a attachment to additional wire of same gauge and it works fine. Very pleased with purchase - 4 star due to short wire on the power side, but everything else was simple plug in - routed wires under he back sill plate for clean installation. Oh, suggest you have lots of wire ties available before starting this project.
No problems at all!
The wiring installation went smoothly. After 1 year the wire we installed from the front of the vehicle rusted off where we connected it to etrailer's wiring at the rear. That was because we failed to wrap it with electrical tape. etrailer's wiring continues to work well.
I had a what I would call a sending unit bad with first wiring harness. I talked to two people on the help line. Nothing they suggested helped. A man from technical support called. He had several questions and then diagnosed the problem over the telephone. They immediately sent a new harness. All three people I talked to were very nice, couldn't ask for better service. Trailer hitch and wiring harness all working great.
Easy to install. Videos were great.
Videos included with trailer hitch and wiring setup were spot on. I installed trailer hitch in 30 minutes. Wiring took 1 1/2 hours. I recommend you purchase the wire tester if installing by yourself. Well worth the few bucks to make sure all lights, tail and stop are working. Plan on purchasing super springs next.
Although, I have not had time to install the hitch and wiring harness, your company provided excellent service.
Have owned this kit for a little over a year and haven't had one problem. Installation wasn't very difficult. Running the wire to the front to get power to the unit wasn't a lot of fun but, other than that, everything fit as it should.
I am looking at purchasing a brake controller for the camper I purchased. I will most likely look to etrailer for it as well.
I am reluctant to write this review because I have not used my new trailer receiver yet. What I did wanted to comment on was the amazing customer service that I have received.
I don't know if I can say this but it's is my opinion.. What Crutchfield is to car audio, etrailer Com is to trailers.. I picked out the trail hitch I needed for my van. Then called in and a sails rep promptly help me with the electric components I needed and some other accessories.. Zip bag pow there on my door step.. After watching the how to install video associated with the products I ordered.. I had my trailer hitch installed in 30 minutes.. I still need to install the electric components but the video, and the help I received from the knowledgeable staff at etrailer. Com I'm sure it wi be mind numbing..
I know this sounds like I was paid to write this.. But every once in awhile I come across a company that is the real deal.. Thank you etrailer
Com.. I would definitely recommend your site to family, friends, and most of all the guys I work with.. Who will buy your products.. I will update with pics after I have put my curt trailer hitch to the test
Hitch and wiring kit were received but the shipping box was not in good condition. The metal was sticking out of the box and the wiring kit box was smashed but nothing was damaged inside the wiring kit box. The receiver hitch did suffer some scratches.
The order was shipped out quickly and was a really good value. I will be installing it soon.
Do you have a question about this Custom Fit Vehicle Wiring?
Info for this part was:
At etrailer.com we provide the best information available about the products we sell. We take the quality of our information seriously so that you can get the right part the first time. Let us know if anything is missing or if you have any questions.


Ray
9/5/2021
I havent used it a lot, but dont expect any disappointments from it.