
Curt T-Connector Vehicle Wiring Harness with 4-Pole Flat Trailer Connector


To see if this custom-fit item will work for you please tell us what vehicle you'll use it with.


Thank you! Your comment has been submitted successfully. You should be able to view your question/comment here within a few days.
Error submitting comment. Please try again momentarily.


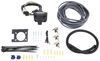
Wiring up a trailer doesn’t need to mean cutting into your factory wiring. The Curt T-Connector Vehicle Wiring Harness with 4-Pole Flat Trailer Connector plugs right into existing connectors for a clean, no-splice install. It’s built as a plug-in harness, so you get the lighting functions you need without altering the vehicle wiring.
The 4-flat connector delivers the basics—running lights, turn signals, and brake lights—so your trailer stays visible and road-legal. It’s the standard style used on small and mid-size trailers, making it easy to hook up and go.
Even if your vehicle didn’t come with a tow package, this harness keeps things straightforward. It connects behind the tail lights and uses the built-in vehicle plugs, so you can add reliable trailer lighting with minimal work and no special tools.
The harness tucks neatly away using its hidden, plug-and-lead layout. That means fewer exposed wires and a factory-style finish once everything is connected. It’s a tidy setup that looks like it came built in from the start.

Videos are provided as a guide only. Refer to manufacturer installation instructions and specs for complete information.
Today on our 2007 Dodge Grand Caravan, we're going to review and install the Curt T-Connector Vehicle Wiring Harness with 4-Pole Flat Trailer Connector, part number C55537. Here's what our 4-pole flat connector is going to look like once it's installed. Four-pole flat connector comes with a nice protective cap that covers the 4-pole flat connector when it's not in use. We'll take it, run it out over the threshold, staying away from the latch because pinching it off in the latch can damage the wire. However, the weather stripping it thick enough that it won't harm it, so we can simply close the rear hatch on it. Then our pole flat connector gets routed down to a hitch accessory.
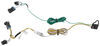
One of the really nice features about our 4-pole flat trailer connector is storing it inside. Keeps it out of the inclement weather and elements outside of the vehicle when it's not in use. Next, let's go ahead and show you how to install it. Here's what our harness looks like when it comes right out of the packaging. The yellow and brown wire connector is going to go on the driver side. The green and white wire harness is going to go to the passenger side.
Our 4-pole flat connector would be down at the hitch. Let's go ahead and show you how to install it. To begin our install, we're going to remove the taillight assemblies. To remove the taillights, we would need to remove the two pushpin fasteners that secure it. Using a flat blade screw driver or we're going to use a trim panel tool, we're going to go underneath the center of the pushpin, pry it out and then remove it completely.
Once our pushpins are out of the way, we can rotate the taillight assembly out of the way from the body of the vehicle, releasing the tab underneath. Next, I'm going to remove the manufacturer's wiring connector on the back of the taillight assembly. To do that, we'll need to release the connector lock which is red tab. I'll slide it over, then press on the connector tab, removing the wiring harness from the taillight assembly. Now with our drivers side down, I'll move over to the passenger side and repeat the same process. Next, we're going to remove the rear threshold.
To do so, we'll just get underneath of it and pop it free. When turned over, we can see the fasteners underneath. Next we're going to fold back on the trim panel on both side. This will allow us access to the manufacturer's wiring that runs out to the taillight assembly. To remove the panel or pull it back far enough to gain access, we'll get behind it. Again, we can use our flat blade screwdriver or trim panel tool, popping the fasteners free. Once we have the panel pulled back, I'm going to go ahead and remove the grommet from the body, opening up a hole that we can run our T-connector through. T-connector will go behind the inside panel and out the manufacturer's hole. So we can run the wire through the grommet, we're going to use a pair of sidecutters, cut a small slice in the grommet, feed our wire through it, and then reinstall the manufacturer's grommet. Now, we can take the Curt T-connector and the manufacturer's wiring and plug them together. Slide our red locking tab in place. Here on the driver side, the taillight is ready to be reinstalled. Take the other side of our T-connector, plug it in to the taillight assembly, lock down our red locking tab, put the taillight back into place. Next we're going to go ahead and route our wiring across the rear threshold. To help hold the wiring, we're going to remove the pushpin fasteners that hold the carpet so we can route our wiring underneath the carpet. Once I have my wiring routed underneath it, I can reinstall the carpeting. Next, we'll take the green and white wire connector and route it behind the panel on the passenger side, repeating the same process that we did on the driver side. Once we've made our T-connection here on the passenger side, we'll take the white wire with the pre-attached ring terminal and ground it to the body of the vehicle. This will create the ground for our 4-pole flat trailer connector. To ground this to the body of the vehicle, we're going to use the self-tapping screw provided with the install kit. Now, in grounding, I also recommend to find an area where the sheet metal doubles up for more secure location. Next, I'm going to take one of the zip-ties provided with the install kit and just secure the wiring together here behind the taillight assembly. Cut off the excess from the zip-tie, get it out of way and clean up our install look. Then reinstall the passenger side taillight assembly. Now with our harness installed, we're going to go ahead and reinstall the interior paneling. Next, I'm going to go ahead and secure the wiring here underneath the threshold, and then install the rear threshold. Make sure the two wires that run through our 4-pole flat connector are approximately the same length. Cut off the excess from the zip-tie, and then reinstall the rear threshold. To test our 4-pole flat trailer connector, we'll go ahead and remove the cap, bring in out test line, putting in the ground clamp on the white wire terminal which is also the ground terminal. Testing the next pin over, which will be the brown wire terminal for the running light circuit. Then the yellow wire terminal be the driver side turn signal, and break. Then the last one would be the passenger side turn signal, and break. Now with the wiring harness installed, we're ready to hit the road. That'll do it for the review and install of the Curt T-Connector 4-Pole Flat Trailer Connection Wiring Harness, part number C55537 on our 2007 Dodge Grand Caravan.
Customer Satisfaction Score:
96% were satisfied with this product
4% of customers were not satisfied
Ratings & Reviews




Heather A.
7/12/2018
It is true that the wires that go to the 4 way plug are not bonded on this wiring harness. If you take a look at the video at around the 5:07 mark our installer runs the wires underneath the trim panel. He then uses a small zip tie to hold the wires together. Then pulls the pigtail up and over from the back of the trim piece. I have attached the link to the video for reference.
Mike E.

3/16/2021
Still working without any problems after a year of weekly use. Great product
Jim
9/12/2023
Everything is working fine
Do you have a question about this Custom Fit Vehicle Wiring?
Info for this part was:
At etrailer we provide the best information available about the products we sell. We take the quality of our information seriously so that you can get the right part the first time. Let us know if anything is missing or if you have any questions.


























Bill R.
9/17/2020
Still works fine - no change from original comments.