
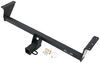
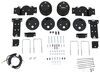
Curt T-Connector Vehicle Wiring Harness with 4-Pole Flat Trailer Connector


To see if this custom-fit item will work for you please tell us what vehicle you'll use it with.
Thank you! Your comment has been submitted successfully. You should be able to view your question/comment here within a few days.
Error submitting comment. Please try again momentarily.


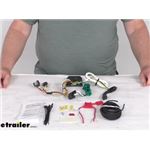
Quickly and easily install a 4-way trailer connector on your vehicle with this custom harness. T-connector plugs directly into existing wiring. Powered converter reduces strain on wiring system and is made using SMT to ensure superior performance.
Features:
Specs:
Installation
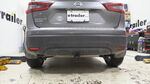
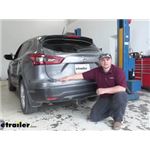
This custom-fit T-connector plugs into your vehicle's wiring harness, which is located behind the driver's-side and passenger's-side tail light housings. Once you've plugged in the T-connector, run the hot lead up to your car battery. Connect the lead to the included fuse holder, and then connect the fuse holder to the positive terminal on your battery.
Once installation is complete, the 4-way connector will be stowed beneath your vehicle, near the trailer hitch. A mounting bracket (sold separately) is recommended to keep the connector secure. It is recommended that you use a small amount of grease on all electrical connections - the plugs on your automobile and the 4-pole connector itself - to help prevent corrosion.
A tail light converter is built into this T-connector. This converter is a circuit-protected, battery-powered unit that bypasses the electrical routes that are used by a basic wiring harness. As a result, there is virtually no draw on your tail light circuits.
Because most trailers run on a two-wire system - wherein the brake and turn signals are carried on one wire - the separate brake and turn signals from your vehicle's three-wire system need to be combined so they are compatible with the wiring system of the trailer. This converter combines the brake and turn signal functions of your automobile so that they run on one wire to properly activate your trailer's tail lights. Note: This will not affect how the tail lights on your vehicle operate.
Curt builds each tail light converter using surface-mount technology (SMT). This method of construction involves soldering electronic components directly to the surface of a printed circuit board. SMT eliminates the need for leads, which are used in older through-hole technology. The result is a circuit board that is smaller yet provides more routing area and that offers superior performance, reliability and durability.
Circuit boards constructed using SMT have been shown to perform better under rough conditions with excessive vibration than those made using the through-hole method. And where would vibration be more likely to occur than in towing applications? Curt converters also produce less heat, leading to increased durability and longer life. In addition, lower levels of resistance ensure better performance, especially for parts that operate at higher frequencies.
Each Curt circuit board is made using high-quality components that are pieced together in the most technologically savvy fashion, leading to greater predictability and reliability in functioning.

California residents: click here
Customer Satisfaction Score:
86% were satisfied with this product
14% of customers were not satisfied
Ratings & Reviews

The wiring to the right taillight is a few inches too short this time compared to the last one I purchased. I will have to add more wire for it to connect properly. Same with the wires going to the black box. They are shorter then the last one. I was at least able to hang that in a different location.

I have not any problems with your product..Thank you for your great customer service and followup!

Dianne

4/13/2023
Just wanted you to know that I am absolutely delighted with my hutch..no issues and just as sturdy as the first day o put it on.Great product and appreciate the follow-up.. and communication. Ps Im a handy woman who installed my own hitch. !
Sent multiple surveys back to etrailer. Thanks for your assistance.
The quality of the product is great however the cables are just too short. I'm and electrician and like to dress my cables and I just couldn't make it work without extending the jumper going to the passenger side light. Add 12" and you have something...
Arrived on time and in perfect condition. Fits my 2022 Rogue Sport SL AWD perfectly and relatively easy to install. Light test at plug shows all A-OK.
Nice kit. Easy to install! Thanks Etrai ler.
I received my order in 3 day not in 6 day thank you very much.
Like your tracking system and prompt sh ipment
Website provided great installation dir ections

Bruce
5/8/2024
The wiring harness for the hitch is not working out. I have brought the car in twice for wiring problems to our Nissan dealer who installed the hitch. They had to detach the wiring harness because it was interfering with the turn signal lights on the car. Two different technicians in separate trip attempted to fix the problem and they were not able to accomplish the task. I have a great hitch but no lights for the trailer. Yes, I supplied the technicians with all the information I had downloaded what was included with the product, and other information that was sent to me.
Couldn’t be made any better. Very easy to install. Very happy with it.
I will be filing a chargeback because no insurance was made on this order which was stolen off my porch.

Katrina D.
8/21/2023
I am sorry to hear that your order has gone missing. Unfortunately we do not cover against theft and highly recommend that you order a replacement and reach out to the local police. You could also file a lost package claim with UPS.
Good service and received on time. As always. Thanks
Great service
Easy product to install
Easy install, was done in under a hour
Do you have a question about this Custom Fit Vehicle Wiring?
Info for this part was:
At etrailer we provide the best information available about the products we sell. We take the quality of our information seriously so that you can get the right part the first time. Let us know if anything is missing or if you have any questions.


Nick S.
11/17/2025
What year Rogue were you installing this in? I can take a look and see if there was something different about that specific year. Is the harness working well for you at least?