


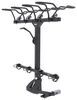
Make emergency repairs anytime, anywhere with this repair stand for your Thule ReVert bike rack. It attaches to the rack so you're always ready just in case something pops up. It also comes with a tray to keep your tools close at hand.
Features:
California residents: click here
Videos are provided as a guide only. Refer to manufacturer installation instructions and specs for complete information.
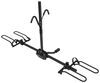
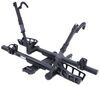
Hi there, it's Evangeline right here at etrailer. Today we're gonna be taking a look and reviewing the Thule bike repair holder for the Thule ReVert bike racks. This is gonna be a very easy to attach accessory that then adds the extra function to your bike rack of making repairs while you're out and about. This is also used by people that don't have a bike repair stand in their garage. Why not just use the bike rack that you may already have on your vehicle So we'll talk about some of its features, how to use it, and later on, I'll also show you how to get it all installed. This carries the bike by the seat post, and I really like how intentional Thule is about the design, where you have rubberized components wherever there's potentially contact with the bike.
You have things like cutouts to accommodate your different saddles. All in all, it does provide a lot of support without taking up a lot of space. As for access to the bike, there's plenty of clearance here. I'm able to fully rotate my pedals. If I needed to check for things along the wheels, I can do that.
There's also a good amount of support in terms of if I needed to like really crank down on a tight bolt or something like that, I would be able to without having to worry about my bike falling off of the holder. This then pushes the bike out to just a spot where it makes it really easy to get to different parts of the bike. A thing that I always look at too is how much movement would there be while I'm really cranking down on things. I'm able to fully rotate the pedals. I have pretty much full access all around the wheel.
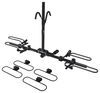
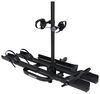
There is a little bit of movement side to side if you're leveraging from the front or the rear wheels. Something that I always struggle with is if ever I need to switch out pedals, things like that, I really have to crank down on them. So having a lot of the support towards the center of the bike is very helpful 'cause then I can really exert the effort and not worry about the bike falling off of the holder. Something they didn't need to add but I'm very grateful for is there's even this magnetic tool tray attached to the base of the holder. So you have four different slots for things like screwdrivers or Allen keys for your tool tray.
That's a magnetic part. A good spot to put things like your 10 millimeter socket so that you hopefully don't lose them as well as any other smaller nuts and bolts that you may be taking off of your bike. Now that little tool tray definitely looks better than my Allen key homemade tool tray, but this is also a good example of how I might, or you might use this bike repair holder, because usually you may have your own tool trays. And, well, a lot of this bike rack just has that square bar that you can still rest those tools on. So the larger items are still accessible and your smaller items are not getting lost. Compared to your bike rack, the holder definitely does sit a lot closer to the ground, which is a good thing because then it is a lot more accessible for you and makes it easier for you to work on your bike. Now just like your bike rack, it also has a 55 pound weight capacity. So on the pretty decently heavy side, which again makes it easier because then you're not lifting your heavier bikes up and onto the rack. So if I'm done doing my repairs, I took the bike off. To store the bike holder away is simply a matter of lifting up on that holder, pushing up until it snaps into place, making sure that that is stowed away. And just like that, you are now ready to load up your bike and drive. Simple as that. If you notice that your bike just maybe has a leak or something you wanna look at real quick after your ride, just bring it back down into position. So pretty nice how easy it is to stow away, but also use when needed. So if you ask me for my personal opinion of this bike repair holder, well, I like it. I like how simple it is, but how it definitely gets the job done, how it doesn't interfere with the job of the bike rack when carrying around your bikes. Even that little tool tray to the side of it is such a helpful extra feature. The only thing I don't like about this is that it's not already included with your Thule ReVert bike rack. It is an add-on accessory that you do have to pay a little bit extra to use with your rack. So if you we inchesre to ask me if ever I was to get a Thule ReVert rack, I would usually get the six-bike version and I would purchase this along with it right off the bat. That way I get the full function of the whole rack because the thing is your bikes will probably need just a little extra repairing when you're out and about. You can also use this just a hose off your bike at the end of a really muddy or dusty ride, and that's pretty helpful before you go off and about your day. So I think it adds a lot in terms of function, and hopefully this video just showed you how it works and if it will work for you. Now if you are curious about how to get it installed, well, stick around. To get your biker repair stand installed, we're gonna go over here to our bike rack. This is best done once your rack is already assembled, especially since you'll need the tools from your rack. If you've lost the tools, you're going to need a 3/4 inch wrench as well as a 5/16th Allen wrench. Use these two to loosen and undo that center bolt completely. And get your repair stand and this is gonna fit into the cover. I'm gonna attach it where I have the curve of the arm facing the vehicle. And then you want that tool tray facing the mast of the bike rack. You're gonna fit that metal bracket over the square bar of the bike rack. Just keep that up. And then there will be a bit of resistance, so just keep pushing away until you get those holes lined up. Now, from our old hardware, we save the two flat washers as well as this nut, but then we're using the new bolt that came with our repair stand. So this bolt and flat washer will go in from the front and push all the way through and secure with another flat washer as well as the nut here in the back. Now you're going to tighten this down to the torque specs that are written in your instructions. Confirm that it works and it fits. Go ahead and lift it up, let it settle into its position, make sure everything is nice and sturdy. And that's how you install your bike repair stand. My name's Evangeline, and I hope this video helped you out.
Ratings & Reviews

A nice little addition to the Revert rack. I was worried about contact with my dropper post but it holds bikes by the seat with just a little pressure on the seatpost via rubber fixtures so it's not a problem. A handy little bike stand for maintenance at the trailhead. Perfect since I will use the rack while camping.
Info for this part was:
At etrailer we provide the best information available about the products we sell. We take the quality of our information seriously so that you can get the right part the first time. Let us know if anything is missing or if you have any questions.


Thank you! Your comment has been submitted successfully. You should be able to view your question/comment here within a few days.
Error submitting comment. Please try again momentarily.