
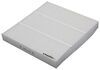
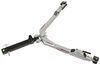
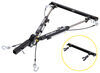
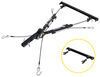
Roadmaster XL Base Plate Kit - Removable Arms


To see if this custom-fit item will work for you please tell us what vehicle you'll use it with.


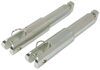
The XL series hidden brackets attach to your vehicle's frame to provide attachment points for your tow bar. The visible portions of the brackets can be removed when you are not towing.
Features:
The square drawbars, or front arms, on the XL series base plate kit are simple to mount and remove, easily securing with hitch pins. Once the drawbars have been removed, the remaining brackets are virtually invisible. On most automobiles, the brackets are mounted within the grille, where they remain not only unseen, but protected from scrapes and scuffs as well.

California residents: click here
Videos are provided as a guide only. Refer to manufacturer installation instructions and specs for complete information.
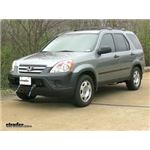
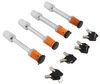
Today on this 2006 Honda CRV, we're going to review and install the Roadmaster XL Base Plate Kit. Part number: 1555-1. All right this is what a bracket looks like when it's installed on our CRV. As you can see here, we got these two brackets that slide into the main bracket that's installed on the vehicle. What's nice about these brackets; when you have your tow-bar off, you can easily remove these guys. There's a little clip right here.
Common everyday pin and clip. Take it out. Remove this assembly, and you don't have all this material hanging out in front of your vehicle when you're not pulling it behind your motor home. Also, the extension cables are detachable, with the quick-link. Now, also you notice here, we have some electrical .. We have inaudible 00:00:50, and a brake-way switch, and this bracket.
Now these parts are not included, with the bracket for the car. And when we're everyday driving, you notice that the bracket is place. Everything stays relatively flush, and makes a very sleek look. And almost looks like it was always a part of a car. Now our MX brackets here will work with all the Roadmaster tow-bars that are out there.
Now all the parts that get attached to the vehicle, as well as the brackets on the outside, are covered with a black-powder coat finish. Now this will provide a great solution to pull your CRV behind your motor home. Plus, when it's not being used behind your motor home, all these attachment points can be removed to make a nice clean look on your vehicle when you're driving down the road. Now I've showed you the features, and how it looks on your vehicle, let's go ahead and show you how we installed it. First step of our install, is we need to open up the hood, and get some fasteners that are underneath the hood. First-off we're going to remove this bolt, using a 10-millimeter socket. Disconnect our battery strap.
Let's loosen that up, and keep it out of the way for now. Next up are a series of plastic fasteners, across the top of the grill here. Release all the plastic rivets, then we'll go ahead and remove those. There's a little slot here to put a small screwdriver into. Pop up the center, and then pull the whole assembly out. Also, sometimes if you're a little stuck, you can use a trim-panel tool, and use that to pop it out as well. Now this whole panel, can come loose, and put this out of the way for now. All right, now let's go ahead and move on to our fender-well here. We're on the driver's side, and there's a bolt up in here, that we got to remove using an eight-millimeter socket. I'm going to remove the same bolt over on the passenger side. Now go ahead and move on down to the bottom of the fender-well, right here. And there's a small Philip's-head screw that we have to remove. I'm using a number two Philip's bit. You can use a screwdriver too, if you need more room you could simply turn the wheel as well. One more time over on the passenger side. Next, let's go ahead and go underneath the front of the vehicle here, where there's another series of fasteners we have to remove. Going all away across the bottom edge. These fasteners are similar to the ones on the top, but they don't have a little edge to put your screwdriver in. But you can put it in this groove that goes all the way around. And then pop out the centers. That one came out pretty easy, but sometimes they're full of dirt when they're at the front of the vehicle. So it may take a little more effort than that. Next up, if your vehicle has fog lights, go ahead and disconnect the electrical behind them. At this point we should be able to take off our entire bumper-cover. So you want to go to the edge of the fender-well right here. Kind of work your hands behind it, and just gently pull it out, from steady pressure. It should pop loose. There it is. You see it's nice and loose. It wouldn't be a bad idea to get an extra set of hands on the other side to do this at the same time. Okay, we'll go ahead and take off our bumper-cover, and put it in a safe spot while we do the rest of our work. All right, next up, a lot of vehicles have an outside air temperature sensor. Located in this area right here. However our vehicle doesn't have it, but if it did there'd be a little plastic bit fitting that goes into the bumper-core here. And you just pop it loose. Now, if our vehicle did have our sensor here, we'd simply unclip it from this spot right here and put it to the side. Once our bracket's installed on the vehicle, we would simply reattach it with some zip-ties. Next up, our bumper-core right here has to be completely removed to make room for a bracket. This will not be reinstalled. To remove the bumper-core, these two bolts here, and here. And one on the inside, you can access from the bottom right here, will have to be removed on the driver side. We're using a 12-millimeter socket for this. Moving over to our passenger side, it's going to be one little bit of a difference. There will be an extra bolt right here that we have to remove. Next we'll go ahead and remove the two same bolts on top. And one on the inside, just like we did on the driver side. Once all our hardware's been removed, we can get this out of our way. Next up, we have to move this horn right here. There's actually one on each side. I had to loosen up with a 12-millimeter socket. We will get these reinstalled after our bracket's been put into place. Now to get our wire loose, we'll squeeze on the clip on the inside here. And just push it out. And you have this whole assembly out of the way while we do our work. We repeat the same process over on the passenger side. All right now, let's go ahead and put some hardware onto our car. We got this brace right here, and this square hole in the back. We'll get this two-inch long by a half-inch carriage bolt. We'll drop that in like this. Now there is a left, and a right-hand-side to these. It's pretty simple to pick out, from just this flat right here, is welded on an angle from this part here. So we just got to make sure it matches with the angle on the inside of the frame. So when it's all said and done, we put it inside. Make sure our bolt drops out a hole at the back. And when it sits okay, this is going to sit completely vertical. Now as you slide this in, you want to keep that flat spot on the bottom frame and try not to knock out that bolt at the same time. Push it in, and let it drop through. This is our driver side. We're going to do it one more time over on the passenger side. One thing to note as we start installing all our hardware, we'll also treat all our bolts with some red Loctite. To this bold, we're going to add this big thick washer, with a cut on it. We're gonna add a lock-washer, and then a half-inch nut. Kind of hard to see, but we'll just put this up in place, with the cut side pointing out of the vehicle. We'll just snug this together, but not tighten it up. That should do. One more time over on the passenger side. Now, let's go ahead and put our bracket into place. So this edge will slide on top of here, on both sides. Now, we'll reinstall the factory bolts on top, with a little bit of Loctite as well. And put those guys into place. We'll do that on both sides. All right now let's go ahead and attach some more hardware. Starting with this hole right here, and our five-eighths bolt. With some Loctite, we're going to put a washer on here. We'll take the spacer, we'll get it started there. Then we'll run it through this bracket. And you have to take another spacer, and put it on the inside. I'm actually using a magnet to help hold it in place for me, while I guide it in. And we'll push the bolt through. So our bolt ran thought, sometimes it can be a little bit on the tight side. We'll take a lock-washer, and install nut. Now out in this gap right here between these two, half-inch carriage bolt. And some Loctite, we'll get it started with another spacer, we'll add a lock-washer and a nut. Same thing in this spot right here. Now we have all our hardware installed on our driver's side, do it one more time on our passenger's side. Once we have all the hardware loosely installed, we'll go ahead and torque, and tighten down the bolts, as described in the instructions. We'll start with the small ones first, then we'll work our way up to the biggest bolts. Now these next bolts will be the half-inch bolts. I'll need to use a three-quarter-inch socket on these guys. Our half-inch bolts here, once again three-quarter-inch socket. All right, now all our hardware is torqued-down. Now go ahead and begin reassembly of our vehicle. Remember the horns we took off earlier We'll go ahead and bolt them back into place. We want to make sure when it's installed that it's out of the way where it doesn't contact anything else. So, doesn't even hurt if you want to bend it back a little bit. That's just fine. We'll do this with both horns, on each side of the vehicle. Now before we put our fascia back on, it's a good idea to run your wiring where your tail-lights, that's going to go to the back, before you put your fascia on. I'm just going to run it behind the headlight here, and down below, I'm just going to leave it in place, so plenty of slack to work with. All right now, let's go ahead and do a quick test of our bumper-cover here. And we'll put it back into place, just temporarily. With our bumper-cover in place, we'll go ahead and look to see where we have to cut. The receiver opening here, we have to remove this bar. And then, to the inside here, there's an attachment point for your safety cables. To make room for that we're going to cut this out, and also these two vertical bars. This is our driver side, we'll have to do the same thing over on the passenger side. Now this is pretty easy material to work with. I'm just going to use some tin-snips to make my cuts, especially on these bigger pieces here. Let us keep scoring across the bottom here at he corner. After a series of test-sits, make sure you have room of our extra accessories, then go ahead and throw on our bumper-cover for good. Okay. Now I can go ahead and reinstall all our fasteners, we're going to work from the bottom, back to the top. Where fasteners we're pulled out, make sure they look like this. We'll push them in. Push in the centers. And that's it. And we'll go ahead and do all the bottom edge first. Put our top-plate back into place, and reinstall all our fasteners. Put in our brace for our battery. One of the last things we need to do, is go ahead and install our safety cables. Put a quick-link onto our tab right here, and pull through. And tighten it up. All right, now these brackets will slide into our main bracket here. Goes right into place. It held in place with a five-eights pin, and a clip. There'll be one for each side. And now our bracket is ready for attachment to your favorite tow-bar. And that will finish it for our Roadmaster XL Base Plate Kit. Part number; 15555-1. On this 2006 Honda CRV.

Easy install, super fast shipping!
Received the base plate today. Thanks for the good service and quick shipment.
Excellant support and service, I recommend both on price and service
Product is in excellent condition and arrived on time. Thank you very much.
You guys are very knowledgeable and quick to respond...thanks, Tom
It worked well
It worked well
Worked as it said, great folks to deal with.
Service was excellent
Won't be installed for a little while. Box was in pretty bad shape but every thing was there and looked fine.
Easy to install directions with pictures were great!
Thank You,
Wayne Wood
Lewiston, Idaho
parts arrived on time,parts fit perfectly and the service is excellent Thank you Bruce
Fast delivery , two day after i called, put them on my jeep in about one hour , they fit perfect very pleased will buy from this company again , very helpful and nice to deal with .
Product was shipped very quickly and it fit.

Fit and works without any problems
Installed is nearly invisible.
Fit vehicle perfectly and works as need ed
Great product. Easy to install. Works perfectly. Thanks.
thanks you were fast ,all parts were there,its on car and were on the road in less than 7 days dam good .
The roadmaster Base Plate kit arrived in good condition and is all
that we hoped for. Extremely well made. Service was good and communication great. We'll order from you again.
I'd share a picture but IS a hidden system. The instruction didn't really apply to my Tahoe but got it on anyway.
The product worked as it was supposed to I highly recommend
Installed as stated, performs excellent .
This is the second time that I have used this identical product number. The first time was 2000 and once again on an identical truck now. It fits as specified and works great.
I received the 3160-A today and was really satisfied with the service.
I have also view the youtube for instalation all I can say is well done.
Earl G. from Ontario, Canada
Info for this part was:
At etrailer we provide the best information available about the products we sell. We take the quality of our information seriously so that you can get the right part the first time. Let us know if anything is missing or if you have any questions.


Thank you! Your comment has been submitted successfully. You should be able to view your question/comment here within a few days.
Error submitting comment. Please try again momentarily.