
Thank you! Your comment has been submitted successfully. You should be able to view your question/comment here within a few days.
Error submitting comment. Please try again momentarily.


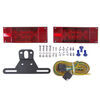
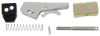
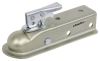
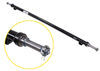
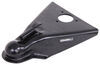
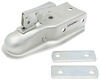
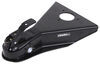
Coupler repair kit contains all needed replacement parts for your etrailer or Ram straight-tongue coupler with a 3,500-lb or 5,000-lb capacity, except for the coupler housing.
Features:
Videos are provided as a guide only. Refer to manufacturer installation instructions and specs for complete information.
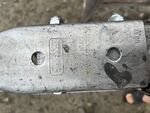
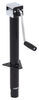
Hi, I'm Matt with etrailer and today, we're gonna be talking about the repair kit for the etrailer and Ram channel tongue couplers. Now, a reason why you might wanna replace this is for a couple reasons. Now, with this sitting out in a lot of different weather conditions, sometimes you're gonna get a lot of debris or water that really get caught up in there. It can really just make it kind of difficult to use sometimes. It might not necessarily be broken, but there is always a chance of that happening because there is a lot of moving components, and rather than replacing your whole coupler, you can just replace this latch, which is gonna be a lot more affordable, and a lot of times, these couplers are gonna be welded on, so it's gonna be a lot of work or you're gonna have to pay someone to get this removed. You'll notice it is a little dingy looking, a lot of that paint has come off, it still works fine, but sometimes it might catch and that's a good reason to replace it, especially if you're working with this on a daily basis.
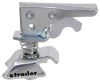
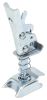
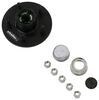
Now, I have the new one in my hand right here and this is still gonna work for your two inch balls, it even has that same embezzling here on the side, let you know so you don't forget, but let's go over all the pieces we have. So if I just undo this real quick, I'm just gonna turn it, it'll loosen up, for the other way, and we'll go over all the pieces. So right here, we're gonna have the actual latch mechanism itself, we're gonna have the large spring that goes on it, and then we're gonna have this base right here, it will sit right on top. Now for the inner components, we're gonna have this smaller spring, we're gonna have this washer, and we're gonna have this kinda nut catch right here, and then we're gonna have the nut, but let's start taking this off and replacing it. So what we're gonna do is lift up on the latch, put it in that up position, what that's doing for us is loosening everything below.
So I can push up on the base and on this little nut catch here. With that out of my way, then I can grab a three quarter socket and wrench, and just start taking that off. (wrench cranking) You might find that you have a lot of resistance, especially if this is an older coupler that might have some rust in here, just kind of take your time with it. Gonna get this off of here. (wrench cranking) Now I can finally remove it.
So once this nut comes off, all I'm really doing is taking off all these individual pieces here at the bottom, putting that off to the side, and then I'm just gonna wiggle a bit, and that's gonna allow me to pull my latch to the top. Now we can grab that new latch, make sure it's in this position all the way straightened out, and we're just gonna drop that through that hole, and make sure it's just sitting in the right position. Now I'm gonna reach down and I'm gonna grab my new spring, put that on, followed by that base. The way this is gonna go on is gonna be at an angle, so trick to this is pushing up on that bolt some so you can get this to sit in there properly. Just like that.
As you can see, the back end is wrapped around this rod right here, and that's what we're looking for. And from here, we're gonna put everything on in the same orientation as we took 'em off. So I'm gonna put on that flat washer with that flat side closest to that little bend we have, then we're gonna grab that little spring washer, put that on too. You want to make sure you're applying constant pressure to this, it's just gonna make that a little bit easier, and that lock nut holder here, and then we'll finish it off with this nut. And once you get that hand threaded on, we'll go back through with the three quarter inch socket wrench and tighten it a little bit more too. (wrench cranking) Just keep tightening until you can't anymore, and right now, we're gonna give it a little test to see how it's fitting. What I'm really looking for is to see how much play we have. Right now, the transition feels pretty smooth, I'm liking the way it feels. It does have a little bit of looseness here at the very top, so I'm probably just gonna tighten that down just a tad bit more. I'm gonna try it again now with this tightened down some more, and right now, this is feeling a lot better, I like that more. So what I suggest doing at this point is just hook it up to one of your balls and just taking it out on a little quick drive, probably around like a parking lot, anything like that just to make sure it's gonna safely latch on, then get out afterwards and check it out to make sure it still looks good, and if it does, then that will complete our look at the installation of the repair kit for your etrailer and Ram couplers.
Ratings & Reviews

Timely shipping.. perfect fit.. who could ask for more?
IT fit perfectly into our old trailer that SOMEBODY ( I ain't naming names ) drove over and broke the old one. I thought about welding the old one but when I saw I could get a brand new one for like 9 $ plus shipping .. and here we are. Sorry about no videos or pics but I am way old school and will not own one of those pocket spy weapons or the apps they run !!! TRUST ME ... I AM NO ONE TRUST NO ONE
Easy to install and perfect fit
Very pleased. The trailer coupling repair kit is sturdier than the original. Now back to work ??

Michael

3/27/2024
Working fine, no problems.

Works great
Didn't work for my trailer tongue repair, but was able to use one piece of it and lock washer to get the tounge repaired
I thought this would take a few minutes to install but I was wrong. Yours was a stronger quality than the one I had. I took the old one off and tried to put yours on but things weren't fitting right. I left the washer with bends in it off and it now fits. No instructions so I figured the washer was included in case it was needed.
Received product quickly and it was the right one. I will use them again
Perfect replacement for my trailer and shipping was super fast.
A perfect, high quality, replacement part at a great price. The shipping is Fast & reasonable as well.
Product was very well represented on the website and fit perfectly.
Great communication pleasure doing busi ness

Gwendolyn Y.
6/17/2025
The new latch looks great on your coupler, Marcellino! How is it treating you so far?
Great price & fast shipping ;)
>Thanks!
Thanks for easy purchase. Was easy to pick out type I needed. When weather warms a little, I will place on trailer.
Excellent service, fantastic delivery time. The coupler repair kit is very well made. I am very happy with it.
Every thing went well from ordering to door step. Installation was easy.
Tricky part to find, but was exactly what I needed. Certainly can't beat the price.

Jim A.
8/22/2018
I had that trailer for 6 months before trading it away, and the part worked great the whole time.
Exact replacement for the original. Good quality.
Good quality, easily installation..
Item was delivered in a quickly. I have yet to install it.

Thomas S.
8/16/2023
Great part, exactly the right fit.
I only used parts of it. Not sure what my old brand was.
Happy
thanks for superb service and a good pr oduct
Great latch
Do you have a question about this Accessories and Part?
Info for this part was:
At etrailer we provide the best information available about the products we sell. We take the quality of our information seriously so that you can get the right part the first time. Let us know if anything is missing or if you have any questions.


John J.
8/8/2023
heh heh heh OK , I got a laugh out of my own review . THANKS FOR THAT and the trailer hitch is still working just dandy since Ive trained the kids not to drive over it anymore ! just so ya KNOW