
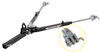
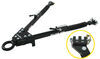
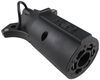
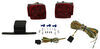
Heavy Duty Magnetic Tow Light Set - Incandescent - 30' Harness
Item # 337TL257M
Our Price: $68.50
Confirmed to Fit
2001 GMC Sierra
1500
2500
3500
Will this fit?
To see if this custom-fit item will work for you please tell us what vehicle you'll use it with.
Thank you! Your comment has been submitted successfully. You should be able to view your question/comment here within a few days.
Error submitting comment. Please try again momentarily.


- All Info
- Reviews (40)
- Q & A (0)
- Videos (2)
- Photos
2001 GMC Sierra - Heavy Duty Magnetic Tow Light Set - Incandescent - 30' Harness
- Removable Tail Light Kit
- Bypasses Vehicle Wiring
- Magnetic Mount
- Universal
- Buyers Products
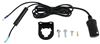
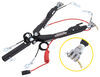
This kit provides your trailer or towed GMC Sierra with the required lighting for towing. Durable rubber-coated housing and polycarbonate lens. Magnetic bases won't scratch your GMC Sierra. Includes wiring harness, hardware, and carrying case.
Features:
- Tow light kit provides required stop, turn, and tail light functions for a trailer or towed vehicle
- Incandescent lights can be seen up to 1 mile away
- Durable rubber coated housing and polycarbonate lens
- Heavy-duty base has magnets for securing lights to your vehicle or trailer
- Lights can be quickly mounted, repositioned, and removed for storage when not in use
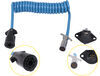
- 30' Wiring harness with 4-pin round plug
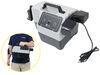
- Carrying case makes it easy to store and transport lights
- DOT approved
Specs:
- Quantity: 2 tow lights
- Light dimensions: 4-1/2" diameter x 3-1/4" thick
- Carrying case dimensions: 14-3/4" long x 10" wide x 4-1/2" deep
TL257M Buyers Products Heavy Duty Towing Light Set


Video of Heavy Duty Magnetic Tow Light Set - Incandescent - 30' Harness


Videos are provided as a guide only. Refer to manufacturer installation instructions and specs for complete information.


Video Transcript for Buyers Products Heavy Duty Magnetic Tow Light Set Review
Hi there flat towers. Today we're gonna be taking a look at buyer's products, magnetic light kit. And this is what our light kit looks like when it's installed. It will adhere to any magnetic surface. So on some vehicles you might be limited. That's why we've got it lower here on our Jeep rather than on the roof, because it won't stick up there.
But this is an acceptable spot. It's right near where the factory lights are. So it's plenty within visible view for people behind you to know your intentions when going down the road. It has nice thick cabling on it. A lot of the cables you see on the magnetic light kits here at E-trailer have just exposed like four pole wiring.
But this is a very thick sheathing over the cabling which makes it feel like this is something that's gonna last a very long time. As long as this cable doesn't fall down and drag on the road for a few miles, I don't see this having any issues for several years of service. And on the bottom of this slide, it does have a felt like material that'll help keep it from causing any scratches or abrasions to your vehicle. And it is a fairly strong magnet if we kinda hold it away and watch it draw in, I mean that's right about a half inch away and I can feel it really pulling towards the vehicle there. So I don't feel like this is something that's gonna be able to fall off or really vibrate going down the road, it feels very secure on the vehicle.
And this kit is an incandescent kit and has a very easy way to remove and replace the bulbs if they do go out. It does kind of, this is the best thing in the world that it's not LED. LEDs typically last significantly longer, usually between five and 10 times longer than an incandescent. It also draws more current than an incandescent. It shouldn't be really putting any strain on your system here since when you plug this in, you're really just powering these lights but it's definitely more efficient to go with an LED version.
But it just kind of depends, LEDs typically are not replaceable. So if you're somebody that's planning on using this for a real long time and you like to do all your own maintenance, this might be the better option for you because you can maintain these. And with these, you do also get 30 feet of cable. So you have plenty of cable for your kind of mid-size vehicles, like our unlimited Jeep here but also for your longer full size trucks, you should have no problem getting those lights from the back all the way up to the front. And you're probably gonna have a little bit excess to work with, which I like too 'cause if any issues we're to occur down the road, you forget something and damage your wiring, slamming into a compartment when storing it or something, with that much extra cable there then you can probably make your own repair without having to buy anything. Just fix the issue that you cause on the wiring. And here at the front, it is a four round connector that is used in this setup here, we'll go ahead and unplug it. It also includes the four round female connector that goes on that side if you need that for your motor home. Now, four round really isn't the most common that you're gonna see on the back of a motor home for like a flat toe setup like this. But I mean, you can get adapters here at E-trailer. You have the connectors, so you can easily hardwire that in. And it does feel like it's all very heavy duty. This is a nice strong metal. There's no plastic ends here, all metal on that side as well. And this cable relief is really nice 'cause that's often the most common place for failure, is where a cable's coming out of the back of a connector, the strain of the weight on it, especially going down the road bouncing, that's where you get failures. With this nice spring mechanism here, that's gonna support the cable. So we don't get that issue recurring, but it still has flex so we can move it around and use it as we need to. So yeah, it's really nice heavy duty cabling. And that is probably the best part I would say of this magnetic light kit is how heavy duty and strong they've made the cables and connectors. Now magnetic lights, I think are a little bit more of a product that is for just some people. Cause the majority of people out there, I would recommend a diode wiring kit. The diode wiring kit is installed on your vehicle and integrates into the vehicle so that way it uses the factory lights to produce all the signals. Now it is a much more involved installation process for a diode wiring kit. With this one, you just simply set it up and plug it in. It's very easy to use, this one. The other one is gonna be more upfront. But once you do that upfront installation on the diode wiring, you simply have to plug in your connector because everything's there. You don't have to get out your wiring, set it up and run it to the front. So it does become easier in the long run but the initial upfront is more difficult. The other issue you run into with a magnetic setup like this is the supplemental breaking system that you're gonna choose to use on your vehicle. There are some such as the stay and play duo and many other of the permanently mounted ones that require tapping into the lighting signals from your motor home. So it can use the brake signals to determine when to appropriately apply the system. But if you're using a portable system that doesn't tap into it or in this case here, this is an air brake loader home, we got an air force 1, it's all run off air pressure. We don't need those signals. So they would work out great in this setup that we're using here. And we set 'em up on our Jeep here today and you can see how we got it set up. They worked out very nice on the Jeep. It was lower than I would like it to be. But since it's so close to the factory lights, it should still be plenty visible for everybody out there to know what's going on. All right, we're gonna begin our installation by getting our connector here wired up. This is the connector that comes in your kit. Now, if you already have a four round connector at the back of your vehicle, you don't need to wire this one in. And if you have an existing seven way or four flat connector, you really don't need to wire this one in either. You could just get an adapter that goes to a four round so you can plug your lights in. We're gonna go ahead and wire it up here and what we're gonna be doing to wire it up is we're actually just gonna go to an adapter ourselves. That goes to a seven way so we can plug it into the existing seven way, but I will show you the wiring here. So if you have a seven way and you want to hard wire it in, I've got those labeled so we can show you on there which wire would go where on your vehicle. Let's get this side mounted up first. There's a small screw located here. We're gonna undo that screw so we can slide out the inner assembly and wire our wires into it. And the four round has all the same functions as a four flat. So it's gonna be the same, all the same wires, just a different shape connector. Once you undo the screw, open up the door and this will slide out that direction. So just push out with your screwdriver there and there we have our connector. So now we're gonna start wiring it in but we need to make sure that you hook all the wires to the correct location of the back. And the labeling's not very well. Doesn't really usually match up with typical four poles. That's why we're gonna show you how to wire it. What I recommend doing here to make sure that you wire it up correctly, this is the plug on the end of your lights that you would plug into your vehicle. We're gonna use this to help us because we have this notch here at the top. So we know that that means it's gonna insert into the plug like this, 'cause the notch goes at the top. We can tell because the inside of there has a notch at the top. We also know that the screw hole is at the bottom on this connector. So when we see our screw hole down there, right there, we're gonna put that at the bottom, away from our notch and plug it in. So now we know we've got it in the correct orientation of how it would sit inside the connector. So then we can wire it up now. So we're gonna go ahead and loosen each one of these up with our Phillip screwdriver here. There's a small screw on the side, and that's what holds the wire in place. It works like a little set screw. So we're just gonna go in the side there and loosen it up. We just need to have it loose enough to be able to poke our wire in. So it's probably far enough and then we're gonna do that with each one so that way we can start inserting our wires. Now that we've got 'em loosened up, we're gonna separate each one of our wires. Now this wiring doesn't come included with your kit. This is what traditional four pole wiring looks like. You got green, yellow, brown, and white. So if you buy some wiring from us here so you can use it, this is typically how it'll come. We wanna separate each one. Looks like they're already split there. If they're not split, you may need to cut in between them to separate them. After you get 'em split, we can peel back a little bit on 'em to separate 'em a little bit further from one another to make 'em easier to work with. And we'll strip back each one of these. All right, so now we can hook our wires into the back of the connector. We're gonna hold the connector in here with that notch towards the top. So we've got a reference point and then the top right one is the one we're gonna start in and that's going to be our green wire. So we're just gonna poke the green wire in there. Make sure you get all your strands in. See, we got one stray little strand there. You can twist them around to help prevent that from happening 'cause that strand could touch another circuit and cause some strange functionality. After we slide it in there, we're just gonna tighten the screw onto the wire. We do wanna make sure it's on the wire and not on the sheathing, 'cause if it's on the sheathing, it will not make a good connection. Below our green wire, we're gonna insert the brown wire. So you can just separate the other two away from it there, slide that one in and then you're gonna tighten that one down. If we just continue going in a circle, inserting all of our wires, the next one is going to be our white one. And then of course that leaves the last one to be our yellow one. Once we get this last one tightened down, we can go ahead and reassemble our connector. All right, so now we've got our wire made here. We can go ahead and slide it into our connector end. So just take the end of your wire, push it through there. And then we can pull this back through. We do need to line the screw hole up with the bottom. So let's see if we can find that there. There's our screw hole, that needs to go down. So that way we can reinstall our screw. And you do need to kind of line it up a little bit. There we go. That looks like we had it pretty close right there. So we can go ahead and reinsert our screw and tighten it down. All right, so we've got our connector end prepared here now. This end of our wiring we would then wanna either wire directly into the vehicle to get all those lighting signals for it, or we would wanna wire it to some sort of adaptor that you can plug into an existing connector that you may already have. So if you have regular four pole flat wiring here, then it'd be as simple as matching up and wiring everything color for color. So you just add your green to your green, yellow, yellow, brown to brown, white to white. If you have a seven way connector, you have more pins here. And the wire colors actually aren't going to necessarily match up. Seven ways can use multiple different wiring color combinations. So it's important that you wire it to the pin, that is for that appropriate function. And I've gone ahead and labeled them. So this is the end that you would insert into the back of your motor home here. So if you we're looking at the cable that you we're gonna insert into the motor home, the top left one here is your brown. Well, it's gonna be for this brown wire. It may not be brown in your seven way but it's the same function. It's taillight, which is your brown wire. We moved one more over from that. That's going to be the left turn signal which on ours is gonna be this yellow wire here. And it may not be yellow on yours. Oftentimes it's red on a lot of these seven poles. If you move another one over, down going in the circle there, that's going to be the ground circuit which is the white wire here and is often still white on the seven way. And then we have to go all the way around, over to this one here over on the side, that's gonna be for our right turn signal, which is the green wire in our assembly here. And it may not be green on yours, a lot of times it's brown on a seven way. But you would just wanna add those colors in. So we'll just hit that one more time. Taillights, brown, left turn, yellow, ground, white, and the opposite side over here is right turn, green. So we're now here at the back of our motor home and we need to get the four way round connector mounted up. It doesn't come with any mounting bracket or anything like that. So you will have to provide your own solution. A lot of times at the back of these motor homes, you could just drill out a hole about an inch and a quarter and you can slide this through and just directly mount it into the material if you want. But if you don't wanna modify your vehicle, you can buy these brackets here. You can get these here at E-trailer. There's actually two brackets we're using here. One of them is this long bracket here on top that uses a clamp to clamp it around your hitch. That way you don't have to modify the vehicle and you can get an ice bracket. The other bracket that we've got located here is actually for a six way connector, but the four way round that comes in this kit also lines up very nicely with this bracket. You can get these both here E-trailer. We're now gonna mount up our connector. So we decided to just wire ours to a four flat so we can plug it into an adapter instead of hardwiring it. But we did show you the steps there. So if you did wanna hard wire it, you can. And if you already have a connector here at the back and all, honestly, I recommend that you just get the adapter rather than wiring in this. This is just nice that it comes with it if you don't have something like this at the back. So we'll just line that up. There you see the holes line up in the bracket, we'll then secure it with the hardware that comes included with the bracket. So just slide the screw through and then put the nut on the other side. We're gonna do the same thing over on the other side of our four round here. And we'll just screw that one in. And then we'll snug 'em down with a 10 millimeter socket. And a lot of times you can just hold the screw as you tighten. It looks like in this case, I'm not gonna be able to, sometimes you can just hold it and just tighten it. If not, then you might need to stick a screwdriver in there and you can tighten it down with a screwdriver in a 10 millimeter ranch or we're gonna be using a 10 millimeter socket here. So at this point now, all that would be left would just be to plug it in and then set our lights on top. Before we plug it in though, I just wanted to show you the couple of features on our lights here before we get 'em set up. So we got the one on the right here. This is what it looks like when it's assembled. So we did remove the snap ring that holds the lens cover in, just pops out of there. And then we can pull our lens and the gasket off to the side. And there, you can see your in candescent bulb inside. So if you need to replace it down the road, maybe five, 10 years down the road, maybe your bulb burns out, you need to replace it. That's how you would get that out of there. And once you've taken care of any maintenance or something, cause you might also want that 'cause maybe bugs are there, they get inside of there. Maybe you're just cleaning it out. So now we're gonna go ahead and reinstall the snap ring. So you can see there, we're gonna get this side in first. And then we got the notch that we can use on this side to help us pop it in over there. And there we go. Our snap ring's back in. It's pretty easy getting it in and out. And that's what holds our lens there and prevents any moisture from getting inside. All right, so now we can go ahead and set 'em up on the vehicle. The one with the single wire going to it is gonna be the passenger, our right side. And the one with the two wires is going to be our driver, our left side. So now we know which light is which. We're gonna just stick 'em in place at any magnetic surface that you've got on the vehicle. On our GP here, we do gotta put 'em down a little bit low, but they are near where the factory lights are. So they should still work out fine for us. Get those set up on each side. And then the remaining wiring that we've got left, we'll need to route towards the front of the vehicle, so we can plug into our connector. And now we're just routing our connector up. We're gonna use this channel here on our Jeep to keep it up off the road there. If you don't have something like that, what you could do is you could route it and pinch it into like one of your weather stripping pieces. Now that could potentially cause moisture to enter in the vehicle. So if you're doing that and it's raining out, I wouldn't recommend that method. You could use cable ties and secure it to door latches, whatever you have available to you, but we're gonna run it up here like this. And then we're actually just gonna use our mirror here to support it. We'll give it a couple loops around the mirror. And then we'll just bring the rest of our cable up towards the front. We'll probably tuck it underneath a wiper blade. Help bring it towards the front. And once we get our connector routed up here to the front, we simply need to plug it in. And then we're ready to operate our lights and verify everything's working properly. You did have to turn the key on. So there is a little beep here, but you can see that we've got our left turn signal, our right turn signal, our tail lamps, and our brake lamps, and all of our signals are working properly. So we are ready to hit the road. And that'll complete our look at buyers magnetic towing light kit..
Customer Satisfaction Score:
95% were satisfied with this product
5% of customers were not satisfied
- etrailer mistake
- Product did not meet expectations
- Too difficult to install
Customer Reviews
Heavy Duty Magnetic Tow Light Set - Incandescent - 30' Harness - 337TL257M
Average Customer Rating: 4.7 out of 5 stars (40 Customer Reviews)
This kit provides your trailer or towed vehicle with the required lighting for towing. Durable rubber-coated housing and polycarbonate lens. Magnetic bases won't scratch your vehicle. Includes wiring harness, hardware, and carrying case.by: David K04/01/2024
Great product, strong and reliable. Very easy to put on and take off of my tow vehicle.


by: Wesley 01/07/2023
2021 Chevrolet Equinox
This product worked great. I am very ha ppy.
by: Kerry 02/24/2024
2021 Buick Encore GX
I'm very pleased with both the products I have purchased and the customer service is exceptional...
by: Lyle E07/05/2023
Very pleased with the products, excellent service that was very prompt.
by: John02/14/2023
I have had many positive experiences with etrailer. They can be trusted.
by: Jake10/22/2021
Took 2 months to get. Back ordered, then damaged in shipping. No update until I reached out. No discount. they really dropped the ball.

Brooke M.
10/25/2021
Thank you for the review! our customer service team should be reaching out to you in the near future.
by: Andrew 08/24/2020
Ford
I opened the box and the first thing I noticed was how sturdy and well built it was. I actually bought this because I have a large cargo basket on the back of my Ford econoline van and I wanted Some lights that I could attach to it when making long distant trips that I could plug into my hitch light adapter. It’s perfect. Would recommend this product in a time people are looking for value for their money. Cheers.
by: David 11/24/2022
Jeep
Works great. Wired it into my Jeep so I can plug it in the back.
Thanks
by: Eric05/17/2023
2008 Chevrolet Silverado
wished it was made with heavy-duty copper not made in china.
by: Glen07/08/2021
Nice wiring and taillight kit - I appreciate that storage container
by: James12/24/2019
Appears to be a quality product, but I'll have to change the male end from a 4-pin to a 6-pin connector to be compatible with my RV.
by: Tom 03/28/2023
Good service and products
by: Paul 01/21/2022
2006 Jeep Wrangler
Exactly what I needed for towing my Jeep Wrangler. A very simple and functional system that comes with a convenient carry case.
by: Donna12/12/2022
Lights would not work, had to fix them
by: David 08/03/2021
Needs to be a four flat or have an adapter to a four flat plug.
by: Larry 04/24/2021
Exactly what I ordered and arrived ahead of time, I'm well pleased.
by: Jeremy 04/03/2024
by: Patti 10/16/2020
Fast delivery and it was exactly what we needed. Thank you
by: John09/15/2018
1999 Honda CR-V
good lites
by: Rick 12/26/2019
great product and super fast shipment.
by: Leroy and Jerald H11/19/2021
2017 Chevrolet Equinox
Excellent, I'm very happy with quality.
by: David 01/20/2022
1997 Chevrolet Cavalier
Exactly what I wanted
by: Susan03/12/2024
by: Wyman12/28/2021
2008 Jeep Wrangler Unlimited
Good quality product
by: Gerald02/25/2022
25
40
Show More Reviews
See what our Experts say about this Buyers Products Tow Bar Wiring
- Is The Buyers Products Heavy Duty Magnetic Tow Light Set # 337TL257M 12 Volt or 24 Volt? The Heavy Duty Magnetic Tow Light Set # 337TL257M is rated for 12 volt use. To use these lights with a trailer connection that is wired for 24 volt power you will need to source a 24 volt DC to 12 volt DC power converter to ensure you do not damage the lights and wiring.
view full answer... - Recommended Flat Towing Light Setup For Easy Installation on 2018 Jeep WranglerAs long as you've installed a tow bar wiring kit on your 2018 Jeep Wrangler that allows your vehicle lights to work in conjunction with the signals from your RV, you won't need to add additional lights when you're flat towing. It sounds like you may not have anything setup on your Jeep yet, so I recommend using the Heavy-Duty Magnetic Tow Light Set - Incandescent - 30' Harness # 337TL257M since it is a completely wireless system that plugs into a 4-way connector on your RV. This is a super...
view full answer... - Are Replacement Lenses Available For Magnetic Tow Lights?The Heavy Duty Magnetic Tow Light Set # 337TL257M, along with all of our magnetic tow lights, do not have replacement lenses available. Your best option is to replace the lights with the Heavy Duty Magnetic Tow Light Set # 337TL257M. These lights include a 30' wiring harness with a 4-pin trailer connector, has light dimensions of 4-1/2" in diameter x 3-1/4" thick, and has a carrying case which makes transporting and storage easier.
view full answer... - How To Add Lights To My Volkswagen Passat While Being Towed On Tow DollyAfter doing research we do not carry nor none of our competitors carry a wiring harness that will control the lights on your 2019 Volkswagen Passat while towing with a tow dolly. You will still have to use your magnetic tow lights like The Heavy Duty Magnetic Tow Light Set # 337TL257M. I like these magnetic lights over the others we carry because the lights can be quickly mounted, repositioned, and removed for storage when not in use. The lights also come with a carrying case which will...
view full answer... - Solution for Needing to Adapt 4-Way Round to 7-WaySince there isn't an adapter available to convert the 4-way to a 7-way your best option would be to cut off the 4-way and wire it to a 7-way connector like part # A7WCB. This way your trailer will not require an adapter and everything would work.
view full answer... - Plug-In Tow Lights For A 2012 Mini CooperInstead of using the Heavy Duty Magnetic Tow Light Set # 337TL257M, which will require a 4 way round connector, I recommend the more common Heavy Duty Magnetic Tow Lights # TL21RK which will utilize a 4-flat trailer connector. If you do not have a 4-flat trailer connector, you can add one with # 119250KIT, which will plug directly into your vehicles factory wiring.
view full answer... - Heavy Duty Magnetic Towing Lights for Flatbed Trailer Towed by 2017 Ford F-350It sounds like you're trying to add some lights to a flat bed trailer being towed by a 2017 Ford F-350. If your 2017 Ford F-350 has a 4 way round pin plug installed (or you're willing to do some wiring), you can use the Heavy Duty Magnetic Tow Lights # 337TL257M which comes with a 4 way round pin plug and socket to install on your vehicle. With that being said, I have a solution for you that won't require any additional wiring work. I recommend using the Heavy Duty Magnetic Tow Lights...
view full answer... - Connecting Magnetic Tow Bar Lights With 4-Way to Motorhome With 7-WayWe have some options for you to connect magnetic tow bar lights to a motorhome connector (which should be a standard RV 7-way), though there isn't an adapter to go from the 4-round on the Heavy Duty Magnetic Tow Light Set # 337TL257M. While you could do some cutting and splicing to get it to work, the much easier option is to go with a magnetic light set with a 4-flat, the Roadmaster Standard Magnetic Tow Lights # RM-2120. There is an adapter that will go from a 4-flat to a 7-way, so...
view full answer... - Connecting Magnetic Tow Lights with a 4-way Connector to a Motorhome with a 7-way ConnectionWhile we do have some 7-way to 4-way adapters, they are all for 4-way flat and not 4-way round. We do not have an adapter that goes from a 7-way to 4-way round. While I am sure there could be come modifications made that will allow you to use the Heavy Duty Magnetic Tow Light Set # 337TL257M, it will be a lot easier to use the Roadmaster Standard Magnetic Tow Lights # RM-2120. The Roadmaster Standard Magnetic Tow Lights # RM-2120 uses a 4-way flat connection, which is a lot more common...
view full answer... - Can You Use the Buyers Heavy Duty Magnetic Tow Light Set 337TL257M with a 7-Way ConnectorI do have an option for you but if you wish to use the Heavy Duty Magnetic Tow Light Set part # 337TL257M you'll need to remove the seven way blade style trailer connector on the tow vehicle and install the included four way round as we don't offer any adapter for this. That said, if you don't want to splice you can use the Roadmaster Standard Magnetic Tow Lights part # RM-2120 with an adapter like the Pollak 7 Pole to 4 Way Connector Adapter part # PK12716.
view full answer... - Availability of Adapter to Go from 4-Pole Round on Trailer to 4-Pole Flat on VehicleI do have a couple options for you, but there isn't an adapter to go from a male (trailer end) 4-pole round to a female (vehicle) 4-pole flat or even a 7-way. So, you could either make your own adapter using part # PK11410 and # HM38138, if you do not want to modify the harness on your magnetic trailer lights, or you could simply replace the 4-pin round connector on them with part # HMC20031, which is going to be the most cost effective.
view full answer... - Why Do the Yellow Lights On the Split Lens Magnetic Towing Lights SPL30B-6 Come On With the BrakesThe Split Lens Magnetic Towing Taillights part # SPL30B-6 are designed for separate wiring systems in which the brake and turn signal circuits are on separate wires. The wiring system you have is combined which means the brake and turn signal circuits are on the same wire. This is what is causing the turn signal bulb to illuminate when the brakes are pressed. The 6 to 7-pole adapter you are using is not really designed to fix this. The easiest option for you will be to switch to a set...
view full answer... - Tow Bar Wiring that Bypasses Vehicle Wiring on a 2015 Jeep Grand CherokeeThe bulb and socket kit # RM-155-2 is not one of the tow bar lighting systems that is recommended for your 2015 Jeep Grand Cherokee (it doesn't fit) so I do not recommend using it. For another option that bypasses the vehicle wiring you can use a magnetic light kit such as # RM-2120 We also have wireless options # 337TL257M and # LIW-LDTL.
view full answer... - Parts Needed for Flat Towing a 2011 Lincoln MKXIn order to flat tow your 2011 Lincoln MKX you will need the following parts: base plates, tow bar, safety cables, lights, supplemental braking and rise/drop adapter; I have listed these parts below for you to have a look at. Base Plates- Blue Ox Base Plates w/ Removable Arms # BX2625 Tow Bar- Blue Ox Alpha 2 # BX7380 (comes with safety cables integrated) Supplemental Braking - Blue Ox Patriot Portable Braking System # BLU37TR Lights- Heavy Duty Magnetic Tow Light Set # 337TL257M64 I...
view full answer... - Parts Needed to Flat Tow a 2010 Ford Explorer Sport Trac 4x4 Behind a Motor HomeWe have all of the parts you are looking for to flat tow your 2010 Ford Explorer Sport Trac 4x4, however, I did some research on your vehicle and it looks like you may need a Neutral Tow Kit from Ford to complete the flat tow setup for your Sport Trac. I recommend checking your owners manual or contacting Ford for any specific procedures or restrictions on flat towing your vehicle. For a base plate kit, you can use the Demco base plate kit, # DM9518199. They're really concealed and there's...
view full answer... - Additional Components Needed to Flat Tow 2014 Subaru XV Crosstrek with Roadmaster Sterling Tow BarThe five basic components required for flat towing are a tow bar, safety cables, wiring or lighting, base plates for the towed vehicle and a supplementary braking system. All of these items are explained in detail in the linked article. Some vehicles will require specific preparation steps to make them ready for towing and some even require addition of items such as a transmission lube pump so it is important to check the owner's manual for your 2014 Subaru XV Crosstrek. You'll want to...
view full answer... - Flat Towing Setup for 2014 Chevy Sonic LS For Use With Demco Excali-Bar Tow BarIt sounds like you're already aware that you'll need a couple of parts in addition to your base plates to complete your flat towing setup-the good news is that your Excali-Bar comes with integrated safety cables and a built in rise/drop to minimize the need for a high/low adapter. In addition to the base plates, like you mentioned, you'll need a supplemental braking solution and lights/wiring for your flat towed vehicle. In order to use your Demco Excali-Bar # DM9511013 Tow Bar, you'll...
view full answer... - Can 2020 Subaru Crosstrek With Manual Transmission be Flat Towed and Parts NeededAccording to the owner's manual I looked up online, your 2020 Subaru Crosstrek with manual transmission can indeed be flat towed. In regards to the parts, they aren't additions, they are necessary in order to safely tow, and for things like a supplemental braking system, the law in most states. Flat towing can be costly, but these parts are important in order to ensure everyone's safety. I will recommend the most cost-effective parts for your 2020 Subaru Crosstrek's flat-towing set up...
view full answer...
Do you have a question about this Tow Bar Wiring?
Info for this part was:

Expert Research:
Jameson C

Video Edited:
Jacob T

Installed by:
Kathleen M

Installed by:
David F

Video by:
Chris R

Edited by:
Daron K

Written by:
Brian T
At etrailer.com we provide the best information available about the products we sell. We take the quality of our information seriously so that you can get the right part the first time. Let us know if anything is missing or if you have any questions.
Wesley
1/30/2024
Still fine