Customers compare ETBC7 to these similar products
Products Featured in this Video
Today on this 1999 Dodge 1500 Pickup, we are going to install part number 90185 Prodigy Brake controller. We are also going to install this T-1 harness part number 118329 from Tow Ready and we are going to install this brake controller also with part number ETBC7. First off we are going to start off installing the part of the T-1 wiring harness part number 118329. We need to do that so our ETBC7 has a 4-pole to plug into. The connection points are underneath the tail light over here. What we are going to do is push the button on top and pull down the bottom and it will come apart. And we are working on the passenger side. On the passenger side we will install the connector with the green wire. All right, we will go ahead and route our 4-pole wire over to the center and then we will run our yellow wire, run that over past the center to the driver side tail light and we will make the same connection underneath the driver side tail light.
Okay we will go ahead and just tie up our wires now. Make it nice and neat. Run it down the 4-pole to the hitch temporarily. We need to mount our 7-pole. There is not really much of a flat spot on a bumper really to work with so what we are going to do is actually add our own bracket to the hitch itself and it is going to mount on right here. This is part number 118136. It has got a close tolerance here because our bracket for the 7-pole is going to meet up right here. We are actually going to attach the 7-pole bracket to this connecting bracket. That will go to the hitch first and then we will put everything up at one time. Attach to the hitch basically with a close clamp. Once you get it started, go ahead and fold the screw back down into place. Now we can go ahead and install our 7-pole onto the 7-pole bracket. All right, next we will go ahead and connect our 4-pole up. Originally we would install previously and we will just run that to the 4-pole that is connected to the ETBC7.
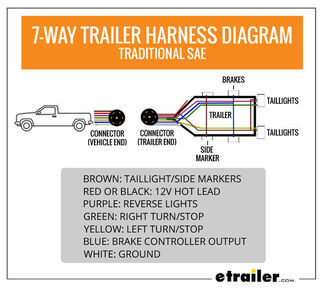
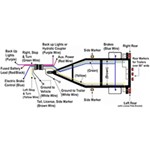
Put a little bit of dielectric grease on there to help protect it. Okay we will go ahead and wrap some tape on there since this will be pretty much a permanent install at this point. Then we will run a zip tie around it to make sure it never comes apart. We will go ahead and run the rest of our wires over the hitch and put a few lips of tape around it to keep everything together. We will go ahead and get our gray wire ready to hook up to the 7-pole harness. We will run our gray cable over top of the hitch and back down to our hook connectors right here. And we are going to do it like this. We are going to hook our black to black and we will hook blue to white. When we go up to the brake controller this white wire is going to go back to blue. All right we will go ahead and take those connections up. We will go ahead and take our wires and cover them up with loom material. We have got the loom installed on our wiring. Again we will just zip tie it some place. This purple wire right here can be ran to the reverse light if the trailer needs it. In this case it will not need to be installed so we will just leave it here in case it needs to be added on at a future point. Okay and all that leaves us left is our ground wire right here. It has a pretty big eye loop here on it already. You can actually cut it off and use one of the smaller eyelets that comes with the ETBC7 kit. And now you are going to start running your gray cable up to your front of the vehicle. Basically the main thing you want to make sure of is that you do not hit anything that is moving or gets hot.
Okay, we will take our cable and pull it on out. This is where it gets a little bit confusing. What we are going to do is run our wire like I said we are going to put our circuit breaker right here. We will just kind of lay out the wire how we are going to route it. Leave a little bit extra length and then we are going to cut it. The wire after we cut it is going to be used to go between the brake controller and the battery itself. This actually has part of a tow package on there so we actually will not be doing it on this one. But a lot of people get confused and do it with extra wire. Next what we are going to do is strip our wire back where we are going to go to our circuit breaker. All right, lets go ahead and pull out our wire. Go ahead and install our circuit breaker and for our hot lead we are going to use a 40 inch circuit breaker. We are going to take our wire and we are going to connect it to our auxiliary post. And the other half of the wire is going to go from copper side going out to the battery. That is going to hook up to our battery. Go ahead and put a ring terminal on here. But we are not going to hook it up. One of the last things we are going to do is hook up to the battery. We can put a couple of zip ties on there. One or two to keep it out of the way for now. Then we will start running our white wire to the inside of the vehicle. To run our white wire back inside to where the brake controller is going to be inside the cab, there is that rubber grommet on the firewall right here. I do not know if you can see it or not that we just stuck a screwdriver right through it and made our own little hole. We are going to take our white wire and just run it right straight through.
The only thing that is left now is to make the connection for our brake controller underneath. And like I said, we are going to have to use that port there for our tow package. We are going to use that the most of our connections and for our white wire we are just going to tap off the blue wire and come up the brake controller. All right, lets go ahead and start connecting our wires. We will be using our butt connectors to do the job. Next you want to take a moment to find a good place to put your brake controller at. This is a nice flat spot right here where we can just bolt our brake controller on. About in that general area right there. Make sure you have it level. You do not want it to have it crooked or like that. You want to have it as straight as possible. And once you find your location you can just install your bracket and we will hook up the brake controller. All right now go ahead and just install the brake controller. Get the screws started on both sides. So at this point lets go ahead and take our power cable and we will just go ahead and zip tie it up safe and out of the way. To make our connection we are going to go ahead and disconnect our ground so we do not shock ourselves on accident by touching a piece of metal with the positive terminal. All right, now we can move on to the positive terminal. Okay put on our ring terminal. Reinstall the nut. Put it all back together on the battery. With our tester hooked up to it we can see if it received our connections so we know if our brake controller is working fine towards the connection. So this brake controller checks out just fine. All right, and there we have it for our install part number 90185 from Tekonsha and ETBC7 kit from Etrailer.com.
Info for these parts were:
At etrailer.com we provide the best information available about the products we sell. We take the quality of our information seriously so that you can get the right part the first time.