
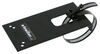
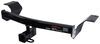
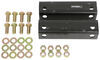
Curt Trailer Hitch Receiver - Custom Fit - Class III - 2"


To see if this custom-fit item will work for you please tell us what vehicle you'll use it with.
This fully welded trailer hitch receiver bolts onto your vehicle's frame with no welding required. Powder coated steel is sturdy and corrosion resistant.
Features:
Specs:
At etrailer.com we're committed to the products we sell, and to our customers. Our experienced and knowledgeable staff are available via both phone and email to address your questions and concerns for the lifetime of your hitch. The technicians at etrailer perform hitch installations on a daily basis, making them a valuable resource for do-it-yourselfers. The one-on-one, personal service you'll receive comes straight from an expert in the towing and automotive field. We've installed it, we've wired it and we've towed with it, so whatever your question, we can answer it.

California residents: click here
Videos are provided as a guide only. Refer to manufacturer installation instructions and specs for complete information.
Hey there, neighbors, Kevin here with etrailer. And today, we're gonna be taking a look at and showing you how to install the Curt Class III Trailer Hitch Receiver here on our 2025 Nissan Kicks. If you own a Nissan Kicks, then you know all too well that with this being such a smaller style SUV, there really isn't enough room for you to haul all of your cargo when you're going out on those adventures. Now, you could easily just throw a roof rack up there and haul a little bit of gear up there, but for the most part, that is gonna be a pretty expensive way of trying to get your cargo from point A to point B. And realistically, it's not always the easiest to try and throw up heavy objects up on top of your car when you can easily do it right here at the back of the vehicle with a trailer hitch receiver. Now, for bang for your buck, trailer hitch receiver is gonna give you a whole lot of other options here, 'cause not only are we having that cargo carrier to haul all of our items and it's at waist level, but it's also going to allow us to haul a bike rack or maybe even a small trailer.
That way, we can take all of those items that we need to with us when we go out on our trips. So this trailer hitch receiver is gonna come with a two inch by two inch receiver tube opening, which is the most common when it comes to accessories. Now, the cross tube is completely hidden behind our fascia here, so it does have a nice professional look here, so that way, you don't see that ugly cross tube hanging down too low. But with that, if you are planning on towing a trailer and you got that trailer wiring, you are gonna wanna make sure that you pick up a long bracket. So in my install video for the wiring on this car that I did, there's a bend that I'm gonna put in that bracket just to have it get low enough, because our fascia is so tight up against the trailer hitch receiver here.
There really isn't a lot for us to grip onto when we're trying to mount up that wiring. Aside from that though, we are going to want to take a few measurements, just because we want to know, you know, if I have a folding accessory, am I gonna be able to actually fold that up and not have it rub against my fascia here And then, also, how much clearance do I have from the ground That way, if I'm going into a decline and then it's gonna bottom out, I don't wanna have my accessory scrape the ground. So when we're looking at our hitch height, we're gonna be going from the ground up to the top of the inside edge of our receiver tube, which is putting us right at 14 5/8. So plenty of clearance. Typically, we wanna see about 12 inches of clearance from the ground.
Otherwise, that's where you wanna start looking at some adapters to kinda raise that up a little bit higher. Now, for our clearance with our fascia, we're gonna measure out from the center of our hitch pin hole to the furthest point on our fascia, which is right around four inches. So if you look at your accessory and you measure from the closest point of that accessory when it's folded up to the center of the hitch pin hole on its shank, if you have more than five inches, you should be good to slap it in there and fold it right up and not have to worry about it rubbing against the fascia. Now, when we have our accessory in here, we wanna make sure that we have a 5/8 hitch pin to pass through and lock it into place. And you're gonna also need your clip to go along with it.
Now, I'd highly recommend picking up one that is anti-rattle and also locking. That way, you don't have to ever worry about someone taking off with your equipment. And then, when it's time to tow a trailer, we wanna make sure that our safety chain hooks can actually meet into that safety chain loop. And with this, this is a pretty wide style loop. So whether you have an S-hook or a clevis style with the little latch on it, you should be good to go, 'cause there's plenty of space in here, there's nothing that's really gonna help bind that up. You should be all good to go. So with this trailer hitch, you're gonna have a 2,000 pound gross towing weight capacity, which is when you are pulling a trailer. And then for the tongue weight, that's that downward force onto the bottom of our hitch tube here, that's gonna be 200 pounds. So that's your cargo carriers and your bike racks. So you will wanna make sure that you also double check what your vehicle's capacity is as well. So pop out that owner's manual and dig through it, make sure that you're not overloading your vehicle. Just because the hitch can handle a weight doesn't mean that the vehicle can as well. And along with that, why don't we just get into the install of this. It really was a very simple one, because pretty much all we're gonna do is just pop out this lower part of our fascia here, and it just really held in with push pins and some clips. So this is something I feel you could do at home pretty easily. The only thing you might not have at home is just a torque wrench, but you can pick one up here at etrailer or at your local auto parts store, and get the couple of bolts that actually mount up our hitch torqued back down. But if you feel like you just don't wanna do that, maybe you just don't have the time to do so and you got a big trip coming up, then feel free to use our dealer locator, and you can enter in your zip code to find a shop near you to get it professionally installed. If you are wanting to this yourself, then stick around and we'll show you how to do it. So to start off our install, we're going to be removing these seven push pins that are holding up this smaller lower portion of our rear fascia. So we'll have four on this side over on the passenger and then there's three more over here on our driver's side. You can use a trim panel tool. Sometimes, they wanna fight you a little bit too much, maybe the trim panel tool's a little bit too thick. That's where you can just come in with a small screwdriver, which I'm probably gonna do. So just a little flathead, you can kinda work that back out. Now, on the inside, we're gonna have a little wire harness that's also clipped in with another push pin, it's right here on the inside. I'm lifting up from below to get to it. And as we get a little bit more space, then you can stick your trim panel tool on there. And pry it out. (push pin clicking) There we go. Now, the rest of this is just held in with some push pin clips. We'll just pop it straight out. (push pins clicking) And we can set our fascia aside. Next, we're gonna be removing both the bottom and the center bolt on both sides of our bumper beam. And that's gonna be just the inside ones here, we don't wanna get that outside one yet. (socket wrench ratcheting) And to do so, I'm gonna be using a 13 millimeter socket. (socket wrench buzzing) All right, we have to switch to a short well here. (socket wrench ratcheting) (socket wrench buzzing) Oh, locked out. We can still get it with the deep well. Now, on our passenger's side, we're also gonna be removing this top bolt, but we wanna make sure that we're getting the one closest to the center of our vehicle. (metal clanking) (socket wrench buzzing) Now, with an extra set of hands, we'll get our hitch raised up into position here. And then we're gonna have some M8 bolts with some conical tooth washers. Make sure that you have those teeth facing towards our vehicle. And we're just gonna put this right into those same factory holes that we just took our bolts out of. Get a couple threads started. Make sure you hit each one. All right, I'm gonna snug each one of these down, and then we'll come back with our torque wrench and torque them as well. (socket wrench buzzing) Probably have to switch to a short well, and maybe get a little bit creative, especially up top here, because we don't really have great access without removing the whole bumper panel. (socket wrench buzzing) (torque wrench beeping) So once you have each one of your bolts torqued, that's gonna do it for the installation of the trailer hitch itself. And now, you would just reinstall your fascia in reverse order. But if you are planning on towing a trailer, you're gonna need some 4-pole wiring at minimum. And that's what we're gonna be doing in just a little bit with this vehicle as well. So now's a great time to leave the fascia off, switch over to your trailer wiring, because this is gonna require us to actually go through the fascia up into our taillight wiring. And then, we're gonna route our wiring down to here, so that way, it can actually mount up to our trailer hitch, so that we can connect to our trailer. So we're gonna take a little break, get that done, and then we'll pop our fascia back on once it's all in place. That's gonna do it for our look at and installation of the Curt Class III Trailer Hitch Receiver here on our 2025 Nissan Kicks. My name's Kevin. And if you still have some questions about what's gonna be the right trailer hitch and wiring combo for your Nissan Kicks, please feel free to reach out to us via our Ask The Experts link, a comment on this video, or a phone call to our customer service department, and we'd be happy to help you out on your journey.

The CURT hitch for 2025 Nissan Kicks is an excellent product, quality all around. The installation instructions by CURT are easy to follow and the video by eTrailer.com is really helpful. However, these instructions are for the all wheel drive (AWD) model. I have a front wheel drive (FWD) model and there are some differences, nothing complicated. Just follow the AWD instructions with the changes detailed below for a FWD model.
The FWD model has 9 fasteners instead of 7 on the bottom of the bumper cover, remove them. Another difference is an undercarriage cover not present on the AWD model that interferes with the installation. The cover is made of soft flexible plastic and is easy to push out of the way. You just need to remove one of the fasteners holding the undercarriage cover, the one for a tab under the end panel on the passenger side. Pull down the tab so you can bend the cover to install the hitch bolts and washers oh the passenger side. The first photo shows the hitch installed with the cover bent under the receiver. I used sheet metal shears to cut the cover around the receiver, but the material is so soft that a good pair of scissors will probably do. The second photo shows the result. The third photo is the completed installation.
Etrailer is a huge resource not only of products but great how to videos also. I also like that they are available via phone when needed

Great quality product.Very easy to inst all.
Installed in about an hour. The instructions were simple, easy to read and follow. The only issue with the installation is the top bolt on the passenger side. It isn’t difficult to install, just tough to get started as the location is tough to reach and see while starting the threads. Definitely a DIY job.
It fit perfect. Delivered on time
Fit perfectly without drilling.
Info for this part was:
At etrailer we provide the best information available about the products we sell. We take the quality of our information seriously so that you can get the right part the first time. Let us know if anything is missing or if you have any questions.


Thank you! Your comment has been submitted successfully. You should be able to view your question/comment here within a few days.
Error submitting comment. Please try again momentarily.