
Features:
Specs:
Manufacturer Cross Reference
Light will work as an exact replacement for:
Wesbar # 003306
Peterson # M151-3RL
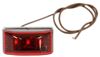
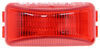
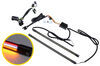
The waterproof construction of this light makes it ideal for use on trailers that may be submerged, like a boat trailer. The housing and lens of each light are sonically sealed together to create a single unit, which means that water will not get into the light and damage the diodes or circuit board.
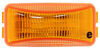
A P2-rated or P3-rated light produces a 45-degree angle of light to either side of its centerline for a total of 90 degrees of coverage. This beam pattern can be seen straight on, but it cannot be seen clearly from the side. So this type of light can be used as either a side marker light or a clearance light, but it cannot function as both. If you need both functions, then you must install 2 separate lights on your trailer - one as a front or rear clearance light and one as a side marker light.
California residents: click here
Videos are provided as a guide only. Refer to manufacturer installation instructions and specs for complete information.
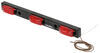
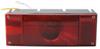
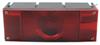
Ryan: Hey everybody, Ryan here at etrailer. Today, we're going to be taking a look at and showing you how to install the Optronics trailer identification light bar. So this is going to be designed for trailers over 80 inches wide and as rear clearance lights. It's going to be a perfect replacement. In our case, our customer's light today was all beat up and not working anymore. So this is really bolted right on.So one big advantage this one has over many others is that it is going to be made out of stainless steel.
That's something you really want to think about, but you're not going to have to worry about any rust or corrosion. And unlike plastic, you're not going to have to worry about it cracking. So with that being said, once you have it on here, really not a whole lot to worry about. However, if one of your bulbs does go out, you can replace them and you can find those here at etrailer. All three of the lights are going to be nice and bright.
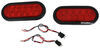
Even with our shop lights on here inside. That way, everyone can see you. Just to give you an idea of how they would look at nighttime. We'll go ahead and turn our lights off now.The back of the lights are going to be sealed and the housings as well. That makes this light submersible.
However, I do recommend to turn off the power to the light, if you do submerse it. Now, the light's overall length from end to end, is going to be 14 and a half inches. It's going to be one and three sixteenths of an inch wide. And from mounting hole to mounting hole, it's going to be eight and a half inches. And if we look at the depth or the thickness of the light, it's going to be one and five sixteenths of an inch.
So those measurements will help you figure out if you're going to be able to mount this on your trailer. So overall, it's going to be a great replacement and give you that peace of mind, knowing that you're safe and legal. Now as far as the installation goes, it's really easy, especially since we only have one wire to hook up.Speaking of which, let's go ahead and put the light on together now. Before installation, we found a spot back here in the center of our trailer, where we're going to mount up our light. Now, we're actually just replacing this light. The old one that we removed is all beat up and not working anymore. So this one's just going to go in place of it. And since we already had that old light on, all of our mounting holes are actually going to line up.So to get it secured, just line up the holes and then we can grab some self tapping screws and secure it to the trailer. Now, if you don't have holes that line up, you simply just have to drill some out. And I do recommend to use these self-tapping screws to secure it. You can find these here at etrailer, with our lights secured, we can now hook up our wire. So we actually have a small hole here and the frame that we're going to pass light wire through. Get that ran, with a little extra slack, and then we connect it to the trailer wiring. So this black wire here is the one that ran to the original light. So we're going to take our new brown, white wire and cut it to length, and get rid of all that extra wire.We're going to strip that end back, hold it back on so it's a little thicker. And the way that we're going to connect the two is with a heat shrink butt connector. If you need some leads, you can find them here at etrailer. Slide that on to the very end of the wire, crimp it down, and then just connect it to this side of the wire. Once we know they're connected, we can come back with the heat source and seal up our heat shrink. So this is what our butt connector looks like once we have the heat shrink all shrunk down. So I went ahead and just used a little clamp here to secure our wiring to the bottom of the floor. That way we don't have to worry about it bouncing around. So now we can go ahead and hook our trailer up and turn our tail lights on to make sure our light is functioning properly. And that'll finish up our look at and our installation of the Optronics trailer identification, light bar.

Easy to install works and looks great!
Info for this part was:
At etrailer we provide the best information available about the products we sell. We take the quality of our information seriously so that you can get the right part the first time.


Thank you! Your comment has been submitted successfully. You should be able to view your question/comment here within a few days.
Error submitting comment. Please try again momentarily.