
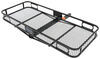
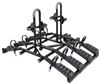
etrailer Trailer Hitch Receiver - Custom Fit - Matte Black Finish - Class III - 2"
(38 reviews)
Price: $198.31
In Stock
etrailer Trailer Hitch Receiver - Custom Fit - Matte Black Finish - Class III - 2"
Item # e49YR
Our Price: $198.31
Will this fit?
To see if this custom-fit item will work for you please tell us what vehicle you'll use it with.
This item qualifies for Free Shipping
In Stock
Thank you! Your comment has been submitted successfully. You should be able to view your question/comment here within a few days.
Error submitting comment. Please try again momentarily.


- All Info
- Reviews (38)
- Q & A (0)
- Videos (2)
- Photos
etrailer Trailer Hitch - e49YR
- Class III
- 2 Inch Hitch
- 4000 lbs GTW
- etrailer
- 400 lbs TW
- 4000 lbs WD GTW
- 400 lbs WD TW
- Custom Fit Hitch
This fully welded trailer hitch receiver bolts onto your vehicle's frame with no welding required. Matte black, powder coated steel is durable and corrosion resistant and creates a rugged look.
Features:
- Custom-fit trailer hitch lets you tow a trailer or carry a bike rack or cargo carrier with your vehicle
- Precision, robotic welding maximizes strength and improves fit
- Bolt-on installation - no welding required
- Complete hardware kit and installation instructions included
- Lifetime technical support from the experts at etrailer
- Matte black powder coat finish over protective base coat offers superior rust resistance
- Stylish, round-tube design
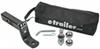
- Ball mount, pin and clip sold separately
- Made in the USA
- Mounting hardware may be imported
Specs:
- Receiver opening: 2" x 2"
- Rating: Class III
- Maximum gross trailer weight: 4,000 lbs
- Maximum GTW when used with weight distribution: 4,000 lbs
- Maximum tongue weight: 400 lbs
- Maximum TW when used with weight distribution: 400 lbs
- Maximum gross trailer weight: 4,000 lbs
- Limited lifetime warranty
Rugged, Matte Black Finish
The sturdy steel construction is protected with a matte black finish for added durability. This unique powder coating gives etrailer hitches a carbide-like appearance and a rugged look that sets them apart from traditional glossy hitches. In addition to being rust and corrosion resistant, the tough matte coating hides dirt, scuffs, and dings better than a glossy finish.


etrailer Technical Support
At etrailer we're committed to the products we sell, and to our customers. Our experienced and knowledgeable staff are available via both phone and email to address your questions and concerns for the lifetime of your hitch. The technicians at etrailer perform hitch installations on a daily basis, making them a valuable resource for do-it-yourselfers. The one-on-one, personal service you'll receive comes straight from an expert in the towing and automotive field. We've installed it, we've wired it and we've towed with it, so whatever your question, we can answer it.
e49YR etrailer Class 3 Trailer Hitch Receiver - 2" - Matte Black Carbide
Installation Details
This Product Fits The Following Vehicles
- 2015 - 2021 Kia Sedona


Video of etrailer Trailer Hitch Receiver - Custom Fit - Matte Black Finish - Class III - 2"


Videos are provided as a guide only. Refer to manufacturer installation instructions and specs for complete information.


Video Transcript for etrailer Class III Trailer Hitch Installation - 2016 Kia Sedona
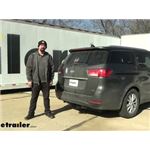
Hell neighbors, it's Brad here at etrailer and today we're taking a look and installing the etrailer trailer hitch receiver on a 2016 Kia Sedona. Now this is what it's gonna look like when it's installed and this is an exposed cross tube meaning you can see the cross section that attaches to the frame of the vehicle but overall it's tucked in there pretty well. So I think it gives it a pretty decent look overall. And the great part is this is a two inch by two inch receiver tube opening which is gonna be a great universal size for a ton of different accessories. So whether you're loading up bike racks, cargo carriers or even a ball mount, they're all gonna go in place with a 5/8 pin and clip. Now this does not come with the hitch so a lot of your accessories will come with one.
Something to look for. If you have used accessories, you may need to pick one of these up and I recommend getting a locking one. That way you can put your accessories in, lock it in place and no one can just walk by and take the accessories with them. Now if you do plan on towing a trailer, you are gonna be using this plate style safety chain loop here which a standard S hook will go on to here fairly easy. I'm gonna have to give a little bit of an angle there but a larger clevis style also works here as well.
Now speaking of towing, you're gonna want to adhere to the weight capacities on the hitch. You're also gonna want to check the vehicle's owner's manual and compare that with the hitch ratings and take the lower of those two to stay safe. And this one's rated fairly decent. You have a 4,000 pound gross trailer weight rating so that's gonna be the weight of the trailer plus the accessories loaded up. And going along with that you have a 400 pound tongue weight which is gonna be the downward pressure that's put on the receiver tube opening and that's gonna be really important for your suspended accessories like your bike racks or cargo carriers.
So just make sure you're staying underneath that 400 pounds when fully loaded. Now this can be used with the weight distribution hitch but the numbers are gonna stay exactly the same with that 4,000 and 400. Now you are gonna want to get some measurements when choosing accessories to make sure that their folding accessories are gonna work here. So from the center of the hitch pin hole to the furthest point on the rear fascia we're looking at 5-1/2 inches. So some of your bike racks and cargo carriers will fold up.
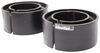
That's something you're gonna wanna make sure that it's not making contact with your fascia as this one does sit a little bit recessed. Now if you are towing a trailer you are gonna want to make sure that you can get the adequate riser drop that you need. So from the top of the receiver tube opening to the ground is 11 inches. So that's a good way to measure your trailer and figure out if you need a riser or drop. Now as far as installing the hitch this one's pretty straightforward, pretty easy to do in your driveway or in your garage. Now you will be dropping down the muffler with just two isolators which isn't too terribly hard to do but sometimes getting leverage if you're working on the ground can be tricky especially on the one further up. But really it's just gonna be a removal of a plastic panel and then there's some factory weld nuts that are there. You just bolt it up assuming that those are clear of rust. But I'm gonna walk you through all those steps to make sure that you get your hitch installed. So let's take a look. To begin our installation we're gonna go underneath to the driver's side and we have this plastic panel and this is gonna need to come off. That way we can gain access to our frame rail where we'll bolt our hitch up. And we're not going to be reinstalling this because the hitch is gonna live up here. Also, if you're doing wiring, now is a good chance to have that wiring handy because it's gonna plug in here as well. Now to get your plastic push pins out, you can simply go into one of the slots, there's four of 'em just gonna pry that center part out and then you should be able to get the whole thing to kind of come out, just go along this outside edge. There's also gonna be one that's kind of tucked up in the wheel, well just get those out and then we'll move our panel and get it outta the way. And that back one is kind of tucked up here on the frame rail so you should be able to reach up and get that one popped out. Now we can pull our panel off and set this aside. We're gonna be bolting this up to the weld nuts that are in the frame rail but we do need to open this up a little bit because we have our exhaust right in the way. So we're gonna need to drop this down and it's pretty easy. You have rubber isolators that your arms kind of go into here. Now, to get that to knock loose sometimes it's gonna get coated up with some road grime, little penetrating oil or even a little spray lubricant of any type. Even soapy water can work really well here to kind of knock those loose. You can then take a pry bar or even a long flat head and just kind of push back on that isolator. They're pretty durable so don't be afraid that you're gonna rip it or anything like that but just kind of find a point of leverage to where you can get this separated. And it also doesn't matter if you're struggling with one you can pry it from the top one or the bottom, it does not matter. So we'll have this one that we dropped out that we are gonna work our way to this other one that's right in front of the crossmember. Same thing, this one's actually a little bit easier to pry. Now granted, you're probably doing this in your driveway or garage, so you might kind of have to sneak under here or raise up the vehicle if you're doing that, make sure you chock the front tires but you can kind of just put it on the bracket and then kind of push this and we should be able to get this to pop off. And if you need to, you can kind of push on the exhaust to give you a little more leverage too. Now you do have another isolator further up that's gonna support the rest of the exhaust. The main thing right now is we can move this to get it out of the way. So we'll go ahead and take a look at our weld nuts. And depending on the mileage on your vehicle you can see these ones have some rust forming around them. That's where we're gonna need to thread our bolts. And so what I recommend doing is with penetrating oil spray those down if you do have rust and I'm gonna use a tube brush to kind of clean those out. Now we have tube brushes here at etrailer and these are kind of nice to be able to get in there and kind of knock some of that loose. Again, feel free to go heavy on that penetrating oil. Ours definitely has rust in there. Now the driver's side, because of that plastic panel there those should be a little bit better. But on the passenger side here you're gonna want to hand thread these bolts in that came with our hitch just to make sure that they're gonna thread before getting our hitch up 'cause you don't wanna be lifting your hitch in place and then fumbling with these. So now these did give me a little bit of trouble as far as clearing out that rust to get these started. So I found a bolt that we had around here that's the same thread pitch and you can take a cutting tool and just make some slots in here and that becomes a tap. Just obviously make sure that it's the same pitch and thread. Now you may not have something like this but again you can get a tap that's gonna be the same one kind of clear that out. But the main thing is as long as you can get a few of these threads started a lot of times you can kind of power through, run it in and out a few times. But make sure, again, you can at least get these started when putting the hitch up. You're gonna wanna grab an extra set of hands to get your hitch in place. But before doing that you can go ahead and pop off these rubber plugs. You can probably use your fingernail, but just take these out and this is gonna allow that hitch to just sit a little bit more flush on our frame rail so we get a little bit tighter fit. Mine's kind of covered up here with some penetrating oil so it's a little slick, but these do come out fairly easy. Now there's one on the other side as well. So go ahead and get these taken out. Now with our extra set of hands we're gonna go ahead and get our hitch in place. Now the trick is to slide it up over the exhaust first. Driver's side's gonna be nice and open. You're gonna want to have your hardware ready. So we have our bolts with the conical tooth washer. Your conical tooth should face with those teeth biting into the metal of the hitch. So just kind of get this aligned up with those holes. And we're just gonna get one started on each side and that's gonna allow us to hold our hitch up in place allowing it to be a lot easier to get the other hardware. So you may have to kind of bump this along to line it up. But take your hardware, get a few threads started on each side and then we should be good. So with those started our hitch will support itself. We can go ahead, get the rest of our hardware in place. With our hardware all in place we'll go ahead and snug these down with a 19 millimeter socket. We are gonna be coming back with a torque wrench to make sure that we have the proper settings. So you don't have to get crazy here you just want everything nice and snug. (drill grinding) So now at this point we're gonna torque our hardware down to the indicated torque setting in the instruction manual. And we'll just go through make sure that they're all torqued down properly Everything's tightened and torqued so we can go ahead and get our isolators put back on our exhaust. And again, you got a little bit of mobility here so if you need to move the muffler to get this to pop in that's not a bad way to do it. Now for our panel, you don't have to reinstall it but I'll be putting some trailer wiring on here which is gonna live in this area. So I wanna protect it from the elements. And I was able to make this fit by trimming out a portion. You can kind of get a rough idea if you kind of follow along this ridge. Main thing is leave this one here so it'll still attach but this should allow us to get this back in place. So again, it's up to you. I just used a dremel and just kind of cut this out pretty easily but that way we still have that protection. And that was a look and installation of the etrailer trailer hitch receiver on a 2016 Kia Sedona.
Customer Satisfaction Score:
99% were satisfied with this product
1% of customers were not satisfied
- Wrong item was ordered
Customer Reviews
etrailer Trailer Hitch Receiver - Custom Fit - Matte Black Finish - Class III - 2" - e49YR
Average Customer Rating: 4.9 out of 5 stars (38 Customer Reviews)
This fully welded trailer hitch receiver bolts onto your vehicle's frame with no welding required. Matte black, powder coated steel is durable and corrosion resistant and creates a rugged look.

by: Sean04/28/2024
2017 Kia Sedona
I bought this hitch receiver a year ago for my 2017 Kia Sedona, and it fit perfectly. Really easy to install with the exception of having to move the exhaust out-of-the-way just a little bit, but that has nothing to do with the product, that’s the way the van was designed. I was able to move the exhaust over and it bolted right on exactly as described in the description. I have towed several different trailers many many times since it was installed and it has worked flawlessly. Definitely worth the money and I highly recommend it.
by: Cameron06/11/2022
2018 Kia Sedona
Outstanding experience! Fast shipping and quality product.
Note: I purchased this for a Korean spec 2018 Kia Carnival. While the Carnival is built on the same frame as the Sedona, there were two bolts on the undercarriage which interfered with the installation. I was able to cut the excess off the bolts which allowed for the hitch to fit perfectly onto the frame.
by: Christopher 05/15/2023
I don't know that there's a whole lot to be excited about when you're fitting a hitch receiver to your mini-van. Luckily, there's also little to complain about, too. This fit up very nicely using the Sedona's pre-existing trailer hitch bolt holes. There was a little finagling when it came to where the hitch slid under the exhaust, but otherwise I have no complaints. The receiver seems sturdy enough for my purposes; I won't be pulling any very heavy loads but I am confident in it's construction when I do have something hooked up.
by: Cindy 05/05/2023
2017 Kia Sedona
This hitch was perfect for our Kia Sedona. Etrailer was awesome to order from. I ordered they communicated from order to shipment received. Price was great, it shipped fast and exactly what it was suppose to be. This hitch did not come with electrical assembly if you need that, then you need to add that on. We did not need because we are only using hitch for E bikes. You'll be very happy with etrailer customer service and this product.
by: Andres 02/12/2024
2020 Kia Sedona
xcellent service, my order arrived very quickly and a few days ago I made a query and they responded very quickly. Excellent YouTube videos, very well explained.
by: Montana06/07/2023
The hitch fits well and looks good. The safety chain holes are large, which is nice. I recommend ordering exhaust removal pliers to help with lowering the exhaust out of the way. All in all, it was an easy install with a little help.
by: Dustin 06/26/2023
2017 Kia Sedona
My buddy and I installed this in about 20 minutes. It was super easy to locate the holes (after watching a quick YouTube video) and from there it was quick. The hardest part is getting to the holes behind the exhaust. I do recommend if possible having two people work on installing this together. It made it a lot easier to handle.
by: Dennis Perry10/07/2023
2018 Kia Sedona
Awesome fit easy to install lest than 1 he


by: William10/29/2023
Excellent product. Worked with n
by: Victor 10/04/2023
works amazing


by: Michael 08/17/2023
Easy install great product
by: John P01/07/2023
2020 Kia Sedona
Great service and pricing. My 2020 KIA Sedona hitch arrived on time and in great shape.
Thanks Etrailer for making it so easy!!!
by: Nathan 07/13/2023
Super easy install.
by: Glen04/22/2022
2020 Kia Sedona
Received the hitch for my 2020 Kia Sedona in a few days after ordering. I watched a YouTube clip on how to install hitches. I knew it would be easier with two sets of hands,so I asked my dad to help with this. We spent approx 30 mins installing it. Super easy, but just make sure you have car ramps to get the rear end up high enough to get underneath to unscrew and screw with good leverage. It had 6 bolts and washers. If you follow the YouTube clip, you'll have no problem.
by: Greg04/13/2023
Great product, love it. Wasn't too hard to install and my vehicle is much more useful now. Well worth it.
by: Andrei D03/29/2022
2018 Kia Sedona
I installed it by myself. The manual was clear and easy to follow. I haven't put any load on the hitch yet so I don't actually know how it performs, but it sure looks sturdy.
by: Seth 08/02/2022
This well-designed hitch made for an easy and quick install! Simple instructions were clear to understand, as well as the simple design, made it easy.
by: Timothy04/01/2022
2016 Kia Sedona
Bought for my 2016 Kia Sedona. Installing is easy if you follow the directions, but do yourself a favor and buy a M12x1.25 tap to chase the threads on your vehicle before you start to make it that much easier.
by: Anita04/02/2022
2018 Kia Sedona
The hitch was very easy to install thanks to my son and grandson! We are very happy with it and the service we have always gotten from etrainer!
by: Chris 10/08/2022
Great product quick delivery And perfect fit
by: Ryan 12/14/2022
Excellently excellent
by: Melissa 09/14/2022
Shipped out fast very well made.
by: Jim 09/15/2022
Always quick delivery! Diane
25
38
Show More Reviews
See what our Experts say about this etrailer Trailer Hitch
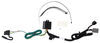
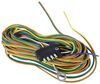
- Trailer Hitch Receiver and Wiring Harness For a 2015 Kia Sedona Compatible With 1-1/4 AccessoriesCurrently the class 3 receivers like the etrailer Trailer Hitch Receiver # e49YR are the only receivers being made for your 2015 Kia Sedona. We do offer a Trailer Hitch Reducer # e63YR that will allow you to use your 1-1/4" accessories or ball mounts. I recommend installing a T-One Vehicle Wiring Harness # 118269 when installing the receiver. This will give you a 4-way flat connector that is needed for most small trailers you may pull, and will also allow you to use Auxiliary Lights #...
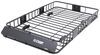
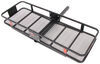
view full answer... - 2016 Kia Sedona Trailer Hitch and Carrier Recommendation for a WheelchairI recommend installing the etrailer Trailer Hitch Receiver # e49YR on your 2016 Kia Sedona and then using the Flint Hill Goods 29" x 49" Carrier w/ 60" Ramp # FHG69ZR for your wheelchair. The etrailer hitch is the only one that has a matte black finish which does a better job than the classic glossy black finish at blending in with the vehicle and helping to prevent scratches from road debris. The wheelchair carrier has an aluminum construction so not only is it corrosion resistant, but...
view full answer...
- Best Trailer Hitch and Wiring for a 2018 Kia SedonaThe trailer hitch I recommend installing on your 2018 Kia Sedona is our etrailer brand because it has a matte black finish that looks better and is more durable than the standard glossy finish you see on the other hitches. When you pair this with the Tekonsha T-One wiring harness for your vehicle you get a very reliable towing setup that you can be confident will last. Here are the parts I recommend picking up: - etrailer Trailer Hitch Receiver # e49YR - T-One Vehicle Wiring Harness...
view full answer...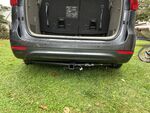
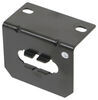
- 2019 Kia Sedona Trailer Hitch and Wiring RecommendationsI recommend the following for your 2019 Kia Sedona: - etrailer Trailer Hitch Receiver # e49YR - T-One Vehicle Wiring Harness # 118269 - Mounting Brackets # 18144 and # 18140 I really like the etrailer hitch because it has a matte black finish that matches black trim on vehicles and hides scratches from road debris, and then the T-One wiring is the most reliable brand we carry so you can be confident the wiring will work properly for years to come. The mounting brackets give you can...
view full answer...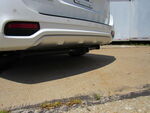
Do you have a question about this Trailer Hitch?
Info for this part was:

Edited by:
Lindsey S

Video Edited:
Chris R

Test Fit:
Conner L

Test Fit:
Bradley B

Written by:
Kristina F

Video by:
Thomas T
At etrailer.com we provide the best information available about the products we sell. We take the quality of our information seriously so that you can get the right part the first time. Let us know if anything is missing or if you have any questions.
Product Experts Available Now!
Call 1-800-940-8924
Cameron
6/11/2023
Proof and edit: After a year of use, I can confidently say that I am incredibly delighted with my purchase! The trailer hitch from etrailer has proven to be an exceptionally reliable and durable addition to my Korean spec 2018 Kia Carnival. Since my previous review, the trailer hitch has consistently exceeded my expectations. It has remained securely attached to the frame, showcasing its high-quality construction and outstanding performance. Ive primarily used the hitch for my OneUp bike rack, frequently taking it on and off, and it has consistently demonstrated its sturdiness and reliability throughout. Im also thrilled to share that the minor installation issue I initially encountered with the two bolts on the undercarriage has had no impact on the hitchs functionality. Although I had to make a slight modification by trimming the excess off those bolts, it hasnt compromised the hitchs ability to fit seamlessly onto the frame. The hitch remains firmly in place, providing a perfect fit and allowing me to tow with complete confidence. Overall, I couldnt be more satisfied with my etrailer.com trailer hitch. Its durability and consistent performance have truly stood the test of time over the last year.