
To see if this custom-fit item will work for you please tell us what vehicle you'll use it with.
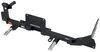
This hitch lets you bring more on your adventures - tow a trailer, haul bikes, or carry gear. The 2" receiver fits accessories for work and play. Bolt-on install means no welding, and the powder coat finish resists rust for lasting use.
This hitch is ideal for towing smaller loads, including lightweight utility trailers or small boats. With a 2,000 lbs gross trailer weight capacity and 200 lbs tongue weight rating, it provides a secure towing solution for lighter applications. The 2" receiver size offers versatility for various towing setups.
Perfect for bike racks and cargo carriers, this hitch allows you to transport bikes, camping equipment, or extra luggage with ease. The 2" receiver accommodates a wide range of hitch-mounted accessories, enhancing your vehicle's cargo capacity for road trips and outdoor adventures.
Skip the stress - this hitch features an easy bolt-on installation with all necessary hardware included. No welding or complicated modifications are required, making it a straightforward project whether you're in your garage or driveway.
From road grime to unpredictable weather, this hitch is made to withstand the elements. The dual-layer finish - an industry-leading powder coat over a protective base - helps prevent rust, chipping, and wear, keeping your hitch looking great and performing reliably for years.
No bulky hitch sticking out - this model features a concealed main body that tucks neatly behind the bumper. The result? A clean, factory-style appearance without sacrificing strength or towing capability.
Keep your hitch in top shape with an open-back receiver design that allows for easy cleaning. Say goodbye to dirt and debris buildup inside the hitch tube, making it easier to maintain and use over time.

California residents: click here
Videos are provided as a guide only. Refer to manufacturer installation instructions and specs for complete information.
Hello, neighbors, it's Brad here from etrailer and today we are taking a look and installing the Curt Trailer Hitch Receiver on a 2021 Ford Escape plug-in hybrid. And this is gonna be a great option really for any vehicle to add a trailer hitch receiver. It's really gonna open it up as to what you can do with your vehicle. You're gonna get real estate that you never had before. So whether you're bringing bikes along, maybe a cargo carrier on vacation or towing a trailer for those jobs, this is gonna be the first step. So let's take a closer look.
One of the first things that I like to point out, the fact that this is a hidden cross tube. So what does that mean Well, a good majority of the hitch is gonna be hidden behind the fascia. So really the only part that you see once installed is gonna be your receiver, as well as your safety chain loops. So you get all the usability of the hitch, but a nice clean look in the process. And this one being a two-inch by two-inch receiver tube opening means you're gonna have a ton of options when it comes to any accessory that you may be loading up.
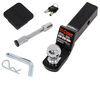
And when choosing accessories, a lot of will come with a pin and clip that'll work with this hitch. But if you're just getting standard accessories, you are gonna need a 5/8 pin and clip to get those attached, and that's not included with the hitch. And something I like to recommend to people, if you plan on leaving your bike rack on for the season or maybe you're out of town traveling with that cargo carrier, you might wanna look at a locking pin and clip. I recommend that locking pin and clip because it's a good deterrent from anyone walking by. They can't just take out your pin and clip in that accessory with them.
Now, if you do plan on pulling a trailer with your Escape, your safety chain loops are nice and easy to get to. It's a plate style, so it's really clean looking. Standard S hook is no problem. The larger or a clevis style, you can definitely get on there. It's a little tricky.
You just kinda have to go at an angle, and a larger clevis style, it's gonna be kind of a similar concept here, but all things considered, you'll be able to hook up those chains. And speaking of towing, you are gonna wanna adhere to the weight capacities, not only of this hitch but also what the vehicle's capable. So because the hitch is rated fairly low, I don't worry too much that you're gonna overdo it with the vehicle. So this is gonna be a class two, meaning you get the two-inch by two-inch receiver tube opening, which I highly recommend. You'll have a lot more options than an inch and 1/4. But weight capacities are relatively low on this. Your gross trailer weight rating is coming in at 2,000 pounds, so that's gonna be the weight of the trailer plus the accessories loaded onto it. But still good enough for a small utility trailer, maybe some jet skis, you know, kayak trailer, things along those nature. But you're not gonna be doing any heavy-duty towing with this. As far as tongue weight rating, that's gonna be the downward pressure on the inside of the receiver tube opening, really accounts for a lot of your suspended accessories, so cargo carriers and bike racks. And this one comes in at 200 pounds. So again, pretty low, but still with 200 pounds, you can still get a bike rack, maybe a four-bike depending on the weight of the bikes. But keep in mind that you are putting a lot of pressure on it, so try to stay within that weight capacity. And if you're looking for different accessories like cargo carriers or bike racks, I always try to recommend people to a folding style. It really saves the total length of the vehicle when it's not loaded up from making it much longer than it needs to be. But with those sometimes folding it up, it can make contact with the fascia, and you can't utilize that. So measuring our center from our hitch pin to the furthest point around of our fascia, we're right at about four inches. So I don't really worry too much that this vehicle's gonna have an issue with clearance. Just keep in mind when they're folded, more than likely you're gonna be blocking your rear view camera, your license plate, and potentially your turn signals. And if you are gonna be pulling a trailer, it's important to get a ball mount that's gonna get your trailer as level as possible. So we'll take a measurement here of our ground clearance. From the top of the receiver tube opening to the ground, we're right at about 12 1/2 inches. And so the best way to get your trailer level and get the right ball mount is get your trailer set up, measure from the ground to the top of the coupler, and then compare that with our measurement. And then you can determine the riser drop necessary. You could always get an adjustable ball mount, and that's a great option to cover a whole span of trailers. But the main thing is you're getting it as level as possible so you have the best towing experience. Now, adding a hitch to the lower portion, there's a big metal beam, and you may be wondering, "Well, I have a hands-free lift gate, is it still gonna work with that" And I'm here to tell you, yes it will. So I have the fob in my hand, and as I put my foot under here for proximity, we can see that it opens up. So no issues there. And more than likely you're on this page because you wanna see how it installs, and this one really isn't that hard to do. There's a few steps that make it a little bit more than just bolting it up, but the basics of it, you're gonna be lowering down the exhaust, the muffler a little bit, and that way you can have clearance, and there's a EVAP canister, and you gotta loosen that up just to, again, make clearance. Now, the tricky part is gonna be you do have to enlarge the holes in the frame just slightly to get your hardware passed in, but beyond that, you just raise it up, tighten and torque it down, and you'll be good to go. So it can definitely be done in your driveway or garage. I'd give yourself maybe an hour, hour and a half and maybe an extra set of hands to get it knocked out, but I'm here to walk you through step by step to make sure that you get this installed. But if you watch that video, the whole installation part, and decide, "You know what, I don't have the time, the place, the tools, or even the want to do that myself," I get it, life happens and sometimes you want someone else to take care of that install for you. And if that's the case, you can find someone close to you by using our dealer locator. You'll simply put in your zip code, you'll find a list of shops close to you that can get not only your hitch, but maybe some trailer wiring or other accessories on at the same time, so you can be out there enjoying your vacation or whatever adventures you may go on. Now, speaking of that installation, let's take a look at that now. To begin our installation, we're going to head underneath by the passenger side exhaust and we're gonna find that we have this clamp that's next to our exhaust isolator mounting. And this is just holding up our wires. But we do need to take this down because we need to remove our exhaust hangers shortly after. So to get this nut off, it's gonna be an 11-millimeter socket. So we'll get this removed. And something I'll say is, as we pull stuff off, make sure that you have a nice organized spot to keep your hardware. It'll make reinstallation of everything a lot easier when we put it all back. (nut rattling) And once that nut is off, we can bring down this clamp, and you'll see that we have another nut here that's gonna drop this down. That's gonna be a 10 millimeter. You're gonna want a deep well just because of this long stud. So we'll get this taken down. Now, as I loosen this up, it's not a nut, it's actually a stud that threads up. You can see that. Now, I'm gonna pull this out and we are gonna have an another one on the other side. But something that we're gonna want to do is support our exhaust, because as this is hanging down, it's gonna put stress on it long term, or downstream I should say. And we don't wanna damage anything in the process. So before I loosen up our other one, you can use a box or a block of wood to just support your muffler. I'm on a lift here, so I'm gonna use a cam buckle strap to just kind of create a cradle for all of this. And once supported, we'll go and remove the same stud that we had on the passenger side. So 10 millimeters should accomplish that. Now, with our muffler lowered down and supported, the next thing we need to attack is on the driver's side. We have a heat shield. This is on our EVAP, we have a EVAP box up here, our canister, and we need to get this heat shield taken down. That's gonna give us access to our frame rail where we're eventually gonna put our hardware. So 10-millimeter socket to remove the three nuts. Take this down. (tool whirring) This is where we're gonna eventually put our hardware, but our canister's still kind of in the way, and so we need to loosen up the hardware to drop it down. Don't completely remove it though. So, there's three 10-millimeter nuts. The first one's pretty easy to find. The other two you're gonna wanna kind of reach back here. There's one that's kind of on this outside. And then if you reach up here, there's also gonna be a mounting spot. So just find those. They're gonna look just like this, and we're gonna lower this down. Again, don't completely remove it though. (nuts rattling) (tool whirring) Now, if you're following the paper instructions that came with your hitch, they say that you need to hold up your hitch and mark where the templates are gonna be, where we're gonna enlarge to get our hardware in place. But you don't really need to do that. I'm gonna point out the holes. And I see why they want you to hold it up, because it does change a little. So on the driver's side, you'll notice that the tab on the hitch is a little smaller. So the holes that we're gonna be putting hardware through are gonna be this most rearward, and then this one that should only be about three inches back. So these are gonna be the two that we tackle here. And then on our passenger side, it'll be a little bit different. So we're not gonna be using that furthest rear hole. It's actually gonna be set back a little bit. So we're gonna be using this one that's in the hole of our heat shield. And then six inches back, we have this oval hole. So I'll mark that. And for the next step, now that we have those marked out, we are gonna need to enlarge the hole, or at least one of 'em, to feed our hardware up. So eventually we'll be passing the spacer block and a carriage bolt. And you'll see pretty quickly that these are quite a bit wider than those holes, and there's really no other way to access these 'cause we'll be feeding them the frame rail and dropping these in. But what we'll need to do is enlarge the hole, so I'm gonna be using a burr bit. You can use a Dremel blade, you can use a lot of different methods. A step bit also works, whatever gets a spot that's large enough for you to feed the hardware in. I do recommend, have your carriage bolt handy. That way, you can test to make sure that it goes in, so you're gonna have to cut it wide enough. It doesn't have to go just super easy. Sometimes you gotta wedge it in. So you can always make the hole a little bit larger. But first things first, I'm gonna start grinding mine out. And you can pick either of the holes to enlarge. You only have to do one. I'm gonna choose the one that's kind of a little bit further forward on our driver's side, just because of this EVAP canister hose, it's just gonna be easier for me to get this spot. So again, I'll grind it out. A lot of times, if I use a Dremel, I just take the cutoff wheel and just run it straight across, kind of makes it like a Saturn-looking shape. And then you can enlarge it as necessary. But again, whatever method you have to do, this is gonna be the best one. (tool whirring) So I've enlarged mine. Again, with my burr bit, it's a little bit wider, so don't worry if it's too big because that spacer block is gonna cover that gap. And as far as making sure that this fits, again, you can kind of go at a angle if you have to, as long as this can slide up. So with this one made, I'll repeat the process on the other side, but this is raw metal, so we wanna make sure it doesn't turn to rust. So I'm just gonna put a little spray paint on there. It doesn't matter what spray paint you have, just something to coat those raw edges. So now with those holes enlarged and then our paint on there, we're gonna get our hardware fed in. So we're gonna grab our pull wire, and it's pretty easy process it. If you've never done it before, it may look a little scary, but it's truly not. Take your coil then, feed it through the holes that we're gonna be mounting up that we marked previous. You may need to put a bend on here to feed it back to that enlarged hole. So put your finger up there, be careful if there's sharp edges, but we'll pull down that coiled section through here. Now, don't pull it all the way through. In fact, on this tail end, if you wanna put a bend, that way it doesn't pull through. But now we can grab our spacer block, and we're gonna feed this on our wire, and you can just push this up into the frame rail. And then our carriage bolt, we're gonna thread onto this coiled section. And then we can feed this up into the frame rail. (metal rattling) And once you have those both fed in there, you can just pull your pull wire. (metal rattling) And the bolt's getting caught a little bit, but a little jostling, we should be able to get this to drop down. Now, we are gonna keep our pull wire on here. That'll help as we raise our hitch up to keep this in place and make sure that it doesn't push back in the frame rail. So we have that side or that hardware done. Now, for the hole that we enlarge, it's actually gonna be a reverse fish wire. So it's actually easier. It'll take your spacer block, just kind of feed that over the coil then. And just hold that in place. Take your carriage bolt, thread that on, and then you just feed these up (metal rattling) and then that drops down. So with these two in place, we're just gonna repeat the same process on the other side of the vehicle. At this point, we're gonna get our hitch raised up. So our goal is to feed the fish wires through the corresponding holes. And as we raise it up, we'll get those studs to pop through. And then we'll pull the pull wire off and feed one of the conical tooth or serrated flange nuts. And if we get one starter on each side, it'll support the hitch, make it a lot easier for the rest of the install. So we'll grab our pull wires, feed those in, and the hitch isn't particularly heavy, but it is cumbersome. So I have my friend Carl here, he's helping us get this hitch raised up. (metal rattling and squeaking) And really important, just make sure that the hardware doesn't push back up as you're trying to thread it. So what I do a lot of times is just use the hitch, push it against it to create friction if you can. Or you can use the pull wire, you can use your fingers. But main thing is don't push this back up in the frame. And with that started, we'll just go through the rest of our hardware and get the rest of our nuts put in place. And once you have all of the nuts started, we're gonna snug them down using a 3/4-inch socket. You don't need to get crazy here, we just wanna draw it up because we're gonna come back immediately with our torque wrench to torque it down properly. (metal rattling) (tool whirring) Those snug down, and now we're gonna come back with the same 3/4-inch socket and our torque wrench. Torque settings are gonna be found in the instruction manual. It's a fairly high torque setting, so I would suggest maybe getting a half-inch torque wrench. If you don't have one, you can generally go to an auto parts store and rent one for free. But this is gonna make sure that our hardware's gonna be obviously strong enough to use our hitch long term. It's also not gonna be too tight, putting stress on anything. So the torque wrench really helps us dial that in. So I'll go through, get these all torqued down properly. And once they're all torqued down properly, we're just gonna put everything back in the reverse order. So that's gonna be tightening down that EVAP canister, putting that heat shield on, and putting our exhaust back in place, as well as that wire loom clamp. But beyond that, really all that's left to do once you get everything put back in is get your accessories loaded up, put it in your pin and clip, and you're ready to hit the road. Hopefully this video was helpful in getting the hitch installed on your Escape. And if it was, please leave a comment. That makes me feel better that I did a good job, but also if there's something that I might have missed or something that I could have done better, also please let me know. Our goal is to really make the best videos possible for neighbors like you that are gonna be tackling a project like this at home, and we're here to guide you through that. With that being said, thanks for joining us for a look and installation of the Curt Trailer Hitch Receiver on a 2021 Ford Escape plug-in hybrid.

2014 Lincoln Corsair Grand Touring III. Nice hitch and fairly easy to install. One thing I didn't like was having to enlarge the frame holes to get the mounting kit hardware in. Once this is done, it's very straight forward, and very easy to install. I'm 78 years old and did the whole job alone on the floor in my garage. It also looks very neat and shows very little. It almost looks factory installed.
A friend helped me and the instructions were good. It took about an hour to install it and all went well. Good product and I'm a repeat purchaser from etrailer.
U Haul has the same hitch delivered for $11.68 less
My hitch was delivered on time. It went on just like the instruction said with no complications.
Just sending Austin an Email reply. So far so good!
Do you have a question about this Trailer Hitch?
Info for this part was:
At etrailer we provide the best information available about the products we sell. We take the quality of our information seriously so that you can get the right part the first time. Let us know if anything is missing or if you have any questions.


Thank you! Your comment has been submitted successfully. You should be able to view your question/comment here within a few days.
Error submitting comment. Please try again momentarily.