
# 1
Rhino-Rack Ski and Snowboard Carrier - Locking - 3 Pairs of Skis or 2 Boards
I think these racks will be excellent during ski outings for many years. I attached them directly to the C-grooves on my Aero bars rather than using the provided clamps. The C-groove attachment is stronger and slightly lower profile. I love the large release buttons!.
I can't ski, I fly fish. However my oldest decided to try downhill skiing after being gifted a pair of skis. I am budget minded should the skiing not work out and after breaking many rod tips decided this might solve 2 problem. I am very pleased w/this equipment holder. It has transported skis & ski poles too and from and no longer does my oldest have to dodge skies coming over the back seat. So far it has taken abuse from the rain (& freezing rain), snow, ice, rapid warming, road salt, and upwards of 70mph and there has been no shifting, loosening, breaking of plastic or any other noticeable problems. I am excited for spring to see how it transports my fly rods.
# 2
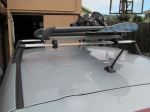
Rhino-Rack Ski and Fishing Rod Carrier - Locking - 2 Pairs of Skis or 4 Fishing Rods
Product arrived very well packaged and on time. It’s very robust and came with locks installed. It’s also set up for T-bolt rails which I needed. It was also a few dollars less than Amazon. etrailer is great to deal with and their YouTube videos on this and other products are extremely helpful.

Last year I purchased Rino ski racks from etrailer and they work great . The hardware fit my roof racks and all the fittings are tight. Ordering was easy. Shipping was fast and I even got a follow up personal email from George a year later asking how I liked them - which was impressive! I would definitely recommend etrailer as an honest and good outdoor gear company!
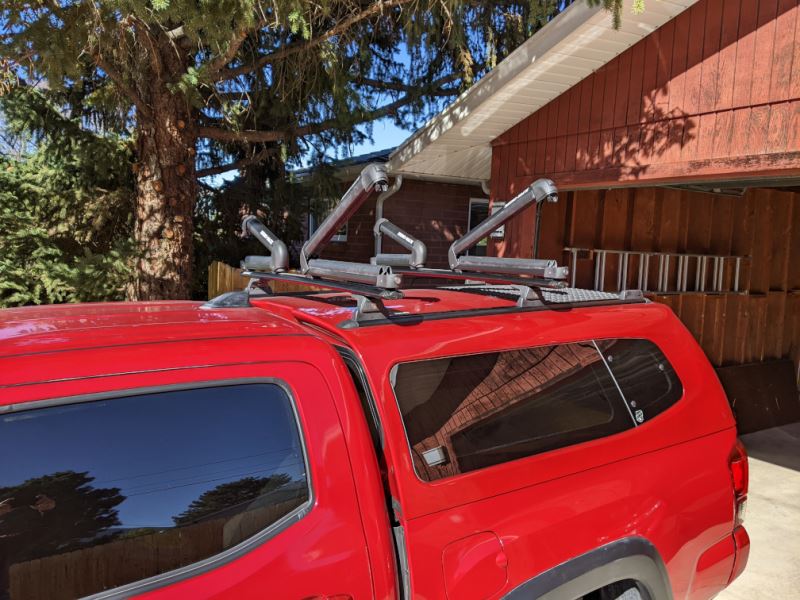
# 3
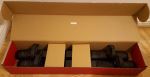
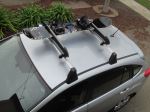
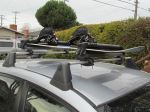
Yakima FatCat EVO 6 Ski and Snowboard Carrier - Locking - 6 Pairs of Skis or 4 Boards - Black
Just got my Yakima Fatcat EVO 6 ski carrier (black finish) and I am stoked. Note that this is different than the Fatcat 6 (non-EVO, previous generation) carrier. This is my first ski carrier, but I and/or my kids ski about once a week at Alta and Snowbird when the lifts are running, so I expect it to get lots of use. Etrailer shipping was fast and item was packed in a sturdy secondary box. PROS: 1. I love the sturdy build and quality finish of the carrier. 2. The design allows many micro-adjustments to fit to your vehicle and to fit the skis. For instance the spring-loaded hinge on one end and the lock on the other end can naturally accommodate different thickness skis. 3. Carrier has a usable width (i.e. width of skis side by side) of 32.75 inches (832 mm). For those that are not skiing on 75-mm-wide skis from 30 years ago, this carrier might actually allow you to fit 6 pairs! 4. Separate mounting brackets for aero or for square/circle cross bars. The aero brackets fit securely on my Acura/Honda OEM cross bars. The flat part of your skis will be about 3 inches (76 mm) above your cross bars. 5. A built-in lift bracket that lifts by an additional 3 inches (76 mm) the hinged end of the carrier, if you have really tall bindings (I don't think I'll need to use it). 6. The aero brackets use a rubber coated steel strap to wrap under your cross bars. This strap has a quick release cam on one end that can be operated when the carrier is not key-locked. This means you can remove or install the carrier without tools in about 4 minutes, once you've done the initial install-related tuning. While the carrier seems sturdy enough to leave on the vehicle all winter, I expect I'll only install it on ski days. This feature really sets this model apart and for me was its biggest selling point. 7. Yakima packages the carrier in a nice-looking sturdy cardboard box with a flap lid. I can fit the two parts of the carrier in the box, with the brackets/straps still installed, for convenient storage (see picture). CONS: None so far, though I haven't yet actually hauled skis up the mountain! After this ski season is over and eTrailer asks me for a follow-up review, I'll let you know. I'm also thinking about seeing if the ski carrier can be attached to my small hitch-mounted cargo carrier. That would make loading and unloading the skis easier than on the roof.
First off...you can't beat the service of etrailer.com. I was looking for a ski rack for my son's 2012 Subaru Impreza with the factory roof rack (base model not the sport). I could find no reviews of anybody installing one of these on one of those. I took the plunge and will say that I am very happy with the outcome. The installation is a bit tricky and four hands help, but after the first one was installed we had the hang of it and the second one went on very quickly. Even with the expedited shipping this rack was about $50 cheaper than the Subaru ski rack. Again the etrailer.com service is fantastic. I have purchased products here before and will do so again.
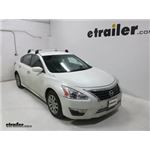
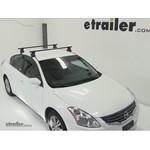
Yakima JetStream Roof Rack Installation - 2019 Nissan Altima
Colin: Hey, everyone. It's Colin here at etrailer. Today, we have a 2019 Nissan Altima. Now, we're going to be test fitting the Yakima JetStream Roof Rack System.This roof rack system mounts to the naked roof of your Altima. It allows you to get all of your favorite accessories on top of your roof, whether you've got a bike rack, a kayak carrier, or even a cargo box.Now we have a couple of different components in our roof rack. Up top, we're going to have our 50" long JetStream crossbars.
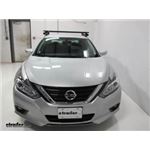
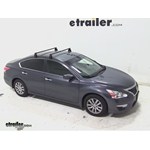
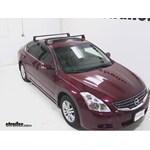
Rhino Rack Roof Rack Review - 2017 Nissan Altima

Today on our 2017 Nissan Ultima, we're going to be test-fitting the Rhino-Rack Roof Rack system consisting of part numbers RRVA126S-2, these are the silver crossbars; part number RRRLKVA, and these are the 2500 Series legs for the Vortex Aero Crossbars; and part number DK381, and this is the custom fit kit for your Ultima that clamps it on to your vehicle. Now, we already have the front on installed, and you can see that it has this nice aerodynamic shape to the bar itself, and that coupled with the rubber strip on the top here will actually cut down the wind noise and drag while you're driving. It is lockable, so once you actually attach both crossbars to your vehicle, it is secured to your vehicle as well. Now, the combined weight capacity for both bars is 165 pounds, although you always want to double-check with your owner's manual to make sure your roof can withstand that kind of weight. Also, these do come in black as part number RRVA126FB-2. All right, let's go ahead and show you how the rear one goes on. We already have it partially assembled on our table, here. We'll go ahead and take our 2500 Series leg, and we'll actually slide it into our track here with this metal bracket, here. It'll just slide in like so, and then we're going to go ahead and do a couple of measurements here to determine the spacing between this edge here and our leg. Normally, you would have measuring strips that you would cut to length, put them in there so it's more of a permanent application, but for demonstration purposes, we'll just go ahead and measure it out. You can find these measurements in your instructions.
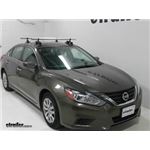
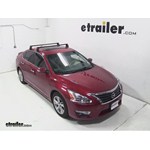
Inno Roof Rack Review - 2017 Nissan Altima
Today in our 2017 Nissan Altima, we're going to be test fitting the Inno Roof Rack System, consisting of part numbers INB127, these are the Inno square crossbars, 50 inches long; part number INSU-K5, these are the Inno feet for the square crossbars for naked roofs; and part number INK625, this is the custom fit kit for this particular vehicle. The Inno Roof Rack is great for carrying a wide variety of accessories ranging from bike racks to cargo baskets to enclosed cargo boxes to ski carriers to some water sport carriers. The bars are nice and sturdy and have a carrying capacity of 220 pounds, although you always want to double check with your vehicle's manual to make sure your roof can stand that amount of weight. Now that we've gone over some of the features of the roof rack, let's go ahead and show you how it installs. We have a front one installed already and we had the rear one partially assembled. This is basically what we're going to get with your roof rack kit here. We'll have the foot, the pad, and the actual clamp itself that goes around, plus these two pieces which fit onto the foot as well. First off, we'll go ahead and place our foot on the end of our square bar here. You see that it has a square opening, however you have to push the bolt here down.
SeaSucker Roof Rack Review - 2016 Nissan Altima
Speaker 1: Today, on our 2016 Nissan Altima, we're gonna be doing a test fit on the SeaSucker Monkey Bars roof rack system. Part number 298-SX6000. The SeaSucker Monkey Bars are gonna allow you to carry roof-mounted accessories on your Nissan Altima. Things like bike racks, kayak carriers, roof boxes, baskets, and more.The crossbars are 48 inches long. They have a round bar design; they're gonna be more aerodynamic than your traditional square bars, but they're not gonna be as aerodynamic as your aero bars style. So there may still be some wind noise and drag.The round bars are gonna work with your traditional clamp-on accessories.
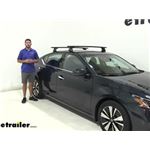
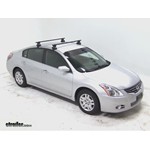
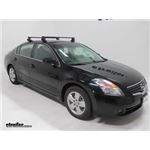
Rhino Rack Roof Rack Review - 2016 Nissan Altima
Speaker 1: Today on our 2016 Nissan Altima, we're going to be doing a test fit on the Rhino Rack Vortex Aero 2,500 Series roof rack system. We'll be using part numbers RRVA126S-2 for the 49 inch silver aluminum crossbars. You can also get these in black with part number RRVA126B-2. We're also going to be using part number RRRLKVA for the Rhino Rack 2,500 Series legs. And then finally part number DK381 for the custom fit kit.This Rhino Rack roof rack system is going to allow you to carry roof mount accessories on your Nissan Altima, things like bike racks, Kayak carriers, cargo boxes, and more. The crossbars are 49 inches long and they have an aero style to them, so they're going to be a lot more aerodynamic than your traditional round or square bar design.
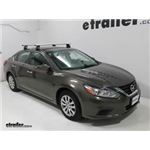
Rhino Rack Roof Rack Review - 2016 Nissan Altima

Today, on our 2016 Nissan Altima, we're doing a test fit of the Rhino-Rack Vortex Aero Crossbars. The part number for the crossbars today is RRVA126B-2. For our foot pack, we're using RRRLKVA, and the fit kit number for our Altima is DK381. We already have our front crossbar installed and put together. We're going to show you how we put our last foot pack together onto our crossbar, and then how we load it up onto our vehicle since it is the same way. Starting off, everything that you see here including our other foot pack is included in our kit. We're going to start by taking our foot pack here, and we're just going to pop off the end.
Inno Roof Rack Review - 2016 Nissan Altima

Today on our 2016 Nissan Altima, we're doing a testfit of the Inno Crossbars. The part number for our crossbars today is INXB 108-2, for our footpack, we're using INXS 200 and for our fit kit for this vehicle we're using INK 625. Now we already have our front crossbar put together, we've got one of our footpacks for the back bar put together, we'll show you the last one, how you secure it onto our bar, and then how we load that up onto our vehicle. Everything that you see here on our table is included with our kit. We're going to start by taking our footpack here, we'll take our rubber piece and we're just going to fit it onto the bottom. Push it down, make sure it's completely secure on the bottom of our crossbar here. Then, we'll flip it around and we're going to unscrew this bolt. We can take our clamp, we're going to hold it into place here, and start to tighten down that bolt once again. Now we just want to tighten it down just enough so that the clamp is held into place.
Rhino-Rack RS 2500 Vortex Aero Roof Rack Installation - 2014 Nissan Altima
Speaker 1: Today, on our 2014 Nissan Altima we're going to be taking a look at the Rhino-Rack RS 2500 Series Roof Rack with the Vortex Aero Crossbars in silver, part number RRRS584. Now the crossbars are also available in black using part number RRRS584B. So here's what our Rhino-Rack Roof Rack System is going to look like on our Altima. Now, it's going to allow us to put all sorts of carriers and gear on top of our car without having to have the factory raised rails. The nice thing about this roof rack system is that it is going to be a complete kit. It's going to have our crossbars with our front pegs built-in, so it's going to have the factory OEM look because the crossbars are going to stop right at the foot pack.
Yakima Q Tower Roof Rack Installation - 2013 Nissan Altima
Today on our 2013 Nissan Altima, we'll be testing the Yakima Round Bar Roof Rack System, part numbers Y00409, Y00727, Y00606 and Y00124. With our Q Towers, Q clips and bars already assembled, according to the included instructions, we will begin our test fit by placing a front crossbar onto the front of our roof. You will then need to measure 15 1/8 inches from the front part of the glass to the first part of the tower on both the passenger and driver side of the vehicle. Once we've established this position, we can turn this over bulbs on the inside of the tower and clamp down the black lever to bring the clips up around tightly against the roof line. With this done we can now place our rear bar onto the rear of our roof. Well then measure the crossbar spread.
Yakima Q Tower Roof Rack Installation - 2013 Nissan Altima Y00124
Today on our 2013 Nissan Altima, we'll be test fitting the Yakima Q Towers roof rack system, with 48" crossbars, part numbers Y00408, Y00727, Y00606, and Y00124. With everything all assembled according to the instructions, we'll begin our test fit by placing the front crossbar onto the front of our roof. We'll then need to measure 15-1/8" from the first part of the glass to the first part of the tower on both the passenger and driver side of the vehicle. This will ensure the front crossbar is perpendicular to the roof. Once we have established this position, we'll then need to tighten the bolt on the inside of the tower, alternating each side, then clamping down the black cover, bringing the clamp tightly up against the roof line of our Altima. With this done, we'll place our rear crossbar onto the rear of our roof and measure the crossbar spread.
Thule Traverse Roof Rack Installation - 2012 Nissan Altima
Today, on our 2012 Nissan Altima, well be test fitting the Thule Traverse Roof Rack System, using part numbers THKIT1580, TH480, and THLB50.With our roof rack pre-assembled according to the instructions found with the fit kit, were ready to go ahead and fit it to the vehicle.Well first need to open the doors on the vehicle. With the doors open, we can now simple set the front crossbar on top of the roof, well then take a measurement from the top of the windshield back on the roof. Well need to measure back 10 inches and this will be the location of the leading edge of the towers on either side of the front crossbar. With the front crossbar in place, we can now tighten it down using the included torque tools within each tower.Now that our front crossbars secured to the vehicle, we can go ahead and move on to the rear crossbar. Again, well set it on top of the roof. This time well need to do another measurement.
Thule Traverse Roof Rack Installation - 2011 Nissan Altima
Today on 2011 Nissan Altima were going to do a test fit of a Thule roof-rack system. Were using Thule square loadbars 50-inch long, Thule traverse roof-rack foot pack and a foot kit part number 1580. And we have our roof rack reassemble according to instructions so I go ahead and place them on the roof. Well start with the first crossbar going towards the windshield. And next we go ahead and put the roof-rack in the correct spot. We need to measure from the edge of the windshield to leading edge of the foot pack.
Yakima Q Tower Roof Rack Installation - 2010 Nissan Altima
Today on our 2010 Nissan Altima, we'll be test fitting the Yakima round bar roof rack system, with a length of 48 inches, part number Y00408, the Q-35 Q clips for Yakima Q towers, part number Y00635, and the Yakima Q tower feet for a naked roof, part number Y00124. To begin out test fit, we'll place the front cross bar, already assembled, onto our Altima. The instructions tell us to measure 10 inches from the top edge of the glass to the closest part of the Q tower, to ensure a good fit. By measuring this on both sides of our Altima, our Yakima roof rack will be evenly aligned. Once everything is situated correctly, we'll tighten the thumb screws inside our Q towers, alternating on each side to keep an even fit. When the Q towers are tightened, we can close the cap. Now we'll open our rear doors, and place the back half of the rack onto our Altima. We'll need to measure again from the center of each cross bar, to get the correct placement of our second bar. The cross bar spread should be 32 inches, and as before, we'll measure this on both sides of our Altima.
Inno Roof Rack Installation - 2008 Nissan Altima
Speaker 1: Today on our 2008 Nissan Altima, we're gonna be test fitting Inno Square bar roof rack system consisting of part numbers, INB117. These are the Inno Square Crossbars, 46 inches long, part number INSUT, these are Inno Feet for the Square Crossbars and finally part number INK116. This is the custom Fit Kit for the Inno Roof Rack System. The Inno Square Bar Roof Rack System is great for carrying a wide variety of accessories on your roof while freeing up space inside your vehicle. This can carry anything from bike racks to cargo baskets to cargo boxes. While the Square Bars are strong and sturdy, they are gonna make some noise while you drive.


What our customers are saying:
"Easy place to shop. Fast delivery and great products. Very happy with my purchase."