
# 1
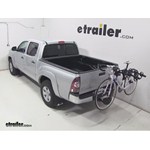
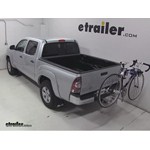
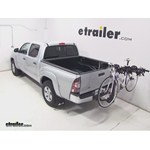
Swagman Truck Bed Bike Rack for 2 Bikes - Fork Mount - 9-mm Skewer
This is my second swagman pickup truck bike rack. I had my first one for about 10 yrs. It rusted/fused. I like this rack because it keeps my road bike up off the road away from potential rock road debris. I also like this bike rack because I am able to see my bike in my rear view mirror as opposed to the bike being down behind the tailgate which limits my view in case of any trouble. I find it very easy to load or unload my bike or a second bike. There are many other bike racks available that are harder to install or maintain and cost more. For the money this is my favorite. Thank you E-Trailer.com
Received the rack yesterday and it took all of 10 minutes to install in my '18 Tacoma this morning. Instructions were pretty thorough and should work great for our bikes (road and mountain). Quality mounts & skewers is a plus. Nice to have the option for locator pins in the side rail, too.
# 2
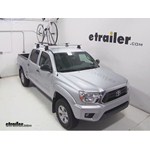
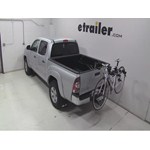
Inno Velo Gripper Bike Rack for Truck Beds - C-Channel Mount
I have a 2021 Toyota Tacoma and they work perfect for my downhill mountain bikes, love them. Can load and unload without ever having to climb into the back of my truck
Velo Gripper Bike Rack install was super easy. Velo Gripper installed exactly as advertised. The videos were very informative and install was exactly as described. Install on 2023 Tacoma and it fit perfectly. Bike looks extremely stable so I don’t anticipate any issues.
# 3
Swagman E-Spec Bike Rack for 2 Electric Bikes - 2" Hitches - Frame Mount
I've been looking a eBike racks for about a month and finally decided on this Swagman rack because it's rated for use on an RV. That's what I needed because it will be on the back of my travel trailer. I had it on my wish list on another site but etrailer had it for $[XX] less, so I jumped on it. It was fairly easy to put together, I installed it on the hitch on my truck so I wouldn't have to wrestle with it on the floor of my garage, that made it easy to assemble. This rack is very well built, and is very solid, it doesn't move while on the hitch on my truck (I installed the RV hardware) so I have no doubt that in will be fine on the back of mhy travel trailer.

So far so good! I have used it on the back of my Jeep Grand Cherokee and on the back of our travel trailer. It is a pretty solid e-bike rack. I would definitely recommend this e-bike rack. We did purchase it for using on our travel trailer, but also works great on the back of our cars, which have 2" hitch receivers. On the travel trailer we also installed a Draw-Tite Hitch, along with a Curt 14" hitch extender for 2" trailer hitches and a Malone anti-rattle hitch lock system. We purchased everything from etrailer. I am very happy with how all of this works together for hauling our e-bikes on the back of our travel trailer.
# 4
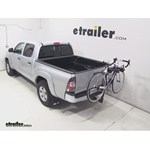
Swagman XC2 Bike Rack for 2 bikes - 1-1/4" and 2" Hitches - Frame Mount
Love my bike rack! Easy on easy off! Great product,
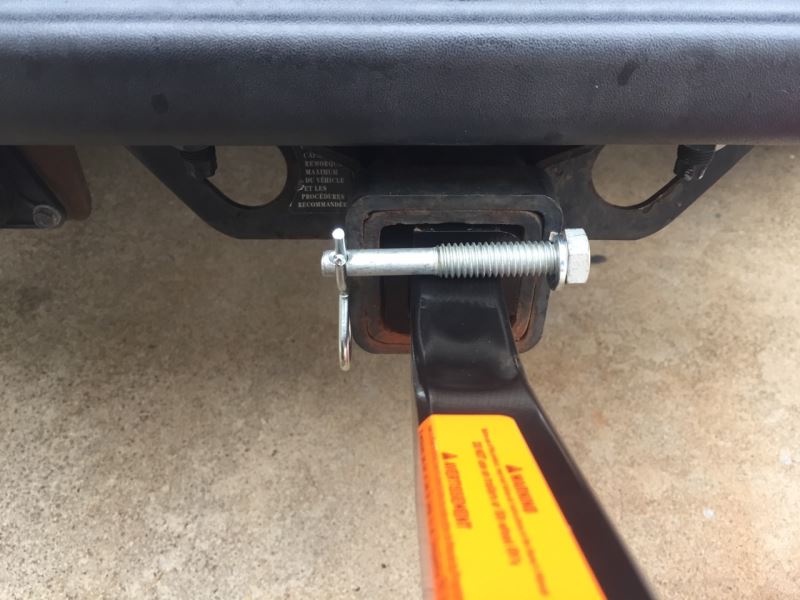
After setting up my new bike rack, I found that the "universal tow hitch adapter" that's used for bigger tow hitches such as my Toyota Tacoma didn't seem to compliment entirely. Attached pictures, you will see that the locking bolt and along with the cotter pin to secure the locking bolt onto the tow hitch doesn't quite reach through all the way across. Therefore, I wasn't able to insert the cotter pin through the locking bolt and couldn't safely secure my bike rack to the tow hitch of my Tacoma. I know the Toyota Tacoma is a very popular vehicle and I recommend all future orders be replaced with a much longer locking bolt (at least 1/2 inch longer) to accommodate truck owners like me. On the contrary, the bike rack does manage to fit onto my Mazda5 Minivan when utilizing the smaller tow hitch (without the universal tow hitch adapter for Class 3 Receiver). The bike rack is very versatile when loading bikes of various sizes and folds up to stow away very conveniently. Overall, great product!!
# 5
Softride Shuttle Pad Tailgate Pad for Mid-Size Trucks - Up to 6 Bikes - 54" Wide
2018 Toyota TacomaThis product was a little tricky to figure out at first, I have a 2018 Tacoma and I had to let the tailgate half way down to get the straps through. After I figured that out, it was easy to use and protected my tailgate. Great product! We've loaded three bikes on it at one time (26.5", 27", 29") and it worked great.
It fit our 2019 Tacoma pick-up perfectly. We used it this past week-end, drove an e-bike and a mountain bike on the highway for an hour to our destination with no problems.
# 6
Swagman XTC2 Bike Rack for 2 Bikes - 1-1/4" and 2" Hitches - Frame Mount
We got the XTC2 to replace an old school rack. It was easy to put together and feels sturdy and well made. We will be using it on a 2016 Civic, 1999 4x4 Tacoma and a Casita Trailer. Looking forward to using it when the weather warms up.
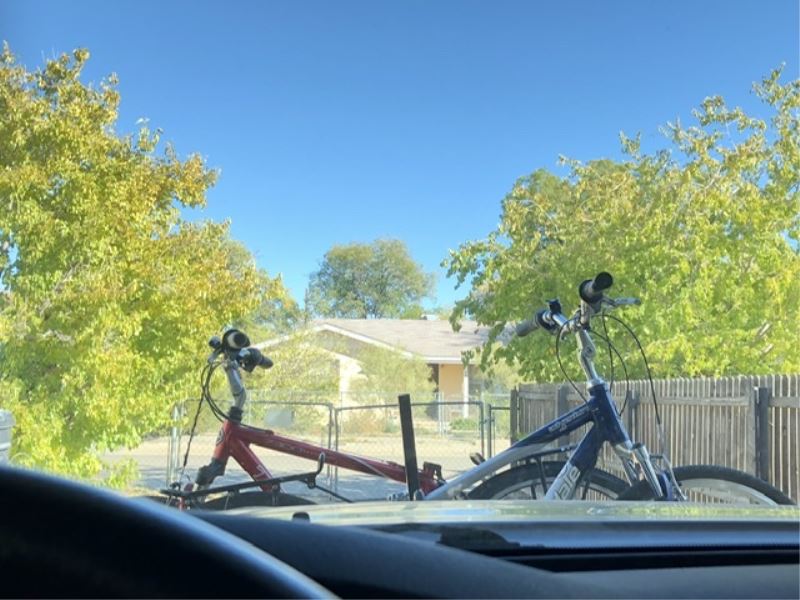
Looks like a good bike rack. I had to get a front receiver hitch and this bike rack so we could take our bikes when we tow our a-frame trailer. The bikes don’t block our view of the road much if the seats are removed.
# 7
Swagman Patrol Truck Bed Bike Rack for 2 Bikes - Fork Mount - 9-mm Skewer and 15-mm Thru-Axle
Quite pleased with nearly everything regarding this rack. Setup was super easy right out of the box, loved that I didn't need any tools. Bikes feel very secure and I haven't noticed any shifting or movement while driving around. My only complaint is that it's possible for someone to remove (or steal) the locking skewers when there's no bike attached just by unscrewing the endcap. Even if the handle is locked in place, just unscrew the endcap and you can remove the whole locking mechanism. So...works fantastic when there's a bike to be hauled, but makes me uncomfortable when I just park the truck and walk away. Works great, could just be a bit more secure.
Garbage. You have been warned.
# 8
Hollywood Racks Truck Bed Bike Carrier - Fork Mount - Bolt On
I looked at so many products, but then saw these pull up on a truck beside me one day. I started with two and mounted them to the rails in my Tacoma truck bed. After continuous use hauling our bikes to and from triathlons, I bought a third! I can now fit three road bikes across the bed of my truck and still have rooms for gear below them. Thanks of the great product guys.
Bike rack in Tacoma
# 9
Yakima BlockHead Single Bike Truck Bed Mounted Rack - Bolt-on - 9-mm Skewer
Works great! It would be nice is it came with the mounting hardware, however. eTrailer.com shipped the product immediately.
Chevrolet Silverado 1500Have used the block head bike mounts by Yakima on trips of 800 to 1500 miles with no incident. Easy to mount the bikes and they have not released even on bumpy roads. Great product for my truck box and bikes are always in view. Easiest way I have found to transport our bikes
# 10
Swagman Chinook Bike Rack for 2 Bikes - 1-1/4" and 2" Hitches - Frame Mount
First platform style I've used. It is on a 2016 Toyota Tacoma. I can ALMOST put the tailgate flat, but goes 99% when tilted back to remove items from bed of truck. There is a lot of nice things about this product. The mast lays down and platform fold closer to your vehicle when not in use. It also tilts away from the vehicle to easier load the front bike. The tightening and locking pin is nice and the ratcheting hooks also lock. Was east to assemble. Galvanized hardware is also a nice touch too. Well worth it, I got it on sale anyway. It was a very long time to ship, got held up at the manufacture. Very happy with the Swagman brand!
Works for my fat tire bike. Once it's set up, it's easy to install and remove. I had to cut out some of the plastic cladding on the underside of my bumper on my 2014 Subaru Outback. Good value. I've had no issues.
# 11
Kuat NV 2.0 Bike Rack for 2 Bikes - 2" Hitches - Wheel Mount - Gunmetal Gray
Fantastic bike rack. Switch it between a Honda Ridgeline and a Subaru Outback Wilderness and it works perfectly. Accidentally lost the locking pin that secures the rack to the trailer hitch and when I inquired with Kurt about ordering a replacement lock keyed to match the locking cables on the rack and the Kuat rep sent one to me for free. (I removed the rack and left the lock sitting on my car bumper. Later that day I drove off and lost the lock on the highway).
Great bike rack. It is easy to install the hitch on a vehicle and to remove it. The Kuat NV 2.0 provides a smooth, gentle ride for road bikes and mountain bikes. Great purchase. Highly recommend.
# 12
Kuat Beta Bike Rack for 2 Bikes - 2" Hitches - Tilting
Kuat Beta is ideal 2" hitch, 2 bike rack. It is well made, relatively light, very sturdy, and installs in a minute. We recently drove for 2000 miles with our bikes on it. Very stable, no vibration. Minimal vibration only on very rough roads, as you would expect.
Built extremely well , simple to use and reasonable cost compared to other brands. Very satisfied. Ed T
# 13
Yakima FrontLoader Wheel Mount Bike Carrier - Roof Mount
It's a fantastic roof rack, which I use above my truck bed. I recently bought a second one so I can take my road bike and gravel bike with me on my camping trips.
Mounted nicely on my Rhino racks and holds our nikes well. Easy to load and unload.
# 14
Thule Insta-Gater Pro Truck Bed Bike Rack - 1 Bike
Another great product from etrailer.
I was not sure this rack was right for me when I ordered it, but the Thule reputation convinced me, and I’m glad I pulled the trigger on it. This fits nicely in the bed of my truck, and secures my bike quite well. I have to drive about 25 miles via mountain roads to get to my paved trail…curvy roads with elevation changes…and I have zero worries about any calamities… For a single bike situation, it’s a great solution that keeps the bike in the bed, not on the back bumper.
# 15
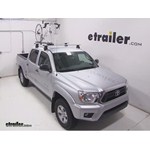
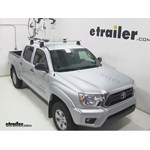
Swagman Upright Bike Rack for 1 Bike - Roof Rack Crossbars - Frame Mount
We just installed the bike rack this weekend for a trip down I95S. The assembly was easy, but I recommend you finish the assembly on the vehicle to make sure the crossbars correctly align with the rack. Someone also recommended you install the upright bar to make sure it faces to the outside of the car. This means you will have to switch the orientation for a passenger-side installation. It is a little more difficult to tighten the upright bar if it is located to the center of the car. Finally, though the clamps may seem narrow, you can fully remove the tightener knob to full pull apart the upright bars. We needed to do this to get my husband's bike to fit within the clamps. The installation was simple. It did require two people to put the bikes on top of a Tacoma Pick-up due to the height of the rack. The bikes were stable on the racks, and we noticed no issues while going down the road. Excellent product for the price.
Great product for the price. Pretty easy to set up. Only issue I have is my mountain bike, which is an XL frame with 27 inch wheels, is pushing the limits of the base. Wish this rack was just 4-5 inches longer that way you have the perfect overlap amount in the middle without pushing the current frame to the limits. With that said it does hold my bike just have to find the sweet spot. But this fits my son’s youth bike perfectly!
# 16
Saris Traps Fork-Block 3 Bike Rack - Triple Track - 47" Long - 9-mm Skewer
2019 Toyota TacomaAfter one year still love this product! Use it in a 2019 Tacoma Short bed with a leer cover. My bike fits perfectly and is stabilized during travel - so easy to take in and out. Also use the wheel holder which works well. When not using the Sari track its so simple to take out of truck and store.
Excellent product and well made. Looks great
How to Install the Yakima FrontLoader Wheel Mount Bike Carrier on a 2013 Toyota Tacoma

Today on our 2013 Toyota Tacoma we're going to be test fitting the Yakima FrontLoader, a wheel-mount roof bike rack with part number Y02103. With our Yakima Q Towers roof rack system already installed on the Tacoma we'll begin our test fit by placing our bike rack directly onto our crossbars. As we do this as our front crossbar we'll want the two outside arms to be in the front of the bar and the single middle bar to be behind it. We can then tighten down our black t-handle to secure the front of the rack to the front of our vehicle. With the front secure we'll now move to the rear. Here we're going to loosen the black t-handle, remove the t-bolt from the slot, bring the clamp around the underside of our crossbar, reinsert the t-bolt, and tighten down the black t-handle to secure it. With our rack secure it's now time to load up our bike. We'll first undo our rear wheel strap and then extend out the large portion of our front wheel clamp.
Install: Yakima ForkLift Roof Mounted Bike Carrier on a 2013 Toyota Tacoma

Today on our 2013 Toyota Tacoma, we're going to be test fitting the Yakima Forklift, a fork mount roof bike rack, with part number Y02098. With our Yakima Q Towers roof rack system already installed on the Tacoma, we'll begin our test fit by placing our bike rack directly onto our crossbars. Here at the front, we're going to remove the skewer, slide back the black cover, and loosen the T handle. This will allow us to remove the T bolt from the lower portion of our clamp. We'll then bring that lower portion around the underside of our crossbar, re-insert the T bolt into the appropriate slot, and tighten down our T handle. This will secure the front of our rack to our crossbar. We can then slide the black plastic cover forward, and re-insert our skewer. With the front secure, we'll move to the rear. Here at the rear, we'll loosen the black T handle, remove the T bolt from the slot, bring the clamp around our bar, re-insert the T bolt, and tighten down that T handle. With the front and rear secure, it's now time to load our bike.
RockyMounts TieRod Stretch Roof Bike Rack Review - 2013 Toyota Tacoma

Today on our 2013 Toyota Tacoma we're going to be test-fitting the RockyMounts TieRod Stretch, a fouk-mount roof bike rack with part number RKY1011. With our Thule Rapid Diverse Roof Rack System already installed on the Tacoma, we're going to being our test fit by placing our bike rack directly onto the load bars. Here at the front we'll bring the black, rubber-coated metal straps around the underside of our load bar, remove the black plastic cover and fit them into the head of the carrier. We'll then use an Allen key to tighten the Allen bolt and secure the front of our rack. With it secure, we can replace that cover, then move to the rear. Here at the rear we're going to remove one of the Allen bolts from our clamp, bring it around the underside of our load bar, reinsert the Allen bolt and tighten both Allen bolts down with an Allen key. With our rack secured to our vehicle, it's now time to load up our bike. We'll begin by undoing our rear wheel strap and making sure that our front skewer is loose and open. We'll grab our bike, place it onto the bike rack.
Thule Vertex 4 Hitch Bike Rack Review - 2013 Toyota Tacoma
Today on our 2013 Toyota Takoma double cab we're going to be test-fitting the Tooley Vertex, a tilting 4 bike rake for inch and a 1/4 and 2 inch hitches, part number Th9029. To begin our test-fit we'll slide the shank of the bike rack into the receiver tube of our hitch. Line up our pinholes, thread in our anti-rattle bolt and tighten it down with a wrench. In this position we'll have about 15 1/4 inches worth of ground clearance. The closest point of the rack to the back of our vehicle's about 3 inches away. Overall we've added about 11 1/4 inches to the length of the Tacoma. Pulling the gray lever at the base of the center mast will allow us to tilt it away from our vehicle. As you can see, this allows us to fully open our tailgate.
Thule Helium Aero Hitch Bike Rack Review - 2013 Toyota Tacoma
Today on our 2013 Toyota Tacoma Double Cab, we're going to be test fitting the Thule Helium Aero, a tilting two bike rack for 1 1/4 and 2 inch hitches, part number TH9042. To begin our test fit, we'll slide the shank of the bike rack into the receiver tube of our hitch. As we do this, we'll want to hold out on the attached pin. We'll line up our pin holes, allow the attached pin to fall into the pin hole. We'll then turn the black knob. This will engage our anti-rattle device and further secure our rack to our vehicle. In this position, we have about 16 inches worth of ground clearance.
Thule Apex 4 Hitch Bike Rack Review - 2013 Toyota Tacoma

Today on our 2013 Toyota Tacoma Double Cab, we are going to be test fitting the Thule Apex, a tilting 4 bike rack for 1 1/4 and 2 inch hitches. Part number TH9025. To begin our test fit we'll slide the shank of the bike rack into the receiver tube of our hitch. As we do this, we'll hold out on the attached pin. We'll line up our pin holes, allow the attached pin to fall into the pin hole and then we'll tighten the black knob. This will engage our anti rattle device and further secure the rack to our vehicle.
Thule Doubletrack Hitch Bike Rack Review - 2013 Toyota Tacoma

Today on our 2013 Toyota Tacoma Double Cap, we are going to be test fitting the Thule Double Track, a platform style 2 bike rack for 1 1/4 and 2 inch hitches, part number TH990XT. To begin our test fit we'll slide the shank of the bike rack into the receiver tube of our hitch, line up our pin holes, grab in our anti rattle bolt and tighten it down with a wrench. We'll then secure it using the provided lock. In this position we have about 15 inches worth of ground clearance. The closest point of the rack to the back of our vehicle is about 5 1/2 inches away and overall we've added 10 1/2 inches to the length of the truck. Pulling the gray lever at the base of the rack will allow us to tilt it away from our vehicle.
Thule Big Mouth Roof Bike Rack Review - 2013 Toyota Tacoma

Today on our 2013 Toyota Tacoma, we're going to be test fitting the Thule Big Mouth, a roof mounted bike rack, with part number TH599XTR. With our Thule Traverse Roof Rack System already installed on the Tacoma, we're going to begin our test fit by placing our bike rack directly onto our load bars. Here at the front we're going to remove the T-Bolt from both clamps, bring the clamps around the underside of our load bar, reinsert the T-Bolt, and tighten down both wingnuts to secure them. With the front secure, we can move to the rear. Here we're going to loosen both wingnuts and remove one completely, we'll bring one of the bolts down on both sides of load bar, bring the metal portion of the clamp around the underside of our load bar, place the bolt back through it, and re-thread on the wingnut. We'll then tighten down both wingnuts to secure the rear of our rack. It's now time to load our bike.
Setting up the Swagman Upright Bike Rack for 1 Bike on a 2013 Toyota Tacoma
Today on our 2013 Toyota Tacoma we're going to be test fitting the Swagman Upright Roof Bike Rack, part number S64720. With our Thule Rapid Traverse Roof Rack System already installed on the Tacoma, we'll begin our test fit by placing our bike rack directly onto our load bars. Here at the front, we're going to bring two of the U bolts around the underside of our load bar, fit them up through the head of our carrier and hold them in place with the four wing nuts. We'll now tighten down all four wing nuts to secure the front of the rack to our load bars. With the front secured, we'll now move to the rear. Here we'll bring a U bolt down through the rack, being sure that one of the threaded portions comes out on both sides of our load bar. We'll then put on the flat black metal portion of our clamp, and hold it in place with two wing nuts. We'll then tighten down both wing nuts to secure this rear clamp to our load bar.
Installation: Swagman Titan Bike Rack for 4 Bikes on a 2013 Toyota Tacoma
Today on our 2013 Toyota Tacoma Double Cab, we are going to be test fitting the Swagman Titan, a tilting 4 bike rack for 1 1/4 and 2 inch hitches. Part number S63410. To begin our test fit we'll slide the shank of the bike rack into the receiver tube of our hitch, line up our pin holes, thread in our anti rattle bolt and tighten it down with the wrench. We'll then secure it using the provided clip. In this position we have about 18 1/4 inches worth of ground clearance. The closest point of the rack to the back of our vehicle is about 6 inches away and overall we've added about 19 inches to the length of our truck.
DIY Install: Swagman Fork Down Roof Mounted Bike Carrier on your 2013 Toyota Tacoma
Today on our 2013 Toyota Tacoma, we're going to be test fitting the Swagman Fork Down. A fork mount roof bike rack, with part number S64710. With our Thule Rapid Traverse Roof Rack System already installed on the Tacoma, we'll begin our test fit by placing our roof rack directly onto our load bars. Here at the front, we're going to bring two of the U bolts around the underside of our cross bars, up through the head of the carrier and we'll hold them in place with two wing nuts. With all four of our wing nuts started, we'll go ahead and tighten them down. This will secure the front of the rack to our load bars. We'll now move to the rear.
SportRack Roof Mounted Bike Rack Review - 2013 Toyota Tacoma

Today on our 2013 Toyota Tacoma, we're going to be fitting the SportRack roof mounted bike rack. Part number SR4622. With our Yakima Q Tower roof rack system already installed on the Tacoma, we'll begin our test fit by placing our bike rack directly onto our crossbars. Here at the front we're going to bring one of the black rubber coated metal U-bolts around the underside of our crossbar. Fit it up through the head of our rack, and hold it in place with two black wing-nuts. We'll take the second black rubber coated U-bolt and repeat that process. We can now tighten down all four wing-nuts, this will secure the head of our carrier to the crossbars on our rack.
SportRack 3 Bike Rack Review - 2013 Toyota Tacoma
Today on our 2013 Toyota Tacoma Double Cab, we are going to be test fitting the Sport Rack Tilting 3 Bike Rack for 1 1/4 and 2 inch hitches, part number SR240. To begin our test fit we'll slide the shank of the bike rack into the receiver tube of our hitch, line up our pin holes and thread it our anti rattle bolt. We can then tighten it down with the wrench and secure it with the provided clip. In this position we have about 15 1/2 inches worth of ground clearance. The closest point of the rack to the back of our vehicle is about 5 inches away and overall we've added 11 1/2 inches to the length of the our truck. Pulling the black pin at the base of our center mast will allow us to tilt it away from our vehicle. As you can see this does give us the ability to fully open our tail gate.
Softride Element Hitch Mounted Bike Rack Review - 2013 Toyota Tacoma

Today on our 2013 Toyota Tacoma we're going to be test fitting the Softride Element Parallelogram, a tilting 4 bike rack for 1-1/4" and 2" hitches, part number SR26248. To begin our test-fit we'll slide the shank of the bike rack into the receiver tube of our hitch, line up our pin holes, thread in our anti-rattle bolt and tighten it down with a wrench. In this position we have about 15-1/4" of ground clearance. The closest point of the rack to the back of our vehicle is about 4-1/4" away, and overall we've added about 13" to the length of the Tacoma. Pulling the two silver pin and clips at the top of the masts will allow us to spin our arms up into the loading position. We'll reinsert the pins to secure them in place. In this position, with our arms extended, we've added about 30" to the length of the truck. It's now time to load our bike.
Softride Dura Hitch Bike Rack Review - 2013 Toyota Tacoma

Today on our 2013 Toyota Tacoma Double Cap, we are going to be test fitting the Soft Ride Dura Parallelogram, a tilting 4 bike rack for 1 1/4 and 2 inch hitches part number SR26247. To begin our test fit, we'll slide the shank of the bike rack into the receiver tube of our hitch, line up our pin holes, thread in our anti rattle bolt, tighten it down with the wrench. In this position you'll have about 15 1/4 inches worth of ground clearance. The closest point of the rack to the back of our vehicle is about 6 inches away and overall we've added about 37 1/4 inches to the length of the truck. A great feature of the Dura Parallelogram is the removable cradle arms. This allows for extra storage options.
Saris Thelma 3 Bike Rack Review - 2013 Toyota Tacoma

Today on our 2013 Toyota Tacoma Double Cab, we're going to be test fitting the Saris Thelma, a platform style 3 bike rack for 1-1/2 inches and 2-inch hitches. Part number SA4239B. To begin our test fit, we'll slide the shank of the bike rack into the receiver tube of our hitch, line up our pin holes, thread in our anti-rattle bolt from the left to the right, and tighten it down with a wrench. We'll then secure it using the provided clip. In this position, we'll have about 15-3/4 of an inch worth of ground clearance. The closet point of the rack to the back of our vehicle is about 3 inches away. Overall, we've added about 10-1/2 inches to the length of our truck. Pulling the gold pin and clip at the base of the rack will allow us to tilt it into its platform position. We'll reinsert the pin to secure it.
Set up: Saris Freedom Bike Rack for 4 Bikes on a 2013 Toyota Tacoma

Today on our 2013 Toyota Tacoma, we're going to be test fitting the Saris Freedom, a platform style 4 bike rack for 2 inch hitches, part number SA4414B. To begin our test fit, we'll slide the shank of the bike rack into the receiver tube of our hitch, line up our pin holes, thread in our anti-rattle bolt from the left to the right, tighten it down with a wrench. We can then secure it with the provided clip. In this position, we have about 15 inches worth of ground clearance. The closest point of the rack to the back of our vehicle is about 4 inches away and overall, we've added about 17 inches to the length of the Tacoma. Pulling the gray lever at the top of the rack will allow us to tilt it away from our vehicle into platform position. In this position, we have about 22 inches worth of ground clearance here at the rear. The closest point of the rack to the back of our vehicle is now about 10 1/4 inches away.
Saris Axis 3 Bike Rack Review - 2013 Toyota Tacoma

Today on our 2013 Toyota Tacoma, we are going to be test fitting the Saris Axis, a tilting 3 bike rack for 1 1/4 and 2 inch hitches part number SA843B. To begin our test fit we'll slide the shank of the bike rack into the receiver tube of our hitch, line up our pin holes, thread in our anti rattle bolt from the left to the right and tighten it down with the wrench. In this position we have about 15 1/2 inches worth of ground clearance. The closest point of the rack to the back of our vehicle is about 5 1/2 inches away and overall we've added about 14 inches to the length of our truck. Pulling the yellow T handle at the base of the mast will allow us to tilt the rack away from our vehicle. As you can see this gives us full access to open our tail gate. With our mast big in its upright position, it's now time to extend our dual cradle arms.
Saris Axis Tilting 2 Bike Rack Review - 2013 Toyota Tacoma
Today on our 2013 Toyota Tacoma Double Cab we're going to be test fitting the Saris Axis, a tilting 2-bike rack for 1-1/4" and 2" hitches, part number SA832. To begin our test fit we'll slide the shank of the bike rack into the receiver tube of our hitch, line up our pinholes, thread in our anti-rattle bolt from the left to the right, tighten it down with a wrench, and then secure it with the provided clip. In this position we have about 15-1/4" worth of ground clearance. The closest point of the rack to the back of our vehicle is about 6" away. Overall we've added about 13-1/2" to the length of the truck. Pulling the yellow t-handle at the base of the mast will allows us to tilt it away from our vehicle. As you can see, this allows us to fully open our tailgate.
Prorack 4 Hitch Bike Rack Review - 2013 Toyota Tacoma

Today on our 2013 Toyota Tacoma Double Cab we're going to be test fitting the Prorack Tilting 4-Bike Rack for 1-1/4 and 2 inch hitches part number PR8062404. To begin our test fit we're going to slide the shank of the bike rack into the receiver tube of our hitch. We'll line up our pinholes, thread in our anti-rattle bolt, and tighten it down with a wrench. We can then secure it with the provided clip. Our racks going to offer us about 14-3/4 of an inch worth of ground clearance. The closest point of the rack to the back of our vehicle is about 5-1/2 inches away.
Hollywood Racks Traveler Tow n Go Bike Rack Review - 2013 Toyota Tacoma

Today on our 2013 Toyota Tacoma Double Cab, we're going to be test fitting the Hollywood Racks Traveler Tow 'n Go, 3-Bike rack for 2 inch ball mounts, part number HR135. For today's test fit we're going to be using the hidden hitch ball mount with an extra long shank, part number 80232. We'll begin our test fit by sliding the shank of our ball mount into the receiver tube of our hitch, line up our pinholes, insert a pin and secure it with a clip. Please keep in mind the ball mount, the ball, the pin and clip are all sold separately. As you can see when installing this with a simple pin and clip, it does allow for some movement in the bike rack. To remedy this we do have some anti sway devices available, you can check our website for more details. We'll now extend out our duel cradle arms, to do this we will pull out the black pin located at the top of the mast, swing our arms into position; we'll then reinsert the pin to hold them in place. To load up our bike we're first going to undo our cradle straps.
Thule Sprint Fork Mount Bike Rack Review - 2013 Toyota Tacoma

Today on our 2013 Toyota Tacoma, we're going to be test fitting the Thule Sprint, a fork mount roof bike rack with part#TH528. With our Thule Rapid Traverse roof rack system already installed on the Tacoma, we're going to begin our test fit by placing our bike rack directly onto our load bars. When we do this, we'll be sure to bring the black rubber coated metal straps around the underside of our load bars. Here, at the front, we'll fit the strap into the head of the carrier. Then we'll turn the black lever to secure it in place. With the front secure, we can now move to the rear.
Test Fit: Kuat Trio Roof Bike Rack on a 2013 Toyota Tacoma
Hi. Randy at Etrailer.com. Today on our 2013 Toyota Tacoma, we're going to be test fitting the Kuat Trio, part number Ru01. To begin our test fit, we're going to place the bike rack up on our two load bars. We're going to take one of the black rubber-coated metal U-bolts, go around the underside of our load bar, and fit it up into the head of our carrier. We'll then take one of the cyllinder nuts with the hex-shaped pattern, up; bring it down onto our U-bolt, and then the second one.
Kuat NV Hitch Bike Rack Review - 2013 Toyota Tacoma

Today on our 2013 Toyota Tacoma Double Cab, we're going to be test fitting the Kuat NV, part number N101. To begin our test fit, we'll slide the shank of the bike rack into the receiver tube of our hitch. We'll line up our pin holes, slide through our pin. As we do this, we want to be sure that it engages our anti-rattle device. We'll then secure it using the provided lock. Here at the rear of the rack, we're going to turn the black knob. This is going to engage our anti-rattle device, and further secure the rack to our vehicle.
Yakima StickUp 2 Hitch Bike Rack Review - 2013 Toyota Tacoma
Today on our 2013 Toyota Tacoma, were going to be test fitting the Yakima StickUp, this is a 2-bike folding platform style rack, it will fit 1-1/4 and 2 inch hitches, its part number is Y02420. To begin our test fit, were going to slide the shank of the bike rack into the receiver tube of our hitch. Well then line up our pin holes, thread in our anti-rattle bolt, and tighten it down with a wrench. Well then use the provided clip to secure it. With our rack in this position, youre going to have about 15-3/4 of an inch worth of ground clearance here. The closest point of the rack to the back of our vehicle its like its going to be here, you see, its about 6 inches away from the back of the truck. Overall, weve added about 9 inches to the length of the truck.


What our customers are saying:
"I love my new bike rack. Thanks for the great deal"