
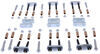
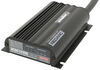
Built to last, this kit, made with surface-mount technology, converts your vehicle's lighting system to match your trailer's. It includes a 60" 4-way flat harness, wire taps, and a power wire that pulls power directly from your battery.
Features:
Specs:
Some vehicles operate on a 3-wire system, wherein the brake signal and the turn signals run on separate wires to illuminate different lights. (Typically, these vehicles have amber turn signals.) But most trailers run on a 2-wire system, which means the brake and turn signals travel along a single wire. You'll notice that, on your trailer, the brake light will flash for the turn signals.
If your vehicle operates on a 3-wire system, it will need to be converted so it will be compatible with the wiring system of your trailer. This is where a tail light converter comes into play. This converter lets you combine the brake and turn signal functions of your vehicle so they run on a single wire to properly activate your trailer's tail lights.
This particular converter also works with newer types of vehicle wiring, like PWM. Pulse Width Modulation (PWM) is standard on European vehicles.
This converter won't overload or cause damage to your system because it pulls power straight from your vehicle's battery. So you can be sure that your trailer lights will activate no matter what type of bulbs your vehicle has - or your trailer, for that matter.
| Wire Color | Wire Function |
|---|---|
| Green | Right turn |
| Brown | Tail lights |
| Black | Battery power |
| Red | Brake |
| White | Ground |
| Yellow | Left turn |
This kit comes with all the wiring you'll need to convert your vehicle's lighting system to match your trailer's. The powered converter box has splice-in wires on one end and a harness with a 4-way flat vehicle-end connector on the other. It also comes with a power wire that will connect to your battery so your electrical system doesn't get overloaded.
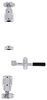
To begin the installation, use a circuit tester (sold separately) to double-check the function of each wire on your vehicle's tail light wiring harness. The color/function of the splice-in wires on this converter may not match the color/function of those on your vehicle, so you'll want to be sure to check all of the wire functions first. Once you've figured out the functions of your vehicle's wiring, use the included quick-splice connectors to connect the corresponding wires on the trailer connector. Quick-splices, or "wire taps" offer a quick way to make connections without you having to strip and twist wires. Just place the wires in one of the taps and snap the cover down.
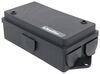
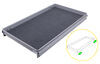
Using double-sided tape, stick the converter box to a flat surface inside your vehicle near the tail lights. It's helpful to clean the surface so the tape can adhere fully.
Once the converter box is spliced in, you need to run the power wire up to your battery. Be sure to remove the fuse before connecting anything so you don't blow it! You can put it back in once everything has been installed. To hook up to your battery, you'll need to disconnect the negative cable from your battery and attach the power wire to the positive terminal with the included ring terminal.
Find a raw, unpainted metal surface to use as a grounding point and secure the white ground wire using the provided self-tapping screw. Cleaning the surface prior to securing the white wire will ensure your converter is fully grounded. Finally, secure the converter wires to your vehicle using included cable ties. If you have a 2-wire system, the red brake wire will need to be grounded as well. You can do that in the same way, using an extra ring terminal (sold separately). Finally, secure the converter wires to your vehicle using included cable ties.
Quick Tips:
Curt builds each tail light converter using surface-mount technology (SMT). This construction method involves soldering electronic components directly to the surface of a printed circuit board. SMT eliminates the need for leads, which are used in older through-hole technology. The result is a smaller circuit board that provides more routing area and that offers superior performance, reliability, and durability.
Circuit boards constructed using SMT perform better under rough conditions with excessive vibration than those made using the through-hole method. And where would vibration be more likely to occur than in towing applications? Curt converters also produce less heat, increasing durability and lifespan. In addition, lower resistance levels ensure better performance, especially for parts that operate at higher frequencies.
Each Curt circuit board is made using high-quality components pieced together in the most technologically savvy fashion, leading to greater predictability and reliability in functioning.

California residents: click here
Videos are provided as a guide only. Refer to manufacturer installation instructions and specs for complete information.
Hi, this is Scott with etrailer. Today, we're taking a look at installing our CURT four-pole trailer wiring on our 2021 Audi Q5. Our CURT Four-Pole Wiring we have on our Audi today is gonna be necessary if you ever plan on pulling a small trailer or if you have accessories like a bike rack or cargo carrier that has accessory lighting on those. What's nice about the way we have this set up is your wiring is gonna be tucked inside your vehicle when you're not using it, and that means it's gonna be away from the elements, it's not gonna get corrosion in your ends, which sometimes they will, even with a cap on them when they're out in the elements, they can't get some corrosion happening here. So, that's nice, it'll just tuck away, and you can still use it the same as you would. All you're gonna do is just put it down here on your bumper.
And your weather strip here is gonna protect your wiring so you don't have to worry about that messing with it at all. So when you're ready to use your trailer wiring, you just plug it in, and then you can just close your gate down on that. (hatch clicking) As you can see, that doesn't hurt that at all. It's not gonna mess with your wiring or cause any arcing. Then, you're all set.
You just plug in either your accessory or your trailer, and you're all set to go. If you have any questions or comments about this CURT Four-Pole Wiring for your Audi, you can always leave a question or comment down below in the comment section, or you can get ahold of one of our experts here at etrailer. They'd be glad to help you out. As far as installation goes, these can be a little tricky, but this one isn't too bad. It's something you could definitely do as long as you know which wires you're going for.
But if it's something you don't have time to do yourself or you just don't want to do that and you want to get a hitch installed at the same time, you can always get a hold of our Dealer Locator and get something done for you locally. If it's something you feel like tackling yourself, stick around, watch our video, and we'll help you get it installed. To start our installation, we want to go ahead and pop our hatch. And here in the back, we're gonna be working on the driver's side. We're gonna have this little cargo cover here and I just want to give that a quarter turn, pull that up and out of the way, and we'll set that aside.
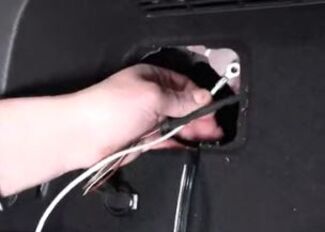
Right here, we're gonna be working in the back. You're gonna have this harness that kind of comes up into this rear pillar. This is the one we're gonna be working with. And as we can see here, this is gonna have some tape on this, almost like a fabric tape that goes up this. You're gonna want to get that at least cut off and pulled back so you can get into this harness 'cause there is quite a bit of wires in here. I went through and already tested our wires and I pulled these three out. These are gonna be the ones we're working with. And I isolated the others so they're not getting in the way when I'm trying to get all my crimping done. So now, we're gonna go over our wires we have here. We have our gray wire with the yellow stripe, and that one is going to be our right turn signal. We have that one. We're gonna have our black wire with a gray stripe. That is going to be our left turn signal. Now, we have our gray wire with a green stripe. That is going to be our taillight signal. So what we're gonna be doing is tapping into all three of these wires to get our trailer wire set up. For our four-pole wiring that comes in our kit, I'll go over our wires we have here. And for our black wire, this is gonna be our 12-volt positive. This is gonna go to our battery. We're gonna have our brown wire. That is going to be for our taillight signal. We're gonna have our yellow wire. That is going to be our left turn signal. We have our green wire. That is going to be our right turn signal. And for this one, we have a red wire here. Now, this is, at times, used for a three-wire system for the break. This is not gonna be used, so what we'll end up doing is grounding this with our white wire, which will be our ground. So we'll take these two, I'll put a ring terminal on the end of this. Put these two together, and we'll run these to our ground here in the back. To give you an idea how we're gonna make our connections, we're gonna have our connectors here that come in our kit, and it's gonna have this little blade on it. So, the wire that's on our vehicle, what we're gonna do with that is we're gonna take our wire that comes in our vehicle, and we're gonna run that through our blue connector and one side of that's gonna go all the way through. So, we'll run that one there. And then the other side that we're gonna tap into our wiring with out of our harness, we'll take that and we'll run that into our side where that will come to a dead end. Now, after we've made that, we have those two wires. Together, we wanna make sure we have that pushed in, both of those, where they need to be. Then, we'll come back through with a pair of pliers. You can use needle nose or whatever you have. And we're gonna push down on this little blade. What this blade's gonna do, it's gonna bite into both of these wires and it's gonna make our connection between the two. So, we just wanna make sure we get that down nice and tight, make sure we get that fully seated down in there. After we've made that connection, all we have to do is close this little cover, and that will cover everything up. What I'll do now is I'll come through and I'll get all these connected and I'll show you how this looks with everything all hooked up. As you can see, we have them connected in there. And make sure when you're doing these that you're getting your wire to run all the way in. Sometimes, you may need to pull out on that little metal tab. That way, your wires, and make sure they're going all the way up to the end so you don't want to get it put in there and then pushing your little tab, and then you're gonna have to take this whole thing off. So just make sure you're getting your wire ran all the way up in here to the top. On the side of our panel, you can see where we have our red and our white wire. These are our grounds. And the nice thing about our Audi today is it does have a factory ground location right here. So it worked out really nice. We just put a ring terminal on our red wire and then ran both of our grounds up in here to our stud. And it's got this tightened down. That's gonna give us a really good ground, so that way, we don't have any issues in the future. With everything over here hooked up, now we need to get our 12-volt hooked up. So what we need to do now is we're gonna get into the back. So luckily, with this particular model, our battery is here in the back, so it's gonna make things a little bit easier on them. So all we're gonna do is just remove our floor coverings, we'll pop those out and we'll set those aside. Now, right up under here, we're gonna have our battery with this panel. This thing's gonna do the same thing. It's just gonna pop up out of the way. It's gonna be in there on little pins. So basically just want to pop up and we'll set that aside as well. Underneath it there we can see where our battery is located. In our kit, we're gonna have this black wire. It's gonna come in a roll. We're gonna use that as an extension. So what I did is I ran it through right here where I able to get it through and then run it up on the inside. And then I just ran it up underneath down this plastic channel and then over, and I have some over here to the battery and just cut off the extra. So I'd like to leave a little bit extra here so I have some room to tuck it away, but now I have it coming out over here where we're gonna make our connection. Now, normally, I would use heat shrink butt connectors. Since this is in the inside the vehicle, these are gonna work out just fine. So what I want to do is just get my end stripped off. I'll just take my wire strippers and I'll just strip off some of that wire. And I'll do that on both of these wires because this one don't have a whole lot of wire coming out of the end. So I like to have a little bit more there, so I make sure we get a good connection. Just get those twisted up on both of those ends. Now, I'll take my butt connector, run that onto the end of our wire, take my crimp and pliers. We'll get that crimp in place, make sure we get a good bite on that. We wanna make sure we get a good solid bite and we do give a little pull. Now, I'll take my other end, do the same thing, and we'll get that crimped in place. (wire clicking) (pliers clattering) Check both ends, and we have a good connection there. Now, we'll move on to the end. That's gonna go to the battery. At this point, we can get our fuse holder built and basically the same process. I'm just gonna get some more wire out of my ends. I did strip a little bit out of these just so I can get a little more wire to work with. But now, we're just gonna go ahead and get these crimped on. (fuse holder clattering) Now, on our other end, we're gonna have our ring terminal. Same thing, just strip a little more wire off of there, and I'll run that onto the end of the wire and crimp that in place. (pliers clattering) Now, on this end, all I'm gonna do is strip off this end and I'll go ahead and crimp this on. (wire clattering) Now, we wanna locate the positive terminal on our battery, which we see here. So this is just gonna have a little cover on it. All we're gonna do is just pop off our cover and set that aside. Here we have our terminal. It's gonna have a 10-millimeter nut on it. A lot of these will have a captured system where you won't be able to back this nut all the way off. So you just want to get this loosened up quite a ways back, back that off quite a ways, and it's gonna stop right there. It's gonna capture that. So what I wanna do, since I have a closed ring terminal, all I'm gonna do with this is I'm gonna end up cutting an end out of it, (wire snapping) cut a piece out of that end, and we're gonna try and fit that in through behind our nut. And I probably need to close that up just a little bit. So what I'll do is I'll just get that end to bite down a little bit. Cut a little more off each side. (wire snapping) Now, you could use a smaller ring terminal, that would work for you as well. But with this, I want to get a little more contact. I'm gonna bring these together just a little bit. Make my ring terminal just a little bit smaller. (tools clattering) Now that I've done that, open that up just a little bit more. (tool clattering) Get that ran down behind that nut. And we'll take our 10-millimeter socket and we'll tighten that back now. (tool clicking) (tool clattering) Now, we see this sticking up. All I'm gonna do is just bend that down out of the way. We'll see if we need to do that for our cover. Now, I'll just take my cover, pop that back on, see if it's gonna go back on with that there. And it will, so we'll just leave it just like that. Now, we'll take our 15-amp fuse and we'll put it in our fuse holder. Get that in there. We'll cover that up. Now, we'll go ahead and test out our lights with my tester. You can do this with a tester. You can pick these up here at etrailer. Or you can just plug it into your trailer and make sure it's working that way. So what I'll do now, I'm gonna go ahead and turn all my lights, and they're working. I'm gonna do my right turn signal, my left turn signal, brakes with left, breaks with right, and all of our wiring is correct, and our tester is showing that everything's working correctly. Now that we know everything works, I'll come back through and get everything put back together. And that'll do it for our look at and our installation of our CURT Four-Pole Wiring on our 2021 Audi Q5. I'm Scott with etrailer, and thanks for watching.

Info for this part was:
At etrailer we provide the best information available about the products we sell. We take the quality of our information seriously so that you can get the right part the first time. Let us know if anything is missing or if you have any questions.


Thank you! Your comment has been submitted successfully. You should be able to view your question/comment here within a few days.
Error submitting comment. Please try again momentarily.