
To see if this custom-fit item will work for you please tell us what vehicle you'll use it with.
Thank you! Your comment has been submitted successfully. You should be able to view your question/comment here within a few days.
Error submitting comment. Please try again momentarily.


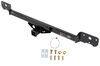
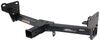
TowSmart's fully welded hitch bolts onto your vehicle. The receiver sits beneath the bumper for easy cargo access. Built from powder-coated steel, it resists rust and corrosion for lasting durability. Perfect for towing and hitch-mounted gear.
With a 500-lb tongue weight, this hitch is ready for your multi-bike rack or a fully loaded cargo carrier. Whether you're hauling electric bikes or extra gear for a weekend trip, it handles the weight with ease.
The 5,000-lb towing capacity makes it ideal for hauling small travel trailers, utility trailers, or lightweight boat trailers, giving you the flexibility to take your adventure wherever you want.
Designed for a simple bolt-on process, this hitch includes all necessary hardware, eliminating the need for drilling or welding so you can get on the road faster.
The square-tube design adds durability while maintaining a clean look. Built to handle work and play, it's ready for whatever your vehicle needs to tow.
The matte black powder coat resists rust and road grime better than traditional glossy finishes, keeping your hitch looking great even in harsh conditions.
California residents: click here
Videos are provided as a guide only. Refer to manufacturer installation instructions and specs for complete information.
Hi, I'm Daniel with etrailer, and today we're gonna take a look at, and I'm gonna show you how to install the TowSmart trailer hitch on our 2014 Ram ProMaster 1500. These vans are really versatile in that you can use them for a variety of different things. I actually installed a hitch on one earlier, and they actually converted the whole inside to a camper. So they we inchesre using their hitch for a bike rack. And as you can see, this is a work truck today. They're gonna be hauling concrete.
So now I'll get into some of the weight capacities this thing can tow. Total towing capacity of this hitch is going to be 5,000 pounds and that is gonna be the hitch plus what ever's packed inside of it. Now this total tongue weight is going to be 500 pounds and that is the weight pushing down on the hitch receiver in this direction. Now if you have a weight distribution system, that'll actually double both of those numbers, so you'll have 10,000 total towing, and 1,000 total tongue weight. But do always check your owner's manual and make sure you're towing what your vehicle can handle.
Now I'll go ahead and get you a couple measurements. So from the ground to the top of the opening of the hitch receiver is gonna be 17 3/4. Now that's gonna be good to know if you wanna make sure that's not gonna bow 'em out when you have an accessory back here when you're going up a steep incline. This is pretty high up, so you shouldn't have to worry about that. Now the next measurement is from the center of the hitch pin hole to the outside of the bumper, which is really close.
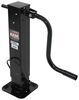
It's about 1 1/2. So this does stick out pretty far, and that's good to know if you have any folding accessories like a bike rack and you wanna make sure that folds up, and it doesn't hit your bumper. And a lot of the bike racks you can fold down so you can still use your doors, but we also offer bike racks that can actually swivel to the side, since you do have these side doors on the back. Now you will need a 5/8 inch pin and clip to secure your accessory in this hitch. Now it doesn't come with it, but it usually will come with your accessory when you get one.
Now I would recommend getting a locking pin just so you can lock that in there. Say you're on the trail and you wanna make sure that no one takes your bike rack. Now let's get into how this looks. As you can see, the cross tubes is completely hidden underneath the rear bumper, and it has a nice shiny black finish. Now these safety chain loops are pretty large on the bottom, and they can easily accept a Clevis style, or an S hook. Whether you're using your ProMaster for work, or if you're taking it out and camping with it, we'd love to see what kind of accessory you're using with your hitch and how you like it and review our comment. As far as the install goes, this isn't too bad, you just have to take this rear bumper off, and it's all a bolt-on application. So if you don't have the time or tools to do it yourself, then you can check out our dealer locator, and we can find a professional in your area to get this done for you. But if you're looking to do it yourself, follow along and I'll walk you through it. First off, we're gonna remove this plastic piece that's covering our bumper. I got a T30 Torx bit, and we're gonna remove these fasteners. (tool buzzing) It's gonna be four running along top. (tool buzzing) And there's gonna be four more that run along the bottom, and I'll those removed as well. (tool buzzing) There's gonna be a tab, I'm just gonna pull up on that, and get this removed now. And now I can get this pulled off. And I can get this set to the side. We can now get this bumper beam removed. It's gonna be have a series of bolts in here. I have a 16 millimeter socket on a swivel socket adapter. It's gonna make it a little easier. You can just use a regular wrench. I'm gonna use this for today. (tool buzzing) Get these removed. (tool buzzing) Now I'm gonna use a 60 millimeter ratcheting wrench, and there's gonna be another bolt on the back side. It's gonna be between the tow hook and the passenger side. (tool clicking) On the driver's side there's gonna be that same bolt in the same spot. There's not gonna be a tow hook on this side. Now this side was on there very tight, and I size down to a 15, and that seems to work better to get this off of here. (tool clicking) And make sure you're holding the bumper in place, because after this is removed there's nothing holding it in. So let me take this off and get this pulled down. Now I'm gonna take the coiled fish wire, and I'm gonna get it through the hole in the back of our bumper. I'm gonna fish that over to this big opening. I'll put our rectangular spacer block in and then our carriage bolt. I'll twist this on that coiled end. And now this part, the bolt's a little long, so you may want to just put that in right now, and I'll get this fished through. (bolt rattling) I did that having to use just a pry bar to get this to move and now I just tilted it back and through the hole. And I did that on both sides. There's gonna be two holes back here. Now I can put these fish wires through the holes in our hitch. I'm gonna lift this into place. Now, there are some welded threaded bolts on our bumper that I can put through the hole to help it hold it in place. (metal clinging) And now we'll pull our bolts through. (metal clinging) Now I'll just pull that fish wire off. I'll get a toothed washer, make sure the teeth are facing the metal, and then I'll put the nut on and I'll do this on both sides. (bolt clinging) Now we can tighten and torque our hardware down. Now there's not a lot of space in there so I can't really get a socket. So I am gonna have to use a wrench and be careful using the other end of it because that can get stuck 'cause this will increase in size. (metal clinging) Now to get these torque down, it is pretty difficult. I have a crow's foot to help me do that. Now if you don't have a torque wrench at home, you can usually rent one from your local auto parts store or you can buy one from us at etrailer. John helping me lift this hitch into place. I'm just gonna line it up, and I'm gonna thread our hardware in. That's gonna be our bolt with just a lock and washer. Once we got all the hardware in, I'm gonna come back through with a 17 millimeter socket and get these tightened down. (tool buzzing) Now that bolt that is welded onto our bumper, that will stick through and we're gonna reuse that same nut we took off. I'm gonna put this back on on both sides and tighten this down as well. (tool clicking) Now we can go ahead and torque all this hardware down to the specs in the instructions as well. (tool clicking) And now we can put our cover back on our bumper. Now this is not gonna fit on properly. If you have that wiring harness in here, it's just for the backup sensor. So I'm gonna pull this out. Just grab some needle nose and I already pulled this out. But I just twisted this off and now I can cut these off. And I will just make sure that wiring harness is gonna be sitting right in here. Push this on, make sure it's not pinched, and we're looking good, so I'll put our fasteners back in. (tool buzzing) Before I put the bottom hardware in, I did notice that I can trim it just a bit to make this go back just a little further. You can get it in. So if you're doing this at home, and you don't care about that, you can just zip this in. But I'm gonna take it back off and just give this a little trim. (tool buzzing) And that this about does it for the look at the TowSmart trailer hitch on our 2014 Ram ProMaster 1500. Thanks for watching.
Customer Satisfaction Score:
94% were satisfied with this product
6% of customers were not satisfied
Ratings & Reviews

First time i used this brand and it was a bad experience. 1st thing is the hitch DOES NOT fit in the bumber install, i had to cut about 1/4 inch off one side of the bumper for it to sit in properly.
2nd: the carriage bolt was too long to be able to "stand up" and fish thru the inside of the bumper. And also the square shape of the washer is too small for the carriage bolt. I had to cut the bolt shorter and file the square opening of the washer.
After that it was a 20 minute easy install.
Etrailer's customer service is still the best. It's just this particular product that has some error in packaging.
Will not buy this particular hitch brand again, but will still use etrailer in the future. Keep it up Etrailer!
very good
Info for this part was:
At etrailer we provide the best information available about the products we sell. We take the quality of our information seriously so that you can get the right part the first time. Let us know if anything is missing or if you have any questions.


Nick S.
9/29/2025
Besides the work arounds to get the hitch to easily install, I am glad you were able to get it on and that we were able to help you out. What are you looking to use the hitch for?