

 Arrives before Christmas
 To see if this custom-fit item will work for you please tell us what vehicle you'll use it with.
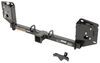
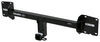
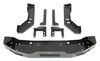
This fully welded trailer hitch receiver bolts onto your Tesla Model Y's frame with no welding required. Powder coated steel is sturdy and corrosion resistant.
Features:
Specs:
At etrailer.com we're committed to the products we sell, and to our customers. Our experienced and knowledgeable staff are available via both phone and email to address your questions and concerns for the lifetime of your hitch. The technicians at etrailer perform hitch installations on a daily basis, making them a valuable resource for do-it-yourselfers. The one-on-one, personal service you'll receive comes straight from an expert in the towing and automotive field. We've installed it, we've wired it and we've towed with it, so whatever your question, we can answer it.

California residents: click here
Videos are provided as a guide only. Refer to manufacturer installation instructions and specs for complete information.
Hello neighbors, it's Brad here at etrailer and today we're taking a look and installing the Curt trailer hitch receiver on a 2023 Tesla model Y. Many times people ask, why would you put a hitch on a Tesla Well, at the end of the day it's still a car and you're still gonna be using it for multiple things, whether it be a bike rack, cargo carrier, and yes, even a ball mount for towing a trailer. These are very capable and still able to tow. Even though they're electric vehicle, people get a misconception and the great part about the hitches for these is they're gonna replace the bumper beam and be a nice clean look overall. In fact, this panel can go back in place when not in use and you're not even gonna know that the hitch is there. Whenever you're ready to use it, you can just simply pop this out and you'll be ready to load up into your receiver.
This is a two inch by two inch receiver, which is gonna be the standard size for most accessories that you'd be picking up. It's definitely the most common and all of the accessories that you'd be loading up into this are gonna require a 5/8 pin and clip. This is not included with the hitch. A lot of times when you get accessories, they'll have them included, but if you plan on leaving cargo carrier, bike rack or ball mount on your Tesla long term, you might wanna look at a locking pin and clip. That's gonna be a good deterrent for anyone walking by and that way they can't just take the stuff with them.
I love the hidden clean look and the availability to put that panel back in place, but that there is some caveats with that. If you do plan on towing a trailer, the safety chain loops are fairly far up here. I can still get a standard S hook in place. It's a little trickier than most just because of the clearance, but it is able to go on there and at the larger clevis style is probably able to go on there as well. If you are planning on towing regularly and you wanna make this a little bit easier, you could put some quick blinks on there, but you still have that availability to hook those on.
Now if you're towing or just using this for accessories, you wanna adhere to the weight capacities on the hitch, but you also wanna check the vehicle's owner's manual to see what it's capable of towing and then compare that with the hitch numbers as well as the ball mount and ball. And anything that you're gonna be towing with, take the lowest number so you stay safe. And this has pretty good capacities with a gross trailer weight rating of 3,500 pounds and that's gonna be the weight of the trailer plus the accessories loaded onto it. The tongue weight rating is 525 pounds, and that's the downward pressure that's put on the inside of the receiver tube opening. And that's gonna account for a lot of your suspended accessories, whether it be a cargo carrier, a bike rack, and that's a pretty solid rating.
With 525 pounds, you could probably get a four bike bike rack loaded up with no issues. And the same thing goes for a cargo carrier. Now this can't be used with weight distribution, so you are gonna be limited to those numbers. The recessed nature of the receiver tube opening means that you are gonna wanna pay attention to some of the accessories that you may purchase because a lot of bike racks and cargo carriers can stow in a vertical position, but with this being recessed, you might wanna look at one with a longer shank than most. Measuring from the center of our hitch pin hole to the furthest point, it's coming in at about five inches. So just keep in mind if those accessories can fold up, you're probably not gonna be able to open up that rear hatch without lowering it down, but that's not too hard to do. And if you're looking at how they're gonna interact with your Tesla, you can take a look at our test fits on products to see how it interacts with it, and that way you can tell your clearances. Now if you're getting a ball mount, you're gonna wanna make sure that you have the proper rise or drop. So measuring from the top of the receiver tube opening to the ground, we're coming in at a pretty healthy 14 and 1/2 inches. So to determine that rise or drop necessary, if you have your trailer available, get it as level as possible, measure from the ground to the top of the coupler and then you can take that number, compare it with our measurements, and then you'll be able to figure out the rise or drop necessary to get the trailer nice and level, giving you the best towing experience. Now when it comes to the installation of your hitch, this one is not exactly an easy one and mostly that's because you're pulling off the rear fascia to remove the factory bumper beam and that's where the hitch is gonna mount up. And I will admit taking off a rear fascia is not a very common thing to do. In fact, I've worked on cars my whole life and never had to take off a rear fascia until I worked here. Don't let that scare you off. This isn't that hard of a vehicle to get the fascia removed. It's just a lot more work than you might anticipate, but I'll be walking you through step by step to make sure that you get it installed. Now if this is something you watch the installation video and you go, I don't have the place to do it, the time, the want, the tools, whatever it may be, adding a hitch is still totally worth it on your vehicle and I highly recommend getting one. But if the installation's holding you back, you can reach out to our dealer locator to find someone close to you to get your hitch installed and that way you can still enjoy the benefits of a hitch. Once you get it installed, whether you do it yourself or have someone do it, let us know how you're using it. Take some pictures. We love to see you out on adventures using our products out in the wild and it gives other Tesla owners an idea of what they can do with their vehicle. Now as far as the installation goes, follow along, I'll walk you through step by step, make sure you get your hitch installed. Speaker With those safety steps out of the way, we can begin removing this underbody panel from underneath of the rear bumper. It's gonna be held in place with 10 millimeter bolts or screws and a few plastic push pin fasteners. It'll be helpful to have a push pin removal tool. However, a small flat head screwdriver will also do the trick for taking these out. Depending on the age of the vehicle at the time of installation, road grime, dirt and debris can gunk up inside of these and make 'em a little bit stiffer, harder to take out. However, prying down from the center section will allow you to push down underneath the base and remove the fasteners. One thing I highly suggest is as you remove these fasteners from the vehicle, having a safe and secure place to put them for when it comes time to reinstall. With those push pins out of the way, we'll come back around with a 10 millimeter socket. (socket whirring) And remove all the bolts. (socket whirring) With all of the 10 millimeter screws and push pins removed from everywhere underneath the vehicle on this underbody panel, we'll have to turn our attention to the wheel well because there's four more push pin fasteners holding this panel up. There's one, two, and three and tucked away just behind the rear tire right there is number four. Now working at these in the wheel well is where the flathead screwdriver might actually be the better tool for this one just due to the confined space. And again, just working underneath of the center section. Once you have it popped up, pry out the back and continue that for the other three. And just be patient when you're working with these. Don't want to tear 'em up or nothing. So if one side of it's a little too gunked up, try working at the other side and they should all pop out. There we go. With all four removed, we'll go over to the other wheel well and repeat the same process. Now we can remove this underbody panel. These do get a little jumpy. Sometimes it's just you pull out a couple of these little tabs and then the whole thing wants to go. So just be careful as you're doing this, especially if you're directly underneath of it. You don't want to get a face full of whatever has been hiding up underneath your underbody panel before you pull it down. But we'll slide it out from over this midsection one, get that work down and then we can shove backward. Alright, and that's what I meant right there, you can see all of these little plastic tabs along it that interlock and slide up into this one above it at the bottom of our bumper. Just be real careful and we'll set this off to the side. The next step of this process is gonna be peeling back this plastic wheel well liner up to about here. And that'll give us enough room to take out an eight millimeter screw from behind here that holds the rear fascia to the quarter panel. Then we're also gonna be removing this little hand nut off of this stud inside the fender liner. Now one thing that I found helpful when doing the other side before this was undoing this hand nut first, allowing you to pull the fender liner back just to get a little bit more room to fit a hand behind the plastic trim and allow for easier pulling. There is a small tab hanging off the bottom of this wheel well liner that hooks behind here, which makes it a little difficult to get your first section pried up and out. But there's a small plastic push pin behind here and that tab you're working against. And this is really the hardest part. Once you get that tab undone and the push pin fastener out, the rest of it just kind of starts pulling out a little easier. One tool that's helpful to have is gonna be a plastic trim panel tool. That way as you kind of hook your fingers back there, you can leverage up. The goal is going to be to create enough room right here to get your plastic trim tool slid back in there and start getting some pressure behind that fastener causing it to come up and out almost there. And you can see this tab on the bottom is really letting us know. Alright, with that removed we can start pulling this back. You wanna be careful, always pull as close to the fasteners as you can so as not to cause any kind of stress because this plastic fender liner stuff, if it creases, it'll show a white mark and chances are you don't want that. So we'll come back with a small crumpled up paper towel, stick it up in here and allow us to have enough room to work at this eight millimeter screw without scuffing up or having any clips come back and touch the paint. When I grabbed the eight millimeter socket for the screw, I also came back and put some painters tape along this just to protect the fascia as we go to take it off later. But with the eight millimeter screw exposed, we can remove it. (socket whirring) And now we can go repeat the same process to prepare the other side of the fender. And now we can repeat the same process to go prepare the other side of the fascia. Our next step of this process is gonna be removing our taillights. And to do that, we have to get inside of the trunk. Now if you disconnected the battery, you aren't gonna have the availability to open up the rear hatch. And if you're having issues getting your Tesla to wake back up, the best way that I've found through that process is to put a jump pack or a jump. There's a positive terminal that you can attach to in the center of the frunk and that's gonna allow you to get the power back up to open this. So it is gonna be important because we're gonna need to remove some of the interior panels. And the first one being the threshold. This is pretty easy, it's just a series of clips. If you reach under the bottom or use a plastic trim tool to pry this up, you should be able to work both corners and then work your way towards the middle and it'll pop out. It may be caught on the weather stripping, so peeling this out might help it along to get this taken out. Now we can set this aside. To get our taillights removed, it's gonna be a little bit a multi-step process here. We're gonna begin by popping out this plastic push pin and this whole section will be a little bit more helpful if you pop out this area just enough because we're gonna peel this back in order to gain access to the hardware and the plug that the taillight has in place. So we're just gonna peel back on our weather stripping and what we're looking for is the taillight plug is right here. There's a locking tab on it. If you pull that back and then push down, we should be able to get our wiring harness undone and it may fight you a little bit, but if you pull the red tab back and use that to press, that's gonna unlock it. And then from here what we need to do, this top cap, this separates. So if you can wedge either a plastic trim tool or even sometimes just by hand, you can kind of walk it back and forth and get a gap. From here, you can just pry this up. And these are side specific, so you might wanna, if you're keeping all your hardware organized, just make sure you have this on the proper one. And then from here, as I peel this back, you're gonna find that there's gonna be nuts on studs. There's two of them and it's gonna be an eight millimeter socket to get those removed. So we'll get those taken out. Now be careful, they're really small and normally they're not terribly tight. So if you just knock 'em loose, I would recommend using your fingers to get the rest of it off. Once we get our last one taken off, what you can do to help get the taillight popped out is where those studs were or are where those nuts, if you just push on those, that's gonna help draw the taillight out. And there's gonna be two alignment tabs that are located kind of right in this area. And to get these popped out can be a little nerve wracking. You don't wanna, you know, crack your taillight or anything in the process. So it's gonna take a little bit of force. On this side, it's a little easier 'cause you charge port so I can get my fingers here. The other side is the taillight that's flush with it. So if you need to, a plastic trim tool, you can kind of just wedge that in there, give pressure, and then just pull this back until you get those tabs to unlock. And then from here we can raise that out. And you can see these are just those alignment tabs. If they're really giving you a lot of trouble, don't force pressure on the plastic. You can run the risk of cracking these pretty easily. What I've found is if you take some soapy water, spray it down in there and really just kinda shake the light, that'll help loosen it up, making it a little bit easier to remove. Taillight removed, that's gonna give us access to a 10 millimeter bolt on each side that attaches the fascia. So we're gonna get those removed. (socket whirring) Now to get our fascia removed, you're gonna wanna start on each corner peeling back and really it's just gonna be a series of clips that continues on. So extra set of hands is helpful. This is a big fascia, it can be rather cumbersome. And I do recommend having a nice organized spot to keep this. You know, it's not gonna be off for that long, but you wanna make sure that your fascia is not getting damaged while getting your hitch installed. And when you get to the taillight pocket, you'll probably notice those clips. You can either press down or pry up on them and that's gonna help loosen this. And wedging a plastic tool can definitely help get this popped over, just hold pressure and then work each one. Speaker There we go. And then from here there's gonna be center clips. You're just gonna pull straight back and we don't have any electrical connections on our fascia so we can set this aside. Speaker Got it. Thank you. Our sensor bar above our bumper beam, we're gonna get temporarily just loosen up and remove and set that aside because we need to get the bumper beam off for the hitch to go in place. And to get the sensor bar off, super easy, it's just four 10 millimeter screws. They're gonna be located along the entire length of it. We got these taken out. (socket whirring) This has a plastic clip that's located right here. You should be able to just pop this out just like that. And then there's gonna be one on the other side and we don't have to unplug anything. If you want, you can just have the sensor bar set aside for now. We'll reinstall it shortly after we get our hitch up. We're gonna be removing our entire bumper beam assembly, so that's not just this aluminum portion here. It's gonna be the flanges that go up to the frame of the vehicle. And there's three flange nuts. They're gonna require a 15 millimeter socket to get these all taken off. So we'll get these removed on both sides. (socket whirring) Once those are removed, we can grab our assembly and set it aside. Our hitch is gonna bolt directly up to those same studs and we're gonna be reusing the same nuts that we just removed. Your bumper beam is not gonna go back. You can do whatever you want with it, but the hitch is gonna replace it so you no longer need that bumper beam. So to get this in place, we'll just line it up and you'll notice that these are slotted. So there's a little bit of side to side movement for the most part. It's gonna be pretty well centered, but now's a good chance to make sure that you have it exactly where you want it. And then we'll grab our nuts, get these hand tightened on and you can snug them down. I wouldn't recommend using the impact because we'll be using a torque wrench to be able to get these perfectly tightened down especially when you have studs like this, if you overtighten it, you run the risk of pulling those out and causing more damage long term. So you can snug 'em down with the 15, maybe just use a ratchet and then we'll come back with that torque wrench. Once those are snug down, refer to your instruction manual for the torque settings and we're gonna just use that same socket and a torque wrench to torque these down. I mentioned earlier you can over-tighten and cause damage. A torque wrench is gonna make sure that it's gonna be tight enough so you can pull things, put your accessories on and not cause issue, but it's not gonna be too tight, putting stress on that hardware. So go through, get all your hardware torqued down properly. So our hardware is torqued down, you've officially installed the hitch. We can put our sensor bar back up and then start putting everything back in in the reverse order. But as I put the sensor bar up, you may notice the plug that's located right here that goes into a dummy cab. If you plan on putting wiring to tow a trailer, this is a great time to do it because you do have to pull the fascia off to gain access to it. So if you're doing your hitch, you might want to pick up wiring out the gate and that way you can get this knocked out. But something I've realized is there are variations between years of Teslas and even though sometimes the wiring says it'll fit, that's not the case. And the reason being is the plug changes designs. I haven't quite found the rhyme or reason why some have 'em proper and some don't. So looking at our plug today, you can see kind of the shape of everything. And the plugin option from Curt has this center divider. So if your plug has that opening, you could pick up this plug and play option, it would just snap into place and you have 4-pole wiring ready to go, which makes it super easy. Unfortunately, ours doesn't have that plug. So we're gonna have to use a slightly different alternative of ZCI wiring on this, which does make a little bit more cutting and splicing and a much more lengthy install. So if you're planning on doing wiring, check this plug while you have your fascia off and see if you have this. And it's gonna save you a lot of time. Now at this point, you're just gonna put everything back in the reverse order that you took it off. So pretty straightforward there. You may notice that the access panel on your rear fascia, there's a notch that you can pop that out. Sometimes it's easier to pop that out ahead of time and that way you can see exactly where the clips are and how to pop that off for the next time. But that's the great part about this one. You get a nice clean look overall, but still all that usability. And that was a look and installation of the Curt trailer hitch receiver on a 2023 Tesla model Y.

This is my second hitch from etrailer and both have been of excellent quality. The fit was perfect and the installation was straightforward. The installation video was very helpful.
As advertised. Tesla install requires removal of bumper but hitch receiver wasn't the issue -- great produce
Info for this part was:
At etrailer.com we provide the best information available about the products we sell. We take the quality of our information seriously so that you can get the right part the first time. Let us know if anything is missing or if you have any questions.


Thank you! Your comment has been submitted successfully. You should be able to view your question/comment here within a few days.
Error submitting comment. Please try again momentarily.