

 Arrives before Christmas
 To see if this custom-fit item will work for you please tell us what vehicle you'll use it with.


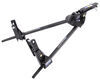
TowSmart's fully welded hitch bolts onto your Ford Explorer. The receiver sits beneath the bumper for easy cargo access. Built from powder-coated steel, it resists rust and corrosion for lasting durability. Perfect for towing and hitch-mounted gear.
With a 675-lb tongue weight, this hitch is ready for your multi-bike rack or a fully loaded cargo carrier. Whether you're hauling electric bikes or extra gear for a weekend trip, it handles the weight with ease.
The 4,500-lb towing capacity makes it ideal for hauling small travel trailers, utility trailers, or lightweight boat trailers, giving you the flexibility to take your adventure wherever you want.
Designed for a simple bolt-on process, this hitch includes all necessary hardware, eliminating the need for drilling or welding so you can get on the road faster.
The round-tube design adds durability while maintaining a clean look. Built to handle work and play, it's ready for whatever your vehicle needs to tow.
The matte black powder coat resists rust and road grime better than traditional glossy finishes, keeping your hitch looking great even in harsh conditions.


Tech Tip
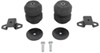
No drilling through vehicle frame required for installation , Exhaust must be temporarily lowered for installation , Hands-free Liftgate sensor areas may be limited to areas away from the center where hitch receiver opening is located
California residents: click here
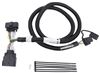
Complete Towing Package for 2018 Ford Explorer


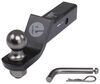
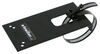
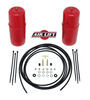
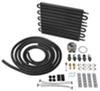
Popular Explorer Trailer Hitch Accessories
Videos are provided as a guide only. Refer to manufacturer installation instructions and specs for complete information.
Hello, neighbors, it's Brad here from etrailer, and today we are taking a look and installing the TowSmart trailer hitch receiver on a 2018 Ford Explorer. And if you don't have a hitch on your Explorer, it's well worth adding one, and the TowSmart is gonna be a great option for that. But it's really gonna open up as to what you can do with your vehicle, whether you're loading up a bike rack, a cargo carrier, or hauling a trailer. So let's take a closer look. Something that's important with a trailer hitch is how is it gonna look on your vehicle And this one does a really good job of being mostly hidden. You're gonna see a little bit of a cross tube right where the receiver is, but it sits right at the bottom of the fascia, giving you a really clean look overall.
And this is a two inch by two inch receiver tube opening, which is really good because it's kind of the standard size when it comes to bike racks, cargo carriers, or ball mounts. So when you're looking for those accessories, you're gonna have tons of them to choose from. And all of those accessories are gonna stay in place with a 5/8 pin and clip. Now this does not come with the hitch. A lot of times when you pick up accessories, they'll have them included.
But if you plan on leaving your accessories on the back of your Explorer long term, you might wanna look at a locking pin and clip. It becomes a really good deterrent for anyone walking by that might see your bike rack or cargo carrier or even ball mount and want to take that. It's gonna stop them at least from being able to just pull that pin out. We have a plate style safety chain loop, and the openings are nice and easy to get a hook on there. Whether you're using a standard S-hook for your safety chains or even a larger clevis style, you'll be able to get that on there fairly easily.
And speaking of safety chains for towing, you're gonna wanna adhere to the weight capacities of not only the hitch but also what the vehicle's capable of towing. So first up, check your vehicle's owner's manual and see what it's rated to tow, and then compare that with the hitch capacities. And this one is rated pretty good. Your gross trailer weight rating out the gate is gonna be 4,500 pounds, which is the weight of the trailer, plus the accessories loaded onto it. The tongue weight rating really comes into a lot of your suspended accessories.
So if you're getting a cargo carrier out there on vacation or a four-bike bike rack, you'll be able to do that pretty well with this because the tongue weight is 675 pounds. I really don't worry too much that you're gonna overload it. Now if you need a little bit of extra gross trailer weight rating, you can use a weight distribution hitch on this, and it's gonna bump up the capacities just slightly to 5,000 pounds for that gross trailer weight rating. But with that on there, it is gonna lower the tongue weight just slightly, which is gonna come in at 500 pounds. But kinda looking at 5,000 to 500, that should put you right there in that safe tongue weight. So if you're using that weight distribution hitch, I don't worry too much that the tongue weight's gonna cause you an issue. Some of your accessories, like cargo carriers and bike racks, have the availability to fold upward, and that's gonna shorten the entire length of the vehicle, which is really nice when you don't have anything loaded onto it. But you do need to make sure that those accessories are gonna work with this vehicle. Sometimes fascias stick out a little bit too far, making it aware you can't fold those up. So measuring from the center of our hitch pin hole to the furthest point of our fascia, we're coming in about 3 3/4 inch, almost four inches. So I don't worry too much that you're gonna have any issues with most accessories. But things to keep in mind, when those are folded up, sometimes they can block your rear view camera, your license plate. I don't worry too much about the taillights, but in order to open up your rear hatch, you are gonna need to fold those down. So just something to keep in mind when going down the road. Now another important measurement is gonna be your ground clearance. And that's not to say that things are gonna bottom out. But when you do have a cargo carrier, bike rack, it will extend the length of the vehicle quite a bit. So as you go up an incline, those can tilt towards the ground and you don't wanna bottom those out. But measuring our ground clearance is really gonna come into play when choosing a ball mount. So from the top of our receiver tube opening to the ground, it's 16 inches. And the best way to determine a rise or drop necessary to get a nice level towing experience is to get your trailer on flat level ground and measure from the ground to the top of the coupler. From there, you can take that measurement, compare it with ours, and then determine that rise or drop necessary. Another way to avoid that is to get a adjustable ball mount. So the main thing is, is getting that trailer as nice as level as possible, and that way you have a great towing experience. Overall, it's a really easy installation to knock out. I would give yourself maybe an hour. You might want an extra set of hands just to help you raise that hitch up and get some of the hardware started. But beyond that, this is definitely one that you can knock out at home. I'd recommend having a torque wrench available before starting, that way you can torque that hardware down. So for your DIYers, I'll walk you through all the steps to make sure that it's installed. But if you watch the video and decide, I don't have the time, the place, the tools, or even the want to do this, I totally understand. Don't let that deter you from getting a hitch on your vehicle 'cause it really does make a big difference as far as what you can do with it. So if that installation's holding you back, you can use our dealer locator to find someone close to you to install this for you so you can be out on the road. You'll just simply put in your ZIP code and find a list of shops around you that can get this hitch installed. For you, DIYers, let's take a look at that installation and we're gonna get this hitch installed on your Explorer. To get our installation started, we're gonna be lowering down our mufflers, and there's gonna be three isolators that we're gonna tackle. And the reason we're lowering this down is because our hitch is gonna bolt up into the frame rail. But as you can see on our factory tow hook as well as our exhaust isolator, those brackets are pretty well in the way that we're going to where we're gonna be mounting up the hitch. So getting those exhaust isolators down, we'll be bolting those up a little bit later to our hitch. And something I'd recommend doing is when you're dropping this, you wanna make sure that it's not gonna be hanging too much, putting stress on the exhaust long term while you're getting installed. So I'm just putting a cam buckle strap. You can use just a box or something along those lines to support the exhaust as we're lowering it down. And the three isolators that we're gonna tackle, two of them are gonna be on the exhaust tip side right off of the muffler. And to get that pried off, you can use the exhaust tip as leverage, and use a pry bar, a large flathead screwdriver. And we're just gonna pry on this rubber until we pop it off that bottom hanger. Now, over time, these can kind of, I'm not gonna say seize up, but definitely be a little bit tricky to pry off. So if yours fights you, what you can do is spray a little silicone or soapy water, and that's gonna help lubricate this to be able to pop off nice and easy. So here's the first one, the other one's gonna be located on the other muffler. So similar concept there. And then there's gonna be one that's on the rear cross member that we'll be taking off as well. (metal clacking) Same concept on the cross member hanger. Now just be aware that once you drop this, it's very possible that it's all gonna kind of drop down a little bit. So make sure that your head is not underneath anywhere on the exhaust to where it'll hit you. Now this one I don't have as much leverage, but you can put the pry bar into the exhaust isolator. (metal clacking) And the bracket that has the isolator, we'll gonna be removing that using an 18 millimeter socket. So on the passenger side, there's just two bolts, so we'll get those taken down. (drill whirring) (drill whirring) (drill whirring) (drill whirring) And we will set this aside. Now on the driver's side, it's gonna be very similar, except there's gonna be one more bolt that's on the side. (drill whirring) (drill whirring) Now we're not gonna be reinstalling either of the brackets, the tow hook as well as this bracket here, but we need the isolators, because we're gonna be bolting them up to this outside tab, and that's gonna become the new mounting point for our exhaust to hang. So we can get these pried off. I have an exhaust hanger removal tool. Something I found to make this a lot easier is take the isolator and just rotate it around. Mine felt like it was almost glued on there. It's just from build-up over time. So I would rotate it, that'll loosen it, and it's gonna make it a lot easier to get these to pop off. We get the isolators put on our hitch, we're gonna grab our long carriage bolts and they're gonna feed through this tab. And then we're gonna take our isolator, slide this on, and then we're gonna grab one of the flat washers and one of the nuts. Now there's three nuts in the kit and they all look pretty similar. One is larger than the other two. The larger one we're gonna use a little bit later. So set that aside and we can thread this on. And this is a lock nut, so it's gonna not completely thread on easy. You're gonna have to use some tools to give it to tighten down. An 11/16 socket is gonna accomplish that for us. (drill whirring) And my battery's dying here, but we wanna tighten this down to where it's gonna hold that carriage bolt in place. You might want it to where you have a little bit of adjustability still, just so we can get that hanger back on. But we'll snug this down. (drill whirring) Snug down. There's no real slop, but I can still move this, and that's kind of what we're looking for. We'll just repeat that same step on the other side. Now we're gonna head to our passenger frame rail and we're gonna get a bolt mounted up. There's a small access hole right in front of the bracket that had the exhaust hanger on there, and this is gonna be a mounting point. So we're gonna create that by using our spacer block, our pull wire, as well as our carriage bolt. So what we'll do is feed that spacer onto that threaded portion of the pull wire, and then we thread the carriage bolt on. And what we'll do is feed this up, same with that spacer block, (metal clacking) and you may have to jostle it around a little bit. But once this drops down, we're gonna leave it just like this. With that pull wire on, this is gonna be key because we'll feed this through the hole on the hitch. And as we raise that hitch up, we don't run the risk of pushing this back up in the frame rail. That wire's gonna keep it right exactly where we need it. Something else that you may want to check. Luckily, the bolts for the hardware on the exhaust hanger we're already here. So these weld nuts should be nice and clean. But just double-check, grab one of your bolts and run it through. Make sure it's nice and easy to feed that in. If you wanna grab an extra set of hands, now is a great time to do that. Take your exhaust isolators and point them down, that way we have plenty of space. And each person, you're gonna want one bolt with a conical tooth washer. There's teeth on here, We want that facing towards the metal on the hitch. And as we raise this up, we're gonna feed that pull wire on our passenger side through the front hole. And our goal as we raise this up is to get one bolt at least started with a few threads to hold the hitch up for us. So have that hardware ready for each person. So I have Ethan here helping me, and we'll raise this up. We may need to shift our muffler just a little bit, just to get that space. But as we feed this through, I'm gonna pull that pole wire up, and that should guide us to that stud that we just put up there. And I'll get these started. (metal clacking) And if you have another one, you can get that started as well. But again, goal is to get one started on each side. That way the hitch will support itself. Once you have those started, you can pull that pull wire off, and just make sure that it doesn't pass up into the frame. And the best way to do that is grab your extra conical tooth washer that you have and feed that on, making sure that that carriage bolt stays in place. And if you push against it, that'll put tension on it, and then you can thread on that nut. (metal clacking) Now if you're having trouble getting that stud to pop through all the way to get it started, you can snug these down a little bit more. It should draw it up and then you can get this hardware up. Once all the hardware is started, we can snug it down using a 3/4 inch socket. You don't need to get too crazy here because we're gonna come back with a torque wrench immediately afterwards and get everything torqued properly, but this is gonna cinch that hitch up. (drill whirring) (drill whirring) (drill whirring) Go through with that torque wrench. And the torque settings are found in the instruction manual. And this is gonna make sure that long term, we can tow safely with our hitch, but also, it's not gonna be too tight. Especially when it comes to weld nuts, you can really damage these by overdoing it. So the torque wrench really makes sure that we have these perfectly where we need them to be. If you don't have a torque wrench, you can get one here at etrailer. You can generally go to an auto parts store and rent one for free, but this is gonna be an important step and really make sure that your hitch is gonna be able to handle what you throw at it. (torque wrench cranking) (torque wrench beeping) With all that torqued down, we've officially installed our TowSmart hitch. All that's left to do is get our exhaust put back up into the isolators, remove our strap or whatever you had supporting your exhaust, load up your accessories, put in your pin and clip, and then you're ready to hit the road. Thanks for joining us. If you do have some pictures of your install or what you're using it for, feel free to send those as well. We love to see neighbors out there using our products out in the wild and what accessories you're taking on to your adventures. With all of that being said, my name's Brad. Thanks for watching a look and installation of the TowSmart trailer hitch receiver on a 2018 Ford Explorer.

The hitch worked out great! My husband was able to install it with no issues. We were able to transport our trailer easily.
Info for this part was:
At etrailer.com we provide the best information available about the products we sell. We take the quality of our information seriously so that you can get the right part the first time. Let us know if anything is missing or if you have any questions.


Thank you! Your comment has been submitted successfully. You should be able to view your question/comment here within a few days.
Error submitting comment. Please try again momentarily.