


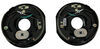
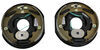
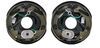
Your old drum is worn and the brakes start grabbing or pulsing. You install this 10" hub and drum with a 5 on 5 bolt pattern. Pre-greased bearings and a setup that matches your 3,500 lb axle give you smooth braking again.
Designed for standard 3,500 lb axle spindles, this hub and drum works with many utility and cargo trailers. Matching your bearing sizes is the easiest way to confirm it will fit your setup.
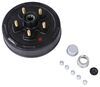
The hub and drum are combined into one assembly, so you are replacing both at the same time. This ensures the braking surface and bearing surfaces work together correctly.
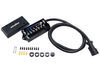
Bearings come packed with grease and races are already installed, reducing prep work and helping ensure proper lubrication during installation.
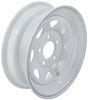
The first number in the bolt pattern is the number of bolt holes. The second number denotes the diameter, in inches, of the circle on which the bolt holes sit.
On wheels with an even number of bolt holes, measure from the center of one bolt hole to the center of the hole directly across from it. (Example: 8 on 6-1/2 means 8 bolt holes with 6-1/2" from the center of one hole to the center of another on the opposite side.)
To determine the bolt-circle diameter on wheels with an odd number of bolt holes, measure from the center of any bolt hole to the point halfway between the two bolt holes directly across from the first. (Example: 5 on 4-1/2 means 5 bolt holes with 4-1/2" measured to a point halfway between the opposite bolt holes.)
Measuring the distance (D) from the center of one bolt hole on the wheel to the center of a bolt hole right next to it can also help to determine the bolt pattern.

Videos are provided as a guide only. Refer to manufacturer installation instructions and specs for complete information.
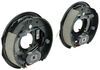
Hey there, neighbors, it's Kevin here with etrailer, and today we're gonna be taking a look at and showing you how to install the Terran Industries hub-and-drum assembly here on our utility trailer. So, when you're doing that routine maintenance on your bearings, you probably are gonna take a look inside your hub and notice, "Eh, I got a lot of deep gouges starting to form inside of the hub face here." And if that is the case for you, it's probably time to replace it because over time this magnet right here starts to get those deep gouges into this, and eventually it's not really making full contact anymore, and it's not going to fully grab onto the face of our hub anymore, and it's not providing that braking power that we're used to. So that's where you go and swap out your hub. Now, there's a lot of different options when it comes to these hub-and-drum assemblies, so it's very, very important that you're getting the correct fit because we need to make sure that our bearings are gonna match up with our spindle. We need to make sure that our studs are gonna match up with the wheel bolt pattern that we have. And then we also need to make sure that this is the right capacity for our axle, and that is also gonna kind of play into our diameter, which is gonna match up with our trailer brake assembly as well.
So all of these components and all of these things kind of all come together and mesh into one thing, and we can go over exactly how to figure out what's going to be the right one for you. Now this particular hub-and-drum assembly is going to be a 10-inch diameter, and it is going to come with a five-on-five bolt pattern. Now that's pretty important because that's how you get your wheels back on. So if you're swapping yours out, you definitely wanna make sure that you're taking some measurements with your bolt pattern on here so that way you can make sure that your replacement's actually going to be the right fit. Now, easy way to kinda figure that out is when you're looking at your wheels, you're gonna wanna measure from the center of one of your studs to the outer edge of one of the opposite studs.
So it's gonna come off looking a little goofy just because you're going to the outside edge of the hole here versus center to center like you would with an even-numbered stud setup. But that is the quick man's way of doing it. So just take your tape measure. It's honestly a little bit easier if you just kind of do it on the wheel, just 'cause you don't have as much stuff in the way, and you can fit that tape measure on there. So if you are going to, I'd probably pick just any hole you want right from the center all the way to that outer edge, like I was talking about.
And then I can give you your measurement. So you would see five on five once we take that measurement. Now, the next half of this is going to be the capacity. So typically, what you're gonna wanna do is look at your axle, and on the backside of it, you should have a sticker right around the center of it. That's gonna list out your axle capacity, which you can then use to determine what capacity hub-and-drum assembly you're gonna need.
Now, in our case, that sticker's long gone. These axles are super rusty. This is a very old trailer, so we don't really know. The next way of doing that would be to measure the diameter of the axle tube, and then there's guidelines that can kind of help you out, especially if it's a little bit smaller. So like 2-3/8 would be like your 3,500-pound. When you get up to three inches, that's where you're gonna be, 5,200 pounds to 7,000 pounds. And then above that, that's where it can really get into some gray areas. So if you're in that gray area and you don't know exactly what you have and you need to figure it out, you can come over and look at some of your other hub-and-drum assemblies. Usually, you'll have some stuff stamped into it, like this one's got "Terran Industries" obviously stamped into it, and Dexter, a lot of the time, will usually put some kind of part number. So you usually be able to look at that and then figure out what you have. Or you can, once again, come back, look at your stud size here, look at your bolt pattern, and then you can kind of start breaking that down until you figure out what's gonna be the right replacement. But another option is to also measure the diameter of your current hub-and-drum setup. You're gonna wanna get the diameter across, and then also how thick it is. So in our case, this is gonna be 10 inches by 2-1/4. This specific one is going to come with the inner bearing already greased and in place, along with the grease seal already seated into the borehole of the hub here. Now it won't have the outer bearing already filled in with grease. You will have to pack that yourself. So make sure that you pick up the Mobilgrease XHP 222. That is what they're using. Obviously, if that has changed since I've came out with this video, definitely make sure that you're double-checking that, making sure it is the correct grease, because you don't wanna mix and match incompatible greases. Along with that, we have our lug nuts as well as a grease cap that also comes with a little gasket here you can pop off. So if you have an E-Z grease axle like we do today, you can easily get access to that grease zerk fitting without having to pop the cap off and be able to lubricate your assembly. I will say that these do come in a variety of different sizes. So that diameter we were talking about, or axle capacity, so the different capacities that go with this, and even different bolt patterns when it comes to the wheels. So it is super important that you really do all your homework and make sure that you're getting the correct thing. And if that's just something that is totally foreign to you, not something that you're used to doing, you don't understand how to do it, you can definitely feel free to reach out to us, not only for our help, but also you can use our dealer locator, and then you can get yourself set up at a shop where they can figure it out for you and get you the parts all at the same time and get them professionally installed. Now, if you are wanting to do this yourself, you figured out what parts you have or that you actually need, then stick around, and I'll help walk you through the process. So to begin our installation of our hub-and-drum assembly, we are gonna first need to jack up the trailer. You can see I've got a little bit of space. I probably need to jack it up just a little bit more 'cause my back wheel's now still kind of rubbing just 'cause the suspension dropped. So with no weight kind of helping force that up, we have both of our shackle straps just kind of dropping right down. So when you get to that point, when you gotta fix that, when you go back on later on, and you're getting the wheels on, you definitely wanna have a pry bar. You can stick it in there, and as you're starting to lower this back down with your jack, you can use that pry bar to kind of swing the shackle straps back up. Now it doesn't always happen. In our case, it did today just because I jacked up both sides and had enough here to where it could really kinda drop all the way down. So I'm gonna crank this up one more real quick just to make sure you got a little bit of movement there. And then from there we can take off our lug nuts. (power tool whirring) Now we're gonna wanna grab a rubber mallet. We're gonna be knocking at, like, a 45-degree angle on the grease cap here, and we're gonna spin it while we're doing that. So that way, it kind of evenly breaks it free. (mallet pounding) So start giving it little taps. (grease cap clatters) Whole point of that is just so that we don't dent it all up. Like you can see, this one already is. I'll kind of dent it in, try to save it so, that way we can reuse it. And then from there we can grab one of our shop towels. Usually, you're gonna have grease all over the castle nut, or axle nut, whatever style axle you got, clean some of that off. And then with a 1 1/2-inch socket, I'm gonna pop this off. Oh, actually, we're gonna wait on that. We had a tang. So we've got the washer with the tangs here. I need to grab a little flathead. We're gonna pop that down, so the little tab is sticking over. Actually, shouldn't have turned this just yet. I'll wait just a second. You can see it sticking out of grease right there. Just let me clear that off a little bit more. So you see one tang right there, one tang down below. That locks it into the castle nut, so that way it can't back off later on. Now that we see that that's in there, like I said, I'm gonna grab a flathead, we'll bend that down, and then we'll be able to remove our castle nut. In most cases, you really won't see a tang washer. Usually, cotter pin's the more popular choice. But once you got that down. And get my wrench that way. There we go. I can then loosen that up, and I should have thrown a shop towel on the floor. I like to just kind of have one to catch everything if in case it drops. Now we're gonna have that washer here. Yep, it's gonna fight me. So grab yourself some needle-nose pliers. (pliers clicking) And we're gonna to pry this out. This may take me just a couple minutes, just 'cause it's kind of already beat up and all greasy, so it's not really wanting to cooperate as easily. But not in too terribly bad shape. I could probably try to bend back that little tang on there and have that be still usable. Now we got it cleaned up a little bit more, I'm gonna pull from each side of my hub; just pull straight out. That's gonna pop off our flat washer and then also our outer bearing. Now the brakes on this are like adjusted way out, so that's a little stiff. (hub rattling) There we go. Set that aside. Grab some shop towels. I like to try and really clean off the spindle, especially because we're gonna be replacing this with different grease than what was already in here. So let me make sure that we get all of these contaminants completely out of here. We don't want any of that mixing with the new grease and then potentially damaging it and having it break down quicker. (towel rubbing) (spray hissing) Using a little bit of brake clean can help make this a lot easier for you, too. All right, now that we have our brake assembly all wired up, we've got the studs on that also tightened down. It's now time to assemble our hub-and-drum assemblies. Now with our hub, it is already pre-packed for our inner bearing, and our grease seal already in there. All good to go. Now the outer bearing is not pre-packed. It's gonna come just in a little bag for you. So you'll wanna make sure that you grab the correct grease, which I have today. And we are going to pack this outer bearing ourselves. Now, if you look on this side, you can see it's real wide and open. You can see the rollers inside of there, but if we flip it over, it's pretty closed off. You can't really get into there as much. So on that open side, we're gonna be scraping the grease into it until it starts to pop out on the front. So I'll get a little bit of this going for you so you can kind of get a picture of what I'm doing. You can see it start to kind of bulge out in between each of the rollers. We want it to be that way all the way around it. And then we're gonna also just smear all the excess that we have on our hand into it all over the place just so we got it all nice and greased up. So I'm gonna keep working this around in my hand a bit. Definitely something you're gonna wanna wear gloves for. I should have put a glove on the other hand as well. All right, now previously this did not have a grease zerk fitting on it. It looked like whoever had it before maybe busted it off and just decided not to replace it. But there's a bunch of dirty grease that's all inside of our spindle because there's a little tube that runs all the way down to back here, right where our grease seal sits. So I've installed a new one on there. Obviously, that's not gonna come with a kit, but I just wanted to make sure I'm doing stuff the right way, and I have pumped out the old dirty grease and pumped in some fresh grease. Now I'm gonna be matching the grease that Terran is using in their hubs here, so that way we don't have anything getting mixed up. So make sure that you're picking up the correct grease as well. It's the same one that we used on our outer bearing. And at this point, what I'm gonna do is just kind of squirt some grease on here. In general, this is gonna kind of help it transition when we go to slide on our hub. And I'm gonna also smear it around on there with my glove. But I wanna get a good chunk of it on here, and then we'll fill in the cavity a little bit more using that grease zerk fitting once we have all of our stuff on. And we're just gonna smear this on. Like I said, this is just gonna help it transition so we don't get any kind of metal-on-metal here. I'm just doing it real light. Now I will swap off that glove. We can grab our hub, flip that around. You can see, like I said, this is already pre-greased, so not much work on this end here, but we will slot that on. (hub rattling) All right, with our hub slid on, we can then pass through our outer bearing. That's it on there perfect. There we go. Now that may slide back out on you a little bit just from the weight of the hub, but following that up, we're gonna have our V-shaped washer, that flat one that. We'll have our tang washer. And then our castle nut to finish it off. And we're gonna tighten this down by hand, and then we're gonna torque it as well. And that torquing is only going to be to just really seat this up and get the bearings fully seated into the hub correctly. And it'll take out any side-to-side play. So you can see right now, even just by hand, I don't really have any side-to-side play, so that's already a good sign. But say we were; that's where torquing comes into play. Now, each manufacturer's gonna have a different torque value that they want for their spindles. This is a Dexter one, specifically, that I'm working on right now. So I'm gonna go to there; preferred settings. Once you torque it, just put it back onto the off position, and then we're gonna back that castle nut back off, and then we're just gonna tighten it up by hand until we can get one of our tangs to fold up. So in our case right now, this is pretty tight by hand right now. That's about as far as I can go, and I can still get that tang up. So I'm gonna take my little flathead screwdriver, tilt that up. Now, with that tilted up, that'll completely block the castle nut from being able to back off. And then we can grab our grease gun again. And I'm gonna grab my grease cap. Now with the grease gun, we're just gonna put a couple squirts in here, and we're gonna keep spinning the hub, that way it'll come out through that grease zerk fitting that's at the back. So I'm gonna shoot a couple squirts in here just 'cause this gun isn't really putting a lot of grease out. Spin it. (hub scraping) (grease gun squirting) (hub scraping) And as you're doing that, you can kind of start to see it coming out from the sides. And on that last one, I could also hear an air bubble pop when I did it. So that's what we're looking for. We just wanna fill the cavity, but we don't wanna go so much that it starts blowing out the backside. So just kinda be careful with it. I honestly don't do too many pumps of it. But with this grease gun, like I said, only going a little bit for each squirt you do, I'm kind of giving it a little bit more than I normally would. (grease gun squirting) (hub scraping) (grease gun squirting) (hub scraping) All right, now with that lubed up, we're gonna now grab our little punch here. You could also just use a piece of wood. That's typically what I do, but luckily one of our guys here has a couple of these that are designed specifically to help punch that back in and provide even pressure, so that way you don't get it all kind of bent up. Now my hammer's over here. (hammer banging) Spin it around; make sure you got it nice and flush up against that borehole on the hub. (hammer banging) (hub scraping) Now with our grease cap on, that is gonna do it for the install side of this. We do still need to put our wheel on, our lug nuts, and then torque that down to the specs listed on that trailer. Obviously, that can kind of vary anywhere. If you have a utility trailer, maybe it's just not listed. A lot of the time, we try to make it at least to like 90 to 100 foot-pounds. So if you don't know exactly what specifically you should be doing on yours, which you can also do, is just look at your stud size, measure the thickness of it, and then you can kind of figure out, based on what stud size you got, exactly what the torque specs would be. Now you are gonna get some new lug nuts with your kit. These ones, unfortunately, are just hair too big. They're not gonna fit a 13/16 socket anymore. So you're gonna wanna switch over to E21. (power tool whirring) Get these (power tool whirring) popped on. (power tool whirring) You'll notice I'm going in a star pattern here, too. (tool beeping) All right, I'm gonna get this rolling, walk over, and we can activate the brake. (brake thuds) You can see it stopped it immediately. So we know our brakes are functioning properly. Now, at this point, we really wanna go out and test drive this and kind of get a feel for it, really. We will let that start to adjust itself so that way we know the brakes are activating and biting on how we want them to. But at this point in the shop, we are all finished. Is gonna do it for our look at and installation of the Terran Industries trailer hub-and-drum assembly here on our utility trailer. My name's Kevin. If you still have some questions about what's going to be the right replacement hub-and-drum assembly for your trailer, please feel free to reach out to us via our "Ask the Experts" link, leave a comment on this video, or a phone call to our customer service department, and we'd be happy to help you out on your journey.

Fit perfect
Great drum hub kit that was complete with all components needed, Quality appears good also.
Easy to install and everything you need is included. Even the grease for the bearings is in a squeeze tube for easy application.
Info for this part was:
At etrailer we provide the best information available about the products we sell. We take the quality of our information seriously so that you can get the right part the first time. Let us know if anything is missing or if you have any questions.


Thank you! Your comment has been submitted successfully. You should be able to view your question/comment here within a few days.
Error submitting comment. Please try again momentarily.