
Thule
Thule SquareBar Evo Roof Rack for Naked Roofs - Steel - Black - Qty 2
Part Number: TH45HG
$480.85
Confirmed to Fit
2017 Subaru WRX
Sedan
Will this fit?
To see if this custom-fit item will work for you please tell us what vehicle you'll use it with.
- All Info
- Reviews (67707)
- Q & A (0)
- Photos
Thule Roof Rack - TH45HG
- Square Bars
- 53 Inch Bar Space
- Thule
- Black
- Overhang
- 2 Bars
This strong Thule roof rack lets you carry gear on your vehicle. Galvanized steel crossbars accommodate clamp-on accessories. Polymer coating provides extra grip for your cargo. Installs on your vehicle's naked roof.
Features:
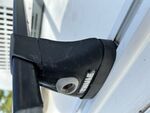
- Complete roof rack system includes 2 SquareBars, 4 Evo Clamp feet, and a custom fit kit for your vehicle
- Square crossbars work with accessories and carriers that clamp around the bars
- Polymer coating provides extra grip for your cargo and helps prevent corrosion
- Thule One-Key System locks (sold separately) deter theft of the rack
- Custom installation on your vehicle's naked roof
Specs:
- Crossbar dimensions: 53" long x 1-1/4" wide x 7/8" tall
- Weight capacity: 220 lbs
- Always observe your vehicle's maximum roof load capacity
- Color: black
- Construction: steel
- Limited lifetime warranty
712400 Thule Standard Square Crossbars - 53" Long - Steel - Qty 2
710501 Thule Evo Clamp Roof Rack Foot Pack for Bare Roofs - Qty 4
145178 Custom Base Clips and Pads for Thule Evo Clamp or Thule Edge Clamp Roof Rack Towers - Qty 4
Installation DetailsCalifornia residents: click here
Ratings & Reviews
4.7
800 reviews
by: Vincent 11/03/2021
by: Ace 12/23/2022
by: Russell 07/15/2021
by: Janice 12/17/2021
by: Thomas 04/24/2021
by: Brandon 07/13/2022
by: Rodney 12/21/2021
by: Greg 09/28/2022
by: Michael 07/07/2022
by: Richard 09/22/2022
by: Vladimir11/19/2021
by: Steven09/03/2022
by: Craig 12/21/2022
by: Ben 03/24/2021
by: Pamela 08/09/2021
by: Jay 12/27/2021
by: Douglas 05/29/2021
by: Martin 03/02/2021
by: Kimberly 08/22/2021
by: Brandon 07/20/2021
by: Mitch 04/13/2021
by: Martin 11/26/2021
by: Sabrina 07/26/2023
by: Christine 06/22/2021
by: Alan 11/17/2022
25
855
Show More Reviews
See what our Experts say about this Thule Roof Rack
- Roof Rack for 2007 Toyota FJ Cruiser to Carry Thule Hullavator Kayak CarrierFor your 2007 Toyota FJ Cruiser that has factory raised side rails you'd need a set of crossbars that extend past the feet of the rack like the Malone AirFlow 2 rack part # MPG216 which is a fit for your vehicle and would work great with the Thule Hullavator part # TH898 that you mentioned.
view full answer... - Recommended Roof Rack for Hullavator and Kayak Carrier on 2019 Honda PilotThank you for all of the information! While you are able to use the Hullavator # TH898 with your setup as far as weight goes, this kayak carrier does require the crossbars to stick out 4" - 8" out past the roof rack feet. Since the Thule SquareBars have a limited amount of space under them for the feet you can only use the 53" Bars # TH712400 but this wouldn't give you the required spacing for the Hullavator. I recommend using the Yakima 60" JetStream Crossbar # Y00426 instead with the...
view full answer... - Is the Malone DownLoader Compatible with Thule Square BarsYes. Your Malone DownLoader # MPG114MD is compatible with Thule Square Bars like the 53" long # TH712400, but it looks like you may want to consider 60" bars like the # TH712500 because of the width of your new Jeep. If you can tell me what type of roof rails you have or if you've got a naked roof, I can also help you identify which foot pack and fit kit will work for your 2020 Jeep Grand Cherokee. I've also linked our entire available selection of roof racks for use on the 2020 Jeep Grand...
view full answer... - Is Thule Square Bar Roof Rack from 2007 Toyota Corolla Compatible on a 2018 Toyota CamryThank you for the picture! It looks like you have the square bar system from Thule that uses the Aero Foot Pack 400XT. I spoke with my contact at Thule who said that the 400XT foot back was discontinued back in 2011 so they won't have a fit kit (the clamps for your vehicle) that would be compatible with both the foot pack and your 2018 Toyota Camry. The current square bar system that fits a 2018 Camry includes an entirely new kit so you will need the 53" SquareBars # TH712400, the Evo...
view full answer... - Will the Thule Force XT L Fit My 2020 BMW X5?Yes, you will be able to fit the Thule Force XT L # TH6357B on your 2020 BMW X5's roof. Not only do you have enough roof for the required crossbar spread of 23-5/8 - 33 inches, you will also be able to mount the box to your roof and fully open your rear hatch. If you are wanting to go bigger, the Thule Force XT XL # TH6358B and XXL # TH6359B will fit as well. As far as mounting, you will need a crossbar system in order to secure the Force XT XXL to your roof. The setup you need depends...
view full answer... - What Size Thule Crossbars are Needed to Use the Hullavator Kayak Carrier on a 2016 Honda CR-VThe length Thule roof rack crossbars needed to use the Hullavator # TH898 on your 2016 Honda CR-V depends on the type of roof the vehicle has. If your CR-V has the flush side rails that run front to back on the roof then you will need the 47 inch bars # TH712200 as well as foot pack # TH460R, and fit kit # THKIT3118. If your CR-V has a naked roof with no side rails or crossbars you would need the 53 inch bars # TH712400 along with Evo clamp feet # TH710501, and fit kit # TH145108. You...
view full answer... - Thule Roof Rack that Can Fit 2021 Toyota Corolla HatchbackDepending on what roof rack you have on your 2002 VW Beetle there may be some components that would transfer to a new vehicle but as far as the complete rack transferring over that would be very unlikely. I'd need to know exactly what roof rack you have on your Beetle as well as the year of the Corolla you have.
view full answer... - Recommended Roof Rack For 2012 Toyota Prius V With Panoramic SunroofYou are correct. The Rhino-Rack roof rack is not designed to be able to fit your Prius with the panoramic sunroof but we do have other options that will. I recommend the Thule SquareBar Roof Rack. This comes with 53 inch square load bars, the foot packs, and the custom kit that fits the roof of your Prius. To order this roof rack you will need part # TH712400, part # TH710501, and part # TH145129. You want to make sure you do not exceed the roof carrying capacity for your vehicle.
view full answer... - Is there a Ladder Rack for a 2016 Ford Transit Connect with Factory Flush Side RailsIt sounds like your 2016 Ford Transit Connect has factory flush rails that run front to back. To add a rack to those rails you will need to look at roof rack options instead of the ladder rack section. The only problem is that the roof rack options are rated lower than the ladder rack # TH29611XT. The most economical option is a Thule square bar system using the following parts: SquareBars # TH712400 Podium feet # TH460R Fit kit # THKIT3032 The roof rack itself is rated for 165 pounds.
view full answer... - Recommended Roof Rack And Cargo Carriers For 2010 Honda Odyssey With A Sun RoofThe Rightline Gear Roof Cargo Carrier, part # RL100S30 will work great on the roof of your 2010 Odyssey. This cargo bag holds 18 cu ft of gear and will work with vans that have naked roofs, raised side rails, crossbars or cargo baskets. This bag measures 48 inches long, 40 inches wide, and 19 inches tall and is made of waterproof woven polyester. Although the bag is waterproof, it is always a good idea to make sure anything you carry in any cargo bag is sealed to keep moisture out. We...
view full answer... - Fitting and Accessorizing a Roof Basket for a 2017 Jeep Grand Cherokee TrailhawkThere's a few things to consider for the fit to your 2017 Jeep Grand Cherokee Trailhawk, but its fairly easy to make sure you have a good fit. The roof crossbars are the primary fit factor. A little research shows that the Trailhawk is about 70 inches wide, so the Rola Roof Basket, part # TH859XT will come across as a little small, but you can verify the specific width of your roof (Which is what will create the illusion) by measuring the distance between your roof rails. The crossbars...
view full answer... - Weight Rating for Thule SquareBar Roof Rack on a 2013 Honda Accord SedanI wasn't able to find anything regarding roof weight rating in your owner's manual either so any specific number will need to come directly from Honda. With that being said, the Thule SquareBar roof rack system that you referenced for your 2013 Honda Accord, consisting of parts # TH712400, # TH710501, and # TH145208, has a weight carrying capacity of 165 lbs and the overall weight of the roof rack itself is 16 lbs. These weight ratings come directly from the manufacturers who have performed...
view full answer... - Recommended Roof Rack For A 2012 Toyota Camry To Carry A Roof BoxWe definitely have a roof rack for your 2012 Toyota Camry. I will also say that looking at Thule was a good option and is one of my preferences for this type of thing. So with that being said, the Fit Kit for Thule Evo Clamp Roof Rack Feet # TH145149 are specifically designed for your vehicle and will hook to the door jambs to secure the Evo Clamp Feet # TH710501 securely to the vehicle. From here you have two options. First will be the Thule SquareBar Evo Crossbars # TH712400. These are...
view full answer... - What Crossbars do You Recommend for the Thule Force XT XXL Box on a 2017 Toyota Sienna?The Thule Force XT XXL # TH6359B will work on your factory crossbars as long as the crossbars measure between 1 and 3-1/2 inches and a width of 3/4 of an inch to 1-11/16 inches. In order to determine if the Force XT XXL will fit factory bars for your 2017 Toyota Sienna, I recommend measuring the height and width of those particular crossbars.
view full answer... - Recommendation For A Roof Rack For 2004 Ford Excursion To Carry 2 KayaksWe carry roof racks for your 2004 Ford Excursion as long as you have the factory tracks that run front to back on the roof. I recommend the Thule SquareBar Roof Rack: 53 inch SquareBars (Item # TH712400), Rapid Podium Foot Pack (Item # TH460R), and Podium Style Fit Kit (Item # THKIT3101). For a carrier for your 2 kayaks, I recommend the Thule Stacker, Item # TH830, because it is designed specifically for carrying multiple kayaks. It can also hold up to 4 kayaks so you have expansion...
view full answer... - Roof Rack for 2019 Subaru Ascent to Carry Older Thule Mountaineer Cargo BoxThe Thule Mountaineer uses narrower U-bolts so for a roof rack that's compatible with that box and the roof of your 2019 Subaru Ascent with factory roof rails the Thule Square Bar Roof Rack part numbers # TH712400 and # TH450R would be what you'd need!
view full answer... - What Thule Foot Pack And Fit Kit Works With The 2015 Subaru LegacyHello Chase, thanks for reaching out. You are correct there is no way to use the Thule Traverse feet on the 2015 Subaru Legacy. The only option would be to use the Thule Evo Clamp Feet # TH710501 and the # TH145193 fit kit. As far as the crossbars, it sounds like you already have some you want to try to re use, correct? If you have the new-style Thule square bars that have a bottom channel, then can work with the Evo Clamp Feet. A 53" bar is recommended for your vehicle, so please make...
view full answer... - Crossbars That Fit Thule 480R Feet for 2017 Porsche CayenneHey Gregory! The Rapid Traverse 480R are compatible with the Thule AeroBlade, WingBar Evo, SquareBar Evo, and ProBar load bars. Just make sure they aren't the 480 which were only compatible with the old square bars. Thule recommends the 53" bars for your 2017 Porsche Cayenne so I would get the Thule WingBar Evo Crossbars # TH711420. The WingBar Evo is going to be the quietest of the bunch and also looks the best in my opinion. If you need anything else don't hesitate to reach out in the...
view full answer... - Can I Use the 53" Long # TH712400 Thule SquareBar on My 2025 Kia Sportage Hybrid?Hello Joseph, Congrats on the new 2025 Kia Sportage Hybrid! What is your favorite new feature? For the Kia Sportage I see that we actually recommend going with the 50" long for the Thule SquareBar. By going with the Thule SquareBar Evo Crossbars 53" Long - Qty 2 # TH712400 you will have 1 1/2" additional over hang on each side. Your best bet is to go out and measure to make sure it doesn't extend past your rearview mirrors, and see if you want that kind of overhang. Do you currently...
view full answer... - Malone Roof Rack Vs. Thule Roof RackThe Malone Universal Crossbar System # MPG201 is a more economical choice but it still does a good job. The design and quality of Thule's system is why they have such a large difference in price. Whether you go with the Thule Crossroads system # TH712400 and TH450R (discontinued) or Thule Evo system # TH712400 and # TH710401 they both are going to be a high quality roof rack system. The Thule racks both have a weight capacity of 220 lbs compared to Malones 165 lbs capacity. You should...
view full answer... - Thule Replacing Old Square Bar and Podium Foot Pack With SquareBar and Evo Clamp Foot PackThe Thule Podium 460 you referenced for old square bars has been discontinued so that is why the expert answers suggest using the Evo Fixpoint Feet # TH49SC for use with the new Thule SquareBar that have a slot in the bottom like the aero style bars. The old Thule square load bars have been discontinued and replaced with the SquareBar like # TH712400. This bar is not designed for the older wrap around style mount but will use the channel mount like the aero bars were already using....
view full answer... - Thule Square Bar Roof Rack that Fits Top Channels on Leer Camper ShellYou can use Podium Foot pack # TH460R, Fit Kit # THKIT3101 and the Thule square crossbars of your preferred length. Here are a few of the most popular bar sizes: # TH712200 set of two 47-inch bars # TH712400 set of two 53-inch bars # TH712500 set of two 60-inch bars There currently isn't a way to reuse your current bars as the design has changed and now the bars install with tracks. Your current fit kit would be only thing you could reuse.
view full answer... - Can I Replace A Thule Tracker II Foot On My Lance Camper, If Not What Do You RecommendI do have a solution for you. Unfortunately, the only part of the rack you would be able to use with the new rack would be the Thule Top Tracks. When Thule redesigned the system they did not make the new feet, crossbars, or fit kits, backwards compatible with their old system. Your new roof rack will consist of the following items: Thule SquareBar Evo Crossbars - Qty 2 60", part # TH712500, 53", part # TH712400, 50", part # TH712300 Thule ProBar Evo Crossbars - Aluminum - 69" Long - Qty...
view full answer... - Will the Thule Hullavator 897 Work With Thule WingBar Evo CrossbarsThe Thule Hullavator 897 is not directly compatible with aero crossbars like the Thule WingBar Evo Crossbars and the adapter needed to use them are no longer available. Therefore, the only option would be to install square crossbars like the Thule SquareBar Evo Crossbars part # TH712400 or obtain the new Thule Hullavator Pro Kayak Carrier part # TH898.
view full answer... - How To Switch Thule Roof Rack to 2018 Honda CR-VYes you can use the Thule Fit Kit # TH145046 with your Thule Rapid Traverse Foot Pack on your 2017 Honda CR-V. This fit kit is compatible with both styles of feet. The Evo Clamp Feet for Thule Crossbars # TH710501 is replacing the Rapid Traverse system.
view full answer... - 2022 Mazda CX-5 Roof Rack Recommendation for Thule Force Roof BoxFor your application I recommend going with a Thule WingBar Evo roof rack because they look sleek and are easier to install than most other roof racks. The correct parts depends on if your 2022 Mazda CX-5 has a bare roof or the flush mount rails: Bare Roof 53" WingBar Evo Crossbars - Black # TH711420 or Silver # TH711400 Evo Clamp Feet - # TH710501 Fit Kit - # TH145079 Lock Kit - # TH450400 (optional) Flush Rails 47" WingBar Evo Crossbars - Black # TH711220 or Silver # TH711200 Rapid...
view full answer... - Roof Rack Recommendation for 2020 Honda CR-V to Use Thule HullavatorFor your 2020 Honda CR-V Touring with a naked roof the Thule WingBar roof rack part numbers # TH711400, # TH710501, and # TH145046 would be your best option with the Hullavator part # TH898 that you ordered. Thule has tested this combination and found that it works great plus it installs easier than other options and also is the quietest option too. For a lock set for just the roof rack you'd want the part # TH450400 but if you wanted lock cores to match the Hullavator as well you'd want...
view full answer... - Is Thule Square Bar Roof Rack from 2007 Toyota Corolla Compatible on a 2018 Toyota CamryThank you for the picture! It looks like you have the square bar system from Thule that uses the Aero Foot Pack 400XT. I spoke with my contact at Thule who said that the 400XT foot back was discontinued back in 2011 so they won't have a fit kit (the clamps for your vehicle) that would be compatible with both the foot pack and your 2018 Toyota Camry. The current square bar system that fits a 2018 Camry includes an entirely new kit so you will need the 53" SquareBars # TH712400, the Evo...
view full answer... - Roof Rack For 2020 Chevy Equinox With Naked RoofWe do have a roof rack system that will fit your 2020 Chevy Equinox beautifully, even without it having any rails or other mounting spots. Your Equinox has what is referred to as a naked roof, and there is one option I really like for your Equinox, which is from Rhino-Rack. The parts that make up the rack and fit your car are the following: - Rhino-Rack Vortex Aero Crossbars # RRVA126B-2 - Rhino-Rack 2500 Series Legs # RRRLKVA - Custom DK Fit Kit # DK488 The reason I like the Rhino-Rack...
view full answer... - Roof Rack Recommendation for 2019 Mazda CX-5 to Carry Thule Roof Cargo BoxYou'll need to install a roof rack first on your 2019 Mazda CX-5 that has no side rails but once you do so you'd easily be able put a Thule Force XT Rooftop Cargo Box # TH6358B or the Pulse L # TH615 that you mentioned. For a roof rack I would highly recommend the Thule Wingbar Evo roof rack part numbers # TH711400, # TH710501, and # TH145079 as this is a very high quality roof rack for your CX-5 that is easy to install and has aero shaped crossbars to give you a very quiet ride quality.
view full answer... - What Size Thule Crossbars are Needed to Use the Hullavator Kayak Carrier on a 2016 Honda CR-VThe length Thule roof rack crossbars needed to use the Hullavator # TH898 on your 2016 Honda CR-V depends on the type of roof the vehicle has. If your CR-V has the flush side rails that run front to back on the roof then you will need the 47 inch bars # TH712200 as well as foot pack # TH460R, and fit kit # THKIT3118. If your CR-V has a naked roof with no side rails or crossbars you would need the 53 inch bars # TH712400 along with Evo clamp feet # TH710501, and fit kit # TH145108. You...
view full answer... - Thule Roof Rack that Can Fit 2021 Toyota Corolla HatchbackDepending on what roof rack you have on your 2002 VW Beetle there may be some components that would transfer to a new vehicle but as far as the complete rack transferring over that would be very unlikely. I'd need to know exactly what roof rack you have on your Beetle as well as the year of the Corolla you have.
view full answer... - Roof Rack Options for 2016 Porsche Cayenne with Naked RoofFor your 2016 Porsche Cayenne with a naked roof we have the flush bar Rhino Rack part # RR86MR which is also an aero bar rack but the bar does not extend past the feet of the rack.
view full answer... - Can the Thule Helium Aero 3 be Used to Carry 3 Bikes in a Class I Trailer Hitch ReceiverThe straight-forward answer is no, you should never carry 3 bikes in a Class I hitch. Any trailer hitch manufacturer will confirm this. Even though it would seem like using a lighter bike rack like the Thule Helium Aero 3 # TH9043PRO would keep the total weight down, it is more about the leverage than the weight. If you have a Class I trailer hitch receiver that has a 200 lb weight capacity and you max it out with 2 bikes or 3 bikes the 3 bike configuration will not be safe because the...
view full answer... - How To Carry Two Kayaks On a 2018 Toyota CamryI have a great option for you to carry multiple kayaks on your 2018 Toyota Camry. The method you have chosen of using j-style carriers will be best because it is easier to load them onto the roof from each side of the vehicle. For a j-style carrier, I really like the Rhino-Rack J-Style Kayak Carrier part # S512 because it has pretty much all of the same features (folding design, padding for protection, included tie-downs) as the top tier brands like Thule and Yakima but at only a fraction...
view full answer... - Thule Roof Rack Options for Carrying Bike Rack on 2017 Ford F-350 Crew CabSounds like you're just needing a roof rack for your 2017 Ford F-350 so you can use your bike rack. We actually do have Thule options for you! You just need to use one of the 60" crossbar options listed below along with the Evo Clamp Feet # TH710501 and the Fit Kit # TH145177: 60" Crossbars WingBar Evo Black - # TH711520 WingBar Evo Silver - # TH711500 SquareBar - # TH712500 Don't forget to add lock cores for your roof rack with the 4-Pack # TH450400, or using the 6-Pack # TH450600 or...
view full answer... - Recommended Roof Rack For 2012 Toyota Prius V With Panoramic SunroofYou are correct. The Rhino-Rack roof rack is not designed to be able to fit your Prius with the panoramic sunroof but we do have other options that will. I recommend the Thule SquareBar Roof Rack. This comes with 53 inch square load bars, the foot packs, and the custom kit that fits the roof of your Prius. To order this roof rack you will need part # TH712400, part # TH710501, and part # TH145129. You want to make sure you do not exceed the roof carrying capacity for your vehicle.
view full answer... - Recommended Thule Aeroblade Roof Rack Recommendation for 2018 Toyota Tacoma47 inch long Thule aero bars would be too short to be used on your 2018 Toyota Tacoma. Thule recommends a 53 inch bar like the part # TH711400 with the feet part # TH710501 and the fit kit # TH145107.
view full answer... - Thule Roof Rack Tower for 2020 Toyota Tacoma Bare RoofHey Ben, thanks for reaching out! Sounds like you're needing just two of the Replacement Foot for Thule Evo Roof Racks # TH69FQ which is for a bare roof. This is sold as a single or in a pack of 4 as part # TH710501 so you'll just want to buy 2 of the single kit. Do you have the fit kit that's needed to secure the Evo feet to your 2020 Tacoma?
view full answer... - Square Bar Roof Rack that Fits 2020 Ram 1500 Quad CabThule offers a square bar roof rack that fits your 2020 Ram 1500 quad cab with the part # TH712500, # TH710501, and # TH145199. Then for a square bar roof rack the Thule Portage part # TH819 would work great.
view full answer... - Thule Roof Rack Recommendation for 2012 Toyota Camry For a new Thule roof rack that fits your 2012 Toyota Camry the Wingbar Evo rack part numbers # TH711420, # TH710501, and # TH145149 would be a great choice confirmed to fit the vehicle and the bike racks you have as well as long as they can fit aero shaped bars.
view full answer... - Fit Kit For Thule WingBar Roof Rack on 2017 Toyota CamryThanks for that information, and the correct fit kit for a Thule WingBar Evo roof rack on your 2017 Toyota Camry is the following: - Fit Kit for Thule Evo Clamp Roof Rack Feet - 5149 # TH145149 This will fit your '17 Camry with the Evo Clamp Feet for Thule Crossbars # TH710501 and WingBar Evo Crossbars # TH711400 or # TH711420
view full answer... - Thule Roof Rack Recommendation for 2014 Volkswagen JettaThe Thule Fit Kit for your 2014 Volkswagen Jetta no longer has a fit for the old style square crossbars. I recommend you upgrade to the Thule WingBar Evo Crossbars - 53" Long # TH711420, the Evo Clamp Feet # TH710501 and Fit Kit for Thule Evo Clamp # TH145016. This will give you the most updated system that will work extremely well with your vehicle and will be quieter than your previous all metal system. This rack will have the t-slot channels in the crossbars for clean mounting of...
view full answer... - Roof Rack Recommendation for 2012 Toyota Tacoma Double Cab for Thule Kayak CarrierFor a great roof rack that is compatible with the Thule Compass # TH890000 on your 2012 Toyota Tacoma double cab with a bare roof, I recommend the following setup: - Thule WingBar Evo Crossbars # TH711420 - Evo Clamp Feet # TH710501 - Fit Kit for Evo Clamp Feet # TH145107 - Thule One-Key Locks # TH450400 With this setup, you receive the benefits of an extremely aerodynamic roof rack that ultimately leads to a quieter ride and increased fuel economy. Also, the Compass mounts to the bars...
view full answer... - Recommended Crossbars and Kayak Carrier for a 2020 Ford F-250 Crew Cab w/ a Naked RoofGlenda, for your 2020 Ford F-250 Crew Cab with a naked roof you can use the Thule WingBar Evo Roof Rack for Naked Roofs # TH48KG with the Evo Clamp Feet for Thule Crossbars # TH710501 and the Fit Kit for Thule Evo Clamp and Edge Clamp Roof Rack Feet # TH29TX. These bars are 60" long, has a max weight capacity of 220 lbs, and will work great to carry both of your Pelican Catch 130 Hydryve's. You'll just need to use two of the Rhino-Rack Kayak Roof Rack w/ Tie-Downs # S512 to carry them...
view full answer... - Fit Kit for Thule Roof Rack on 2017 Chevy Colorado Crew CabFor your 2017 Chevy Colorado, if you have the Crew Cab Cab you need Crossbars # TH711420, Evo Feet # TH710501 and the Fit Kit # TH145179.
view full answer... - Will the Yakima RocketBox Pro # Y07192 Fit My 2020 Mazda CX-5?On your 2020 Mazda CX-5, you have enough crossbar spread for the required 24-32 inches of the Yakima RocketBox Pro # Y07192. Also, according to your attached photo, you have the Thule WingBar Evo Crossbars like the # TH711400 installed. With these crossbars, the RocketBox will be able to attach to your crossbars. In addition, since you have a measurement of 54 inches from the center of your front crossbar to the line where the roof and hatch meet, you have enough space to fully open your...
view full answer... - Thule Roof Rack Fit For 2020 Ford F-150 SuperCrew CabThe only difference is one is also a fit for some Super Duty trucks while the other is a fit solely for the F-150; Thule uses different part numbers sometimes but I recommend sticking with the fit kit that is solely for the F-150. The complete Thule roof rack set up for your 2020 Ford F-150 SuperCrew Cab is the following: - Thule WingBar Evo Crossbars - Silver # TH711500 or Black # TH711520 - Evo Clamp Feet for Thule Crossbars # TH710501 - Fit Kit # TH29TX - (Optional): Thule One-Key...
view full answer... - Where Does Thule Roof Rack Install on 2018 Subaru WRXThe Thule WingBar Roof Rack # TH711420, # TH710501, and # TH145178 for your 2018 Subaru WRX that you have will have the front bar sit 9 inches from the windsheild line to the front of the front foot. Then the second bar will sit 31-1/8 inches behind it measured on center.
view full answer... - Recommended Length of Thule Square Crossbars for 2016 Subaru WRXThe recommended length of Thule square crossbar for a 2016 Subaru WRX sedan is the 53 inch Thule SquareBar Crossbars # TH712400. For your Subaru's naked roof the rest of the rack is made up of Evo Clamp Feet for Thule Crossbars # TH710501 and Fit Kit # TH145178. This will give your '16 WRX a highly functional and durable roof rack which gives you the ability to carry all types of different cargo. The crossbars are made of galvanized steel to ensure they are free from rust and and even...
view full answer... - Availability of Fit Kit for Thule Rapid Traverse Foot Pack for a 2015 Subaru WRXThe correct fit kit to mount the (discontinued) Thule Rapid Traverse foot pack TH480R to your 2015 Subaru WRX is the discontinued part THKIT1649. Thule has been doing a complete remake of their products and so basically all of their roof rack and bike racks have been changed to a newer style that better accommodates newer vehicles. I reached out to my contact at Thule to see if the newer fit kit will work with the Rapid Traverse foot pack but he said that none of those parts are interchangeable. Luckily...
view full answer... - Can you Get Just the Foot Pads for Thule Roof RacksThule does not offer the foot pads alone of their roof racks. We do have the fit kits that are available to your 2013 Subaru Impreza, though. I was unable to find which roof rack you have based on the numbers you gave me, but the two Thule fit kits available for your Impreza are: Fit Kit for Thule Podium-Style Roof Rack Feet- 3068 - part # THKIT3068 Fit Kit for Thule Evo Clamp Roof Rack Feet - 5178 - part # TH145178
view full answer... - Cargo Box for 3 Snowboards for a 2016 Subaru Impreza HatchbackIf your 2016 Subaru Impreza hatchback came with the factory roof rack including the crossbars that run side to side then I recommend the Thule Force XT Sport # TH6356B. This box will hold up to 3 to 4 snowboards up to 175cm long. If your Impreza does not have the factory crossbars or the factory side rails then you would need to add a roof rack. For a model without any sort of rail or bar on the roof you would use the 47 inch SquareBars, part # TH712200, along with the Evo clamp feet,...
view full answer... - Recommended Roof Rack for 2019 Subaru WRXI recommend going with the Thule Roof Rack for Subaru WRX that uses the Thule Wingbar Evo # TH711400, Evo Clamp Feet # TH710501 and Fit kit # TH145178 since it's got the aerodynamic Wingbar Evo that will help reduce the wind noise that often accompanies these roof racks. I've linked a video that shows how this rack looks on your 2019 WRX as well as how it will install that you may want to have a look at as well.
view full answer... - Roof Rack for both a 2015 Toyota Prius and a 2016 Subaru Impreza 4 Door I would be happy to help you find a roof rack for your 2016 Subaru Impreza four door and for your 2015 Toyota Prius. There is one brand of roof rack by Thule that is going to have two out of the three required parts to fit both vehicles. You will however need different feet for the individual vehicles. For your Impreza you will want the 2015 Subaru Impreza Roof Rack by Thule. The roof rack includes: Thule WingBar Evo Crossbars - Aluminum - Black - 53" Long - Qty 2 item # TH711420 Evo...
view full answer... - Thule Roof Rack Fit For 2016 Subaru Impreza SedanCompletely understandable that you don't want to be wasting your time and money, so I checked with Thule for you, and while there is a Thule roof rack that fits your 2016 Subaru Impreza sedan, your current 400xt foot pack will not work with a fit kit for this vehicle, which means you do need a new roof rack set up. The Thule roof rack that fits your '16 Impreza consists of: - Thule WingBar Evo Crossbars # TH711420 (Black) or # TH711400 (Silver) - Evo Clamp Feet for Thule Crossbars # TH710501 -...
view full answer...
Do you have a question about this Roof Rack?
Info for this part was:

Video Edited:
Chris R

Updated by:
Wilson B

Updated by:
Alex H

Written by:
Matthew S

Edited by:
Daron K
At etrailer.com we provide the best information available about the products we sell. We take the quality of our information seriously so that you can get the right part the first time. Let us know if anything is missing or if you have any questions.
Product Experts Available Now!
Call 1-800-940-8924


Thank you! Your comment has been submitted successfully. You should be able to view your question/comment here within a few days.
Error submitting comment. Please try again momentarily.