
Rhino-Rack 2500 Series Legs for Vortex Aero Crossbars - Naked Roofs or Fixed Mounting Points - Qty 4

 Arrives before Christmas

- All Info
- Reviews (8964)
- Q & A (0)
- Videos (137)
- Photos
Rhino Rack Accessories and Parts - RRRLKVA
- Roof Rack
- Feet
- Rhino Rack
- 4 Pack
Durable nylon legs with built-in locks help mount Vortex Aero crossbars to your vehicle's naked roof or fixed mounting points. Leg bases pivot to level bars on your roof. Pair with 2 crossbars and fit kit to create complete roof rack.
Features:
- 4 Legs help to mount Rhino-Rack Vortex Aero crossbars to your vehicle's naked roof or fixed mounting points
- Pair with 2 crossbars and a custom fit kit (sold separately) to create a complete roof rack
- Leg bases pivot to ensure the crossbars are level on your roof
- Locks secure system to your roof
- UV-stabilized, glass-reinforced nylon is durable and weather resistant
- Allen key included to ensure legs are securely mounted to your roof
Specs:
- Quantity: 4 legs
- Weight capacity: 165 lbs
- Always observe your vehicle's maximum roof load capacity
- 5-Year limited warranty
RLKVA Rhino Rack 2500 Series Legs for Vortex Aero Cross Bars - Qty 4
Installation DetailsCalifornia residents: click here
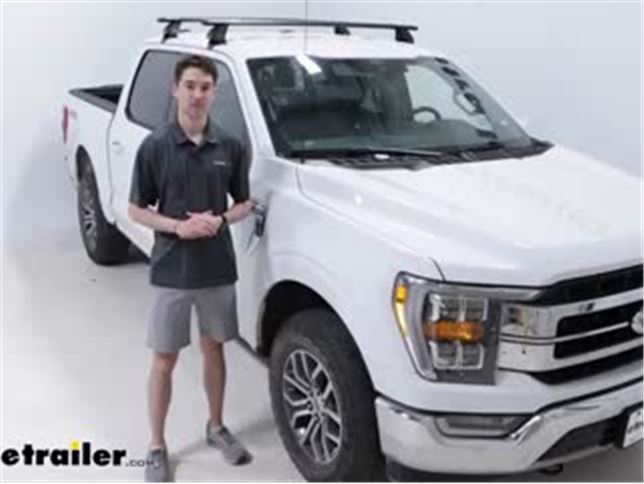

Videos are provided as a guide only. Refer to manufacturer installation instructions and specs for complete information.
Video Transcript for Set up: Custom DK Fit Kit for 4 Rhino-Rack 2500 Series Roof Rack Legs on a 2021 Ford F-150
How's it going everybody, it's Ethan here at etrailer. Today we're gonna be taking a look at and showing you how to install the Rhino-Rack Vortex Aero Roof Rack System on our 2021 Ford F-150. So with the F-150, obviously we have a good amount of bed space, but if you wanna get something longer or larger up there and maybe couple this with like a ladder rack to give some longer loads like a ladder or a lumber or on the sports and rec side, maybe you have a larger kayak you wanna get where you need it to go, a roof rack system like this one is gonna be a great solution for you. So let's take a closer look. The roof rack is going to have a weight capacity of 165 pounds. It's going to fit on our roof with the fit kit that we'll show you in the installed portion.
But 165 is gonna be a pretty solid or pretty common number that you see with roof racks like this, which is gonna be fine for most of the things you wanna get up there. You just wanna double check and make sure that your roof weight rating is in that same ballpark. Make sure you know what each of those are and go by the lowest ready component just to be safe. The crossbars we have on our system right now are gonna be 59", which is a solid length. We stay pretty much well within the width of our vehicle overall.
They're going to be elliptical so they taper on both ends to cut down on some of that wind noise and drag. But anytime you put something up on the roof, you're gonna deal with that. Luckily, we also do have a vortex strip on the top which is how the bars get their name. So that's going to help again cut down on some of that wind noise, otherwise we just have that open channel up here. Speaking of that channel though, that's gonna be great for your T-track accessories.
If you have those, you can slide those in. But with the strip you are going to have to trim it up if you wanna leave this strip in with those accessories on. So it's not a horrible idea to just grab another strip if you want to, in the event that you do end up doing some trimming. On our end cap here, we do have a plastic lock which we can use to unlock or lock our end cap but you can upgrade those to metal if you'd like. On the underside, you do have the option to use a measurement strip that you are gonna trim up and put wherever your towers are not.
In our case, this is just for demonstration and we'll talk a little bit more about that in the install portion as well, but that'll cut down on that whistling noise underneath as well. And using the provided key, we can take our end cap off and just show you how that works. So it's just a metal lock core there that will expose our fit kit hardware. So as long as our end cap is on and it's also locked up, no one is going to be able to access your fit kit hardware and remove the rack from your roof. From here I'm just gonna get a quick measurement to give you an idea of how much height you're going to be adding to your roof with the system. So from here in the middle, you're going to be looking at adding about 4-1/4" from the highest point. So if you're thinking about storing this in your garage, especially if you have something on there, add about 4-1/4" to whatever that's gonna be to find out whether or not it will fit in your garage or if you'll go anywhere where there might be some clearance issues. The roof rack system is gonna be made out of an anodized aluminum so it's gonna be really lightweight, easy to work with, but also very durable and rustproof at that point. It's got a nice matte black finish so it looks good. I think it fits the aesthetic of our F-150 really well. Overall, the install portion isn't too terribly difficult. It can be a little bit tricky, but you just need to be patient. Use the measurements that the instructions give you and make sure that you know where everything is gonna go. But if you need a little bit of help with that process, we'll walk you through it right now. To get started, the first thing we'd like to do is to slay everything out so that we know where and what it is. So we have our crossbars, we have towers, our fit kit, the clamps, and the hardware. We've got the pads and the bases for our towers. We have the tools and I would recommend picking up some kind of fabric tape measure as well as a regular tape measure. And then we have this measurement strip that comes included that we'll have to trim up according to our needs and definitely keep the instructions close by 'cause we will have to reference those often. But we'll begin by removing the end caps on our crossbars. We are going to use this plastic key to fit into the end cap. Just turn it and pull it out as long as we have it rotated fully, and we need to remove that in order to get our towers on. So we're going to line up this metal plate here with the underside, with the channel underneath our crossbars and just slide those on. And now is when you're gonna use that measurement strip. So for our case, ours has already been trimmed up so we can't use it effectively but you're gonna basically line it up with your tower, find the measurement on your instructions. In our case, we're looking for 169, so I'll get that roughly to where it needs to be. In your case, you could actually use the full measurement strip and trim it up if you need to. We repeated that process on the other side. We just slid our tower under this channel here and line it up according to the measurement, removed our end caps and now we just need to replace those real quick. Again, just put 'em on and tighten 'em down with the key. From here, since we're doing our front crossbar, just be sure to reference the instructions but we're going to attach one of our base pads to the rest of the base, and we wanna make sure you can see this arrow on here. We wanna make sure that ends up facing forward, so in our case, we're going to get these on and then we'll line it up with the tower. With the pad connected to the base, you can see where these openings are, and where they'll fit on our towers. So from here, again, we just wanna make sure that that arrow is facing forward, and we can snap this on into place. And then we're gonna repeat this process again on the other side. Once our towers are roughly in place, we're going to get a measurement. In your case, you could use the measurement strip. In our case, we would've to trim that up, and this is just for demonstration, so I'm gonna use our fabric tape measure to find that 169 millimeter mark in our case. And now I'm going to use the Allen key provided to tighten this down. As we tighten down, something important to note is that this tool does have a built-in torque spec, so just the way it's designed. Once we start turning, as soon as we see that line straightened out, that's about as tight as we want to go. Once we have our towers all set up, our measurements where we need 'em to be and both bases in place, now we can place our crossbars roughly on our roof, whereabout we think they're going to go. Just a matter of getting them roughly in place for now. And then we're gonna come back and get the measurement to make sure that they're in the right place. From here, again, since this is the front crossbar, I'm going to be using the measurement A in our case, which is 280 millimeters or 28 centimeters from the center of our door jam to the center of the tower. So in our case, I need to slide forward quite a bit. It's gonna be kind of hard to tell for now until I move the other one forward as well. So I'm gonna go to the other side and get that measurement now. Once we have everything in place and all our measurements are good, if your end caps are on, make sure we get those out of the way. If they're locked, go ahead and just use the provided key to unlock it. But now we're going to fit the bolt through this hole here on our clamp and make sure that it threads into that opening there inside our tower. Once you get the bolt here to start threading, it's probably gonna be easier just to use the tool to get it most of the way in. In our case, I'm gonna go to about 70, 75% here. I'm not gonna tighten it down all the way 'cause it might start pulling the whole system towards me, rather I'm gonna tighten this one down, and then I'm gonna go back to the other side, tighten that one down, come back and finish this one up, and then finish the other side up as well just to make sure everything's even as possible. Now that we've gone back to the other side and tighten that one down, I'm gonna finish tightening this bolt here. Again, just using this tool. Once it gets to the point where it straightens out, that's how you know we're at the desired torque. So I'm right about there now. All that's left to do is to replace our end caps and lock those up. So overall, if you're looking for a really effective way to extend your load space, whether that's getting some larger or longer items up on your roof, the Rhino-Rack Vortex Aero Roof Rack System is gonna be a great option for you. We just took a look at how to install it and how it fits on our 2021 Ford F-150.
Customer Satisfaction Score:
95% were satisfied with this product
5% of customers were not satisfied
- etrailer mistake
- Product did not meet expectations
- Wrong item was ordered
Ratings & Reviews
4.7
2549 reviews
See what our Experts say about this Rhino Rack Accessories and Parts
- Does Thule Motion XT Rooftop Cargo Box Fit Rhino Rack Roof RackThe Rhino Rack Vortex Crossbars # RRVA137B-2 you referenced measure 3-1/8" wide x 1-3/16" tall. The Thule Motion XT Rooftop Cargo Box # TH629806 will fit crossbars that are up to 3-1/2" wide and 1-11/16" tall so they will work on these bars! If you let me know the year, make and model of your vehicle I can confirm for you which Rhino Rack roof rack will fit and the parts you will need.
view full answer... - Recommended Rhino-Rack Roof Rack For A 2016 Ram 3500 And How Does Roof Rack Capacity Work Hey Bob, Roof rack systems are typically only rated up to 165lbs because that's typically above the capacity of the vehicle's roof. More recently all manufacturers are switching to removing the capacity from the listing and telling consumers to check the weight capacity of the roof because people have been overloading their roofs and causing damage. The # RR38ZE is missing a crossbar but includes the correct amount of feet and and fit kit components so you'll need to order the following...
view full answer... - Roof Rack For 2020 Chevy Equinox With Naked RoofWe do have a roof rack system that will fit your 2020 Chevy Equinox beautifully, even without it having any rails or other mounting spots. Your Equinox has what is referred to as a naked roof, and there is one option I really like for your Equinox, which is from Rhino-Rack. The parts that make up the rack and fit your car are the following: - Rhino-Rack Vortex Aero Crossbars # RRVA126B-2 - Rhino-Rack 2500 Series Legs # RRRLKVA - Custom DK Fit Kit # DK488 The reason I like the Rhino-Rack...
view full answer... - How Can I Tell if I have Fixed Mounting Points on My 2015 Mazda CX-5 for a Crossbar System?According to the specs I have, you may have fixed mounting points on those rubber strips on your 2015 Mazda CX-5. The way you can tell is if there is a small removable tab on those rails that cover the holes. I went ahead and attached a video of a 2015 Mazda CX-5 with fixed mounting points to give you perspective about what to look for. If you determine that you have fixed mounting points, I recommend the following setup: - Rhino-Rack Vortex Aero Crossbars - Aluminum - Black - 46" #...
view full answer... - Recommended Roof Rack and Cargo Carrier for 2013 Toyota CorollaFor your 2013 Toyota Corolla, I recommend the Rhino-Rack Vortex Aero Crossbars # RRVA118B-2, the 2500 Series Legs # RRRLKVA, and the Custom DK Fit Kit # DK152. This is a confirmed fit for your vehicle. I also recommend the metal lock cores # RRVA-LEC4 for when you use the T-channel mounting for accessories that have that mount that fits in the slot on top of your crossbars instead of wrapping around them. Then for your rooftop cargo carrier, I recommend the Thule Force XT Rooftop Cargo...
view full answer... - Parts Needed to Add a Roof Rack on a 2018 Honda RidgelineIf you would like to stick with the Thule theme that you have going then I recommend using a Thule roof rack system that uses the AeroBlade bars. For your 2018 Honda Ridgeline you will need 60" crossbars which is part # TH711500 for Silver or part # TH711520 for Black along with the Rapid Traverse Foot Pack # TH480R, and the Fit Kit # THKIT1811. The WingBar Evo bars have an aerodynamic design that cuts down on wind noise and drag compared to traditional bars. If you prefer the more traditional...
view full answer... - Roof Rack Options for 2016 Porsche Cayenne with Naked RoofFor your 2016 Porsche Cayenne with a naked roof we have the flush bar Rhino Rack part # RR86MR which is also an aero bar rack but the bar does not extend past the feet of the rack.
view full answer... - What are the Differences Between Roof Bag on Naked Roof and Roof Rack Mounted Bag?Apart from how the rooftop bags mount there is little difference between the cargo bags that go on the naked roof of your 2013 Kia Soul or one that attaches to a roof rack. To avoid having to put a pricey roof rack on your Soul, I strongly recommend going with a bag that mounts to your naked roof such as the Rightline Gear Sport 2 Rooftop Cargo Bag # RL100S20. This bag is waterproof, has 15 cubic feet of storage and is 44" long x 36" wide x 19" tall. You can mount the Rightline by running...
view full answer... - Recommended Roof Rack For 2015 Honda CR-V With Naked RoofWe do have a roof rack that will work for your 2015 Honda CR-V. What we have found is that you cannot have factory side rails added to a vehicle after it has been delivered but we have a solution for you. I recommend the Rhino-Rack Vortex Roof Rack. This features anodized aluminum aerodynamic crossbars with a rubberized Vortex strip in the crossbar top channel to disrupt airflow for a quiet ride. Along with the crossbars the system uses the Series 2500 Legs that include locks to secure...
view full answer... - How to Use Rhino-Rack T-Load System to Transport Kayak on 2016 Chevy Silverado 1500The Rhino-Rack T-Load Hitch Mounted Load Assist and Support Bar # RTL002 that you referenced is designed to be used with an existing roof rack crossbar system or bare roof carrier, which aren't included with the kit. If you want to go with a more permanent setup to use with the T-Load the best route is with a crossbar system. If your Silverado has the Crew Cab I recommend the Rhino-Rack Vortex Crossbar System that consists of # RRVA150S-2 for the two 59" Vortex Crossbars in Silver or...
view full answer... - Replacement Crossbar, Towers, and Feet for a 2022 Honda CR-V Using Rhino Rack 2500 SeriesJeff, first of all, I'm relieved to hear you weren't injured in this accident. As far as replacements go, we do have a replacement crossbar with the Rhino-Rack Vortex Aero Crossbar # RRVA137B but the towers and fit kit are only sold as a complete set with # RRRLKVA & # DK284. Hopefully no more turkey accidents in the future, but if it happens again we have you covered! Feel free to drop a comment and let me know if there is anything else I can do to help!
view full answer... - Recommended Roof Rack For A 2018 Chevy Equinox Hauling A Kayak And Bike Hey William, If your 2018 Chevy Equinox has rails that run from front to back then I recommend the Yakima JetStream Crossbars # Y00425 and TimberLine Towers # Y33TR. If you have a naked roof then you'll need the following roof rack components: Rhino-Rack Vortex Aero Crossbars # RRVA126B-2 Rhino-Rack 2500 Series Legs for Vortex Aero Crossbars # RRRLKVA Custom DK Fit Kit for 4 Rhino-Rack 2500 Series Roof Rack Legs # DK488 To haul the kayak you can can clamp on a carrier like the Rhino-Rack...
view full answer... - Roof Rack for a 2016/2017 Ford Edge Sport with Panoramic Glass RoofI would be happy to make some recommendations for you but I need to know the year of your Ford Edge Sport to select the proper products. Just let me know.
view full answer... - Roof Rack and Kayak Carrier for 2018 Mitsubishi Outlander SportI will be happy to walk you through what you will need to add a roof rack and kayak carrier to 2018 Mitsubishi Outlander Sport in the budget you mentioned. You said there are places to install a rack system, but I am unsure if that meant your '18 Outlander Sport had a naked roof (meaning no rails of any kind on the roof already) or a roof with factory flush-mounted rails that run front to back so I'll give you options for both. Rhino Rack is a high-quality roof rack manufacturer and they...
view full answer... - Recommended Bike Rack For 2015 Range Rover SportThe only trunk mounted bike rack that we have that is compatible with your 2015 Range Rover Sport is the SeaSucker Hornet Rear Window Bike Rack - Handlebar Mount - Vacuum Cup Mounted # 298-BH1302. To carry two bikes, you would need to use 2 of these carriers. My recommendation is to use a roof rack and bike rack. For this, I recommend the Rhino-Rack roof rack comprised of: Rhino-Rack Vortex Aero Crossbars - Aluminum - Black - 59" Long - Qty 2 # RRVA150B-2 Rhino-Rack 2500 Series Legs...
view full answer... - Recommended Rhino Rack Roof Rack With Bike Rack And Surfboard Carrier For 2015 Ford F-150For your 2015 Ford F-150 SuperCrew Cab, I recommend the Rhino Rack Roof Rack consisting of: Rhino-Rack Vortex Aero Crossbars - Aluminum - Black - 59" Long - Qty 2, # RRVA150B-2 Rhino-Rack 2500 Series Legs for Vortex Aero Crossbars - Qty 4 # RRRLKVA Custom DK Fit Kit for Rhino-Rack 2500 Series Roof Rack Legs - Naked Roof # DK427 The custom fit kit is designed to specifically fit your vehicle curves and prevent marring and scratches as you mentioned. This kit is rated to carry 165 lbs....
view full answer... - Replacement Rhino Rack Fit Kit and Feet for 2011 Ford EdgeHey Lawrence, the parts you need to get your 2011 Ford Edge Rhino Rack going again would be the fit kit part # DK228 for the fit kit and for the feet part # RRRLKVA.
view full answer... - Which Rhino Rack Roof Rack Fits a 2012 Nissan Rogue with a Naked RoofYes. The Rhino Rack Roof Rack for 2012 Nissan Rogue that uses the parts # RRVA126B-2, # RRRLKVA and # DK146 is compatible with your 2012 Nissan Rogue with a naked roof. As long as your kayak carrier can attach to aero/elliptical shaped bars, which most can, you'll be able to carry two 40-lbs kayaks without any issues. I've linked a review and installation video of this kit you can check out as well if you need any tips when it comes time to install the rack.
view full answer... - Rhino Rack Aero Bar Roof Rack Availability for 2015 Toyota PriusWe have a black Rhino Rack roof rack that fits your 2015 Toyota Prius with the part numbers # RRVA118B-2, # RRRLKVA, and # DK195 but if you were wanting the flush bar style of rack where the bars don't extend out past the feet of the rack then the best option is the silver part # RRRS490 you mentioned.
view full answer... - Roof Rack Kit for a 2015 Ford Escape With a Naked RoofYou have a lot of great options for a 2015 Ford Escape with a bare roof. I recommend the Rhino Rack Vortex kit, consisting of: Rhino Rack Vortex Aero Crossbars # RRVA137B-2 Rhino Rack 2500 Series Legs, part # RRRLKVA Rhino Rack Fit Kit 2500, part # DK375 These are a great balance of compatibility, ease of installation and value. Their aero shape is quieter than other crossbar designs and with the included T-Channel, can use some accessories with low profile channel mounts for better...
view full answer... - Recommended Roof Rack and Kayak Carriers for 2018 Nissan Frontier Crew CabFor your 2018 Nissan Frontier Crew Cab, I recommend the Rhino-Rack roof rack consisting of: Rhino-Rack Vortex Aero Crossbars -54" Long # RRVA137B-2 Rhino-Rack 2500 Series Legs # RRRLKVA Custom DK Fit Kit # DK108 Locking Endcaps for Vortex Aero Crossbars - Metal Cores # RRVA-LEC4 Then I recommend the Rhino-Rack J-Style Kayak Carrier # S510 and # RRS512X for your two kayaks. Finally you may want to consider the Rhino-Rack Universal Load Assist # RR-RUSL to help you safely load your kayaks.
view full answer... - Roof Rack Recommendation for 2016 Jeep Grand Cherokee Altitude with Metal Flush Roof RailsFor your 2016 Jeep Grand Cherokee that has the E Group style roof flush rails we have the Rhino Rack Aero Bar roof rack part numbers # RRVA126B-2, # RRRCH4, and # RRRCP27-BK that will work well.
view full answer... - Roof Rack Recommendation for a 2011 BMW 3 Series with the Yakima Sweet Roll Kayak CarrierI recommend going with a roof rack that connects directly to the roof of your vehicle with a bolt over the style that clamps to your 2011 BMW 3 Series Sedan. For your application I recommend checking out the Rhino-Rack roof rack which includes the following parts: 41" Vortex Aero Crossbars - # RRVA106B-2 2500 Series Legs - # RRRLKVA DK Fit Kit - # DK292 This will work great with your Yakima SweetRoll Kayak Carrier w/ Tie-Downs # Y04074.
view full answer... - Recommended Roof Rack Compatible With Thule Hullavator Pro Kayak Carrier on 2018 Honda HR-VFor your 2018 Honda HR-V to be compatible with the Thule Hullavator Pro Kayak Carrier and Lift Assist with Tie-Downs # TH898, you have to use slightly longer crossbars. The Hullavator requires 4-8 inches overhang to give clearance. In order to give you the clearance without giving you too much bar length, I recommend the following system: Rhino-Rack Vortex Aero Crossbars - 49" Long - Qty 2 # RRVA126B-2 Rhino-Rack 2500 Series Legs # RRRLKVA Custom DK Fit Kit # DK454 Metal lock cores...
view full answer...
Do you have a question about this Accessories and Part?
Info for this part was:


At etrailer.com we provide the best information available about the products we sell. We take the quality of our information seriously so that you can get the right part the first time. Let us know if anything is missing or if you have any questions.








Thank you! Your comment has been submitted successfully. You should be able to view your question/comment here within a few days.
Error submitting comment. Please try again momentarily.