
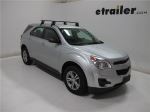
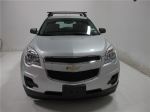
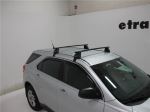
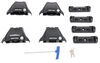
Rhino-Rack Sportz Roof Rack for Naked Roofs - Aluminum - Black - Qty 2


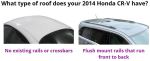
To see if this custom-fit item will work for you please tell us what vehicle you'll use it with.
This aerodynamic roof rack gives you the freedom to haul gear and cargo on your vehicle. Full-length aluminum crossbars offer plenty of space for channel mount and clamp-on accessories. Installs on your vehicle's naked roof.
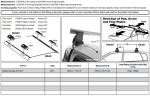
Features:
Specs:
 Alternate Instructions
California residents: click here
Videos are provided as a guide only. Refer to manufacturer installation instructions and specs for complete information.
Hi, I'm Matt at etrailer, today we are gonna be talking about the Rhino-Rack Sportz Crossbars and roof rack on our 2020 Ford Ranger. Now this will be a great option if you're looking for something that's gonna look pretty tough, and feel nice, and look just a little bit more rugged on top of your roof, then this is gonna be a great one for you, so let's check it out. Now with your Ranger, you can move your accessories, items, whatever it be in a lot of different ways. You're gonna have that bed back here and you can even pull the trailer behind you. Now, pulling the trailer behind you is gonna really lengthen that footprint of your vehicle, making it kinda hard to get through those tight spots. Another thing to think about is with this having a smaller bed, you're not gonna have as much room back here, especially for those longer items.
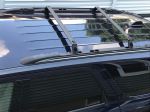
And if you have a tonneau cover on here, having those larger items might not be possible for you. That's where a roof rack comes into play, and especially the one we have today. This is going to be rated for a lot of different accessories, whether you're putting a rooftop tent up there, you're putting ladders there, kayaks, bike racks, anything like that, this is gonna be able to handle it. And we can actually take a closer look at how all this is gonna work together. We're gonna have a 50-inch Sportz Crossbar up here, and what makes these ones unique is that they're gonna have this open channel here in the center, and we're gonna have these rubber strips that go around 'em.
So if you tie anything off to your roof, these rubber pads are gonna help make sure we don't scratch anything up and kind of cushion 'em into place. And this center channel here is if you have any T-channel accessories, you can put 'em right here. And I will say, these end caps are fairly easy to work with. And then underneath, we're gonna have our towers, so these towers are gonna have a locking core here, so it's gonna have extra security. If I remove that, you can see how this is all held into place.
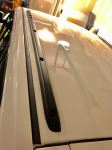
We're gonna have this clamp that is held by one bolt, and if I remove this, you can kinda see where that clamp is grabbing onto. And we're gonna have this rubber pad that's gonna make sure we don't scuff up your roof. Now what's nice about this is this is relatively flat, so that lets me know, one, we gotta really good fit up here, and two, we're not gonna have a lot of wind noise with this. And now we can actually take a closer look at how this is sitting on top of our roof. You can also use clamp-on accessories, too.
So I'll get you a measurement of underneath here, which is gonna be three inches. So that kind of gives you an idea if you have any extra large clamps, you are gonna have room to work with them. In some cases, they might be a little bit tight at the handle, but will fit on here. And then for the total height, this is gonna be sitting about a little bit under four and a half inches. So it's a little bit higher than some other ones out there, but again, this is gonna be more of a rugged design. Now something else to think about is the total height of a vehicle, plus these crossbars, and any accessories on top of that. Make sure that that's gonna be able to fit under any low-ground clearance areas, anywhere like a garage. And for the total crossbar spread, we have. This is gonna be at a little bit over 37 inches. So that's fairly large for a crossbar spread. So I think that's gonna be coming more in handy for any type of ski carriers, or kayaks, or even some rooftop tents. Definitely check if the accessories you have are gonna be compatible with the spread. Now, in my opinion, I think this is going to be a pretty nice option, again, if you're looking for something that looks a little more rugged. If you're looking for something that looks a little bit more sleek, I'd recommend the Thule roof rack. These are probably gonna be my top two options for this vehicle today 'cause they're both really easy to work with, they look nice, and they're reliable. It just depends on what type of style you want on top of your roof. Now if we're installing it, it won't take too long, and pretty much most people can do this at home, so if you want to handle this, just stay tuned, I'll walk you through the process. To begin the installation, you're gonna notice I already have one of my crossbars installed, it's gonna be the same process. So I'm gonna have the crossbar itself, we're gonna have the towers, (towers clattering) their end caps, the clamps, and we're gonna have the bases. And I'll go and show you how to put that base on now. So when we're putting that base on, there is gonna be an arrow on the bottom of it, it's really hard to see, you gotta be pretty close to it. And I'm just gonna push that on to this base here. This will have a orientation you want that arrow to face. In our case, today, it's gonna wanna be faced forward. And you'll notice on this base, there's another arrow on that facing out, so make sure it looks like that, and if it does, we can put it onto our crossbar. So with this crossbar, you're just gonna remove the end cap by pulling on it. And there's gonna be this strip in here. I'm removing my case. A lot of times, you can just leave this installed. And then we'll install this because we're gonna have a little square washer on the bottom. That square washer's gonna go into this channel. And if it's too tight, there's gonna be a bolt on the very top of it that you loosen up. So push it into place like that. And what I'll typically do with this, I'll just use this as my measurement guide. 'Cause if you look at your instructions, it's gonna give you a measurement, and it's gonna be basically from the very end of here to where the edge of that tower sits. So double check what yours says, match it up, and then we are gonna tighten this down with our included Allen key. Once that's tightened down, then grab your end cap again, throw this on here, and repeat that on the other side. You wanna make sure that both of these are tightened down completely, and we just take our time with this. Doesn't have to be perfect at this stage. Just wanna put that up there. And once it is, we can start getting a couple measurements. So the first measurement we'll get will be from this crease right here to the edge of this crossbar. And then the second measurement we're gonna get is gonna be from the front of one crossbar to the front of the second crossbar. Gonna grab our clamps and install those. So typically, you're gonna have this bolt that's already on here. I already took mine off. It's gonna go through this hole on that clamp. We're just gonna hand-thread it in to begin with into this nut. Once you get that threaded on, it can kinda be a little bit tricky at first. (parts clattering) Then we'll start using our tool. The best practice with this is just to tighten it down a little bit on one side so you get some resistance. Then you'll jump over to the other side, going back and forth until this is all the way tightened down. And the way you're gonna be able to tell this is all the way tightened down is when this blue bar right here fully tightens into place. If you have the newer Allen key that comes with your kit, then you'll have a tool that makes a clicking sound once it's fully all the way in place. Then you can throw on your cap, lock it into place, you have to give it a little shake test, make sure it's not gonna go anywhere, and if it feels good, you can take it out for a ride. (door slamming) Now, if you guys have any other questions, let us know here at etrailer. And again, I'm Matt, and thanks for watching.


Do you have a question about this Roof Rack?
Info for this part was:
At etrailer we provide the best information available about the products we sell. We take the quality of our information seriously so that you can get the right part the first time. Let us know if anything is missing or if you have any questions.


Thank you! Your comment has been submitted successfully. You should be able to view your question/comment here within a few days.
Error submitting comment. Please try again momentarily.