
To see if this custom-fit item will work for you please tell us what vehicle you'll use it with.
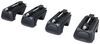
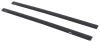
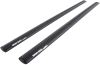
This aerodynamic roof rack gives you the freedom to haul gear and cargo on your vehicle. Full-length aluminum crossbars offer plenty of space for channel mount and clamp-on accessories. Installs to raised rails on your vehicle's roof.
Features:
Specs:
 Alternate Instructions
California residents: click here
Videos are provided as a guide only. Refer to manufacturer installation instructions and specs for complete information.
Hi Matt with etrailer. Today we're gonna be talking about the Rhino Rack Roof Rack on our 2022 Nissan Armada. Now this is gonna be a great option if you are looking for something that's gonna be, one, easy to use and, two, it's just gonna give your vehicle a rugged look. So let's check it out. Now what I like about a roof rack is we're using the space on top of our roof. Since this is a larger vehicle, we have a lot of room to work with.
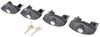
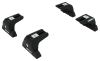
You can get this in a couple different variations. If you're just putting your vehicle's information into our fit guide, we can get you on the right track. But what I really like about this kit we have today is one, like I said, it's just easy to work with. You can even take off the end caps with no trouble at all, just like that and slide in accessories into this larger T channel. Now, at the very top of it, this is what I think makes it look a little bit more rugged and it does make it rugged too.
'Cause if you have some more hard surface items going on top of your roof rack, this type of textured surface is gonna handle it very well. And beneath that, we're gonna have the towers. And the towers are doing a really good job today 'cause you can tell we don't have any gaps underneath here. So that's gonna prevent any wind noise and it just makes it look better on top of our roof. Let's get a couple measurements to see how this fits up here.
So the first one I'm gonna get is gonna be the total height it adds. That's gonna be a little bit over two inches, so that's gonna be pretty low profile for the most part. It's still important though to take the total measurement of the vehicle. The crossbar is on anything that's sitting on top of there. So you know if you make it under a tight spot like a garage.
Now for the space underneath those bars, it's gonna be a little bit more limited. We're gonna have a little bit over an 1 1/2. So if you have some larger clamps, it might be a little bit difficult to use or if you have a sunroof, if that expands up, it could make contact with something. If you're worried about this, we have plenty of real estate on our roof that we could just shift this back some. Or if you need a wider spread, you could do that too. Because right now the spread we have, it's about 28 inches and we still have a whole another section on the back of here. And these are be pretty hefty with a decent weight capacity, but it's important to check what your vehicle is rated for, and then go from the lowest rated component so it don't damage anything. Now, in my opinion, again, it's really easy to work with and it's just gonna look pretty cool on top of your roof. Now if you like Rhino Rack, they're gonna have another type of crossbar we have on our website and that's gonna be more of the standard one, but it sits a little bit more low profile. And if you're looking for more of a look like that, I'd go with that instead. It just really comes down to what type of aesthetic you're looking for. Now if you do decide to go with this, let us know if it has made transforming your gear or your cargo a little bit easier in either comment or view. Now when it comes to the installation, that's actually a pretty easy process, but we do talk about some tips and tricks and make it a little bit easier. So if you're curious to see that, just stay tuned, we'll walk you through it. So what I like to begin is making sure we have everything we need. So you'll notice I already have the front crossbar installed. It's gonna the same thing for the back one. So we're gonna make sure we have both of our crossbars, we're gonna have the tool, and I like to have a measuring tape on hand. Just make things a little bit easier. And we're gonna have the crossbar itself. Now we're gonna make sure this is facing in this orientation with the bottom side facing up. And then, I'm gonna remove these end caps just by pulling on them. Just like that. You'll grab your tower. And sometimes you'll notice if this is kind of too tight, it's kind of difficult to get in place. So what I'll do is take my tool and loosen this up a bit. Once that's loosened up enough where these two pieces aren't making contact, typically they'll go in here fairly well. There you have it. Now, you'll want that bolt facing on the outside in this orientation. Then we'll repeat this process on the other side. With both of those towers in place, we can put it on top of our roof and it doesn't have to be in the perfect spot yet. We'll just roughly place it up there. I like to start on one side, get it around that bar. If it doesn't line up perfectly with the other side, we can just go over there and adjust it. So what we can do from here is I'd recommend putting your other crossbar up here too if you haven't. And we can get a couple measurements. We want this to be squared off as much as possible. So what I'll do is I'll come over to a mounting location like this and make sure both of these are right next to there. Or you could just simply get a measurement and make sure that this is gonna work with your gear, that you have the right type of crossbar spread. Once we've done that, then you can come over here and check your overhang and make sure it's even on either side. And if it is, we can tighten these down. So I'm gonna grab my tool and I'd recommend tightening this down enough. We have a little bit of resistance. Go to the other side, do the same thing, and just go back and forth so everything's nice and even until it's fully tightened down. You're eventually gonna reach a point where you have a lot of resistance. And when we start to turn this some more, you're gonna hear a click. Just like that. Once you hear that click, you know it's tightened down all the way. So from this point, what I'd recommend doing is doing that on the other side and putting our end cap on and giving it a good shake test, making sure it's not gonna go anywhere. If it feels pretty good, you can load it up and take it out for a ride. Now, if you guys have any other questions, let us know here at etrailer. And again, I'm Matt and thanks are watching.
Do you have a question about this Roof Rack?
Info for this part was:
At etrailer we provide the best information available about the products we sell. We take the quality of our information seriously so that you can get the right part the first time. Let us know if anything is missing or if you have any questions.


Thank you! Your comment has been submitted successfully. You should be able to view your question/comment here within a few days.
Error submitting comment. Please try again momentarily.