

 Arrives before Christmas
 To see if this custom-fit item will work for you please tell us what vehicle you'll use it with.


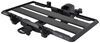
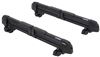
This custom fit kit lets you mount Inno XS300, XS350, XS400, XS450, INTR, or INXR roof rack feet to your vehicle's factory fixed mounting points, flush rails, or tracks. Kit includes all hardware necessary for mounting feet to your roof.
Features:
Specs:

Videos are provided as a guide only. Refer to manufacturer installation instructions and specs for complete information.
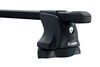
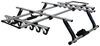
Today in our 2016 GMC Yukon, we'll be taking a look at showing you how to install the Inno Aero crossbars. The part number for our crossbars today are IMXB138-2. For our Inno through-feet fixed mounting point kit, we're using IMXS350, and for our custom-fit kit for the Yukon, we're using INTR154. This roof rack system will allow you to mount cargo boxes, bike racks, kayak saddles, seat carriers, and other accessories. By putting these accessories on your roof, it will give you more room inside your car and more room in the back. The Inno Aero crossbars are low-profile, aerodynamic crossbars that are going to help reduce wind noise and drag. The integrated weather strip is going to keep out dirt, debris, and grime.
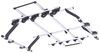
It's also going to allow you to install any channel mount accessories into that weather strip as well. The Inno crossbars have a 165-pound weight capacity, but you do want to check your vehicle's owner's manual to make sure your roof can withstand that much weight. Now that we've gone over some features, we'll show you how to get this installed. I've gone ahead and laid out all of my pieces on the table just to go over them with you. The only things you will need to provide are a flat tape measure and a flat-head screwdriver. Everything else that you see on the table here does come included with the kit. We have our crossbar here that's pre-assembled with that weather strip already inserted.
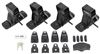
We've got our foam blocks here. These are going to go in underneath our crossbar, into this channel, once we have our crossbar loaded up and in place. That's just going to help to cut down on wind noise and drag. You will be able to place it in here with that foot pack in and snip off the end. We're not going to do that today, but I will let you know when it is time for you to do that. Up in front of that, we have all of our hardware.
The smaller bolts are for whenever we're securing our brackets that secure to our roof. These are going to be the bolts that secure to our flush rail system. These brackets and covers here are going to be what secure everything to our vehicle. We have our crossbar end-caps here. That will be installed afterwards.
These covers will be perfect for when you want to take your crossbars off of your vehicle but leave your brackets on. That's just going to be placed on a cover and just give some extra protection for that. Then we have our 2 foot packs with our covers for our foot packs, and we have a set of keys to lock the covers to our foot pack to help to prevent theft and tampering. Now, once you've decided where you're going to mount your back crossbar and you've removed the 2 plastic screws, we're going to take our bracket and place that over the 2 holes using the longer of the included bolts, and we're just going to tighten that down. Then we'll take our included hex wrench and we're just going to tighten those down completely so that the bracket is nice and tight and secure on our flush rails. With those completely tightened down, we'll take our plastic cover and we're just going to set it over the top. Now we'll do the same thing for the other side. Now we have our brackets and our plastic covers installed. We're going to remove the bracket under here so that we can install it onto our flush rails, and then we'll be able to secure our foot pack to that bracket. To do so, we're just going to flip this over and we're going to loosen up this knob here. With that loosened up, we can pull out this bracket, set that off to the side, and we also want to open up this lever, which will help us when we want to install our foot pack onto our crossbars. Now let's go and install our metal bracket onto our flush rails. Here we have our metal bracket that we just removed from our foot pack. We want this notch to be facing towards the inside of our vehicle. We're just going to place that right on top of that plastic cover. We'll take 2 of our smaller bolts, and we're going to insert them into the closer holes towards the inside. I'm just going to hand-tighten those down to start, then we'll use our included tool once again to tighten those down all the way. Once again, we'll repeat the same process for the other side. Now we can take our 2 foot packs and install them on our crossbar. We'll take our first one, lining up this portion here with the hole on our crossbar, then we're just going to slide it along our crossbar. Do the same thing to the other side. Now, when we load this up, we want to make sure that our lever is completely open and that our bolt is completely loose. If that bolt is too tight, we can't open the lever, and it won't allow us to install this onto our crossbar. Now with an extra set of hands, we're going to place our crossbar onto our vehicle. Now we want the bracket that's attached to our foot pack to sit behind this bracket that we installed onto our cover. What we're going to do is loosen up our bolt just a bit more. Then we have this bracket here in the back, this black one there, we're just going to push that back once we have it completely loose. That's going to allow our crossbar to push down and sit in the appropriate place. Now we want to take our measurements and adjust for our crossbar overhang. Now, to measure a crossbar overhang, we're going to measure from the end of our foot pack to the end of our crossbar. There's no specific measurement for this, just as long as it's even on both sides. Now with that even, we'll start to tighten everything down. We're going to use the black knob here at the end. Now we'll need inaudible 06:28 to close the lever on the back so that our foot pack secures to our crossbar and doesn't allow that to move, but it's also going to tighten up this bracket so that it squeezes onto the bracket that we installed on our flush rails. Now once again, we can take our included tool. We've got 2 holes on each side. We're going to insert that tool in the bottom hole and we'll be able to rotate and torque down our foot pack. With both those sides completely tightened down, now would be the time to take our foam piece and insert it in and then you could cut off the excess. Once you have your foam pieces installed and cut, you can take your crossbar end-cap and secure that in place. Then we'll take our foot pack end-cap, place it on, and lock it into place. That's going to help to prevent theft and tampering of your crossbars. That's going to be our completed look at the Inno Aero crossbars kit for our 2016 GMC Yukon.

These worked perfect on my 2016 Chevy Suburban

Easy to order, easy to install and quite effective in it's use. Thank you.
Fit like a glove and seem very tough, we will see on the next road trip
Do you have a question about this Accessories and Part?
Info for this part was:
At etrailer.com we provide the best information available about the products we sell. We take the quality of our information seriously so that you can get the right part the first time. Let us know if anything is missing or if you have any questions.


Thank you! Your comment has been submitted successfully. You should be able to view your question/comment here within a few days.
Error submitting comment. Please try again momentarily.