
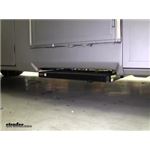
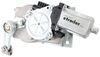
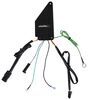
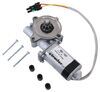
Replaces the electric step, motor, and switch kit for your Kwikee 38 series RV steps. Motor extends and retracts the step when it receives the signal from the switch kit. Wiring pigtail hardwires to your RV's power.
Features:
Specs:
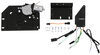
Note: This step assembly includes the steps, motor, and switch kit only. The steps will operate manually through the switch kit.
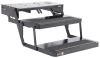
If you want the complete step assembly that allows the steps to automatically extend and retract with the RV door, you will need a control unit. The switch kit included with this assembly will still work, but if you want to be able to override the automatic retraction, so the steps stay out whether the door is open or closed, you will need a different switch kit. The complete assembly with steps, motor, control unit, and switch kit is available under part number LC3723383.
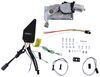
The included 4-way plug fits into the existing wiring harness on your RV. Most vehicles should having this wiring already set up. In the event that your RV is missing the wiring, a 4-way pigtail is included to help you hardwire the unit to your RV.
The Kwikee steps include several safety features in an effort to prevent injury to you or your passengers and damage to the RV steps. If an obstruction is detected while extending, the steps will halt and retract back into the stowed position. The steps will also retract when you turn on the vehicles ignition, even if the automatic retraction override has been activated, in case you forget to stow them before driving away.
Will Kwikee Electric Steps Work for You?
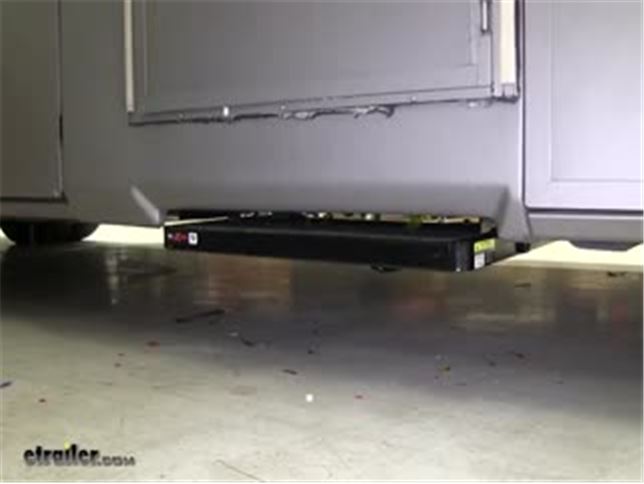
Electric steps are typically installed on RVs and some travel trailers. The electric steps from Kwikee install and fold up underneath the camper for simple storage. To ensure you choose the correct size for your application, there are a few measurements you will need to take.
The Kwikee electric steps attach to the underside of the camper chassis, directly beneath the doorway. To decide which size you'll need, locate the space available underneath your camper that lines up with the doorframe, and measure the width and depth. You will need a mounting space that is at least 25-1/2" wide and 11-5/8" deep.
If it turns out you have more or less space beneath your doorway, there are other step assemblies available with bracket sizes ranging from 24-3/4" wide to 37-1/4" wide. A full list of the available steps is below.
Outriggers - metal brackets that act as an extension (LC301704 - sold separately) - may be needed for installation depending on the model of your original stairs. These provide extra length if the old steps are longer or wider than the new.
Once you know where the mounting bracket will go and what size mounting bracket you need, that spot will be used as the "mounting point" to determine how many steps you will need.
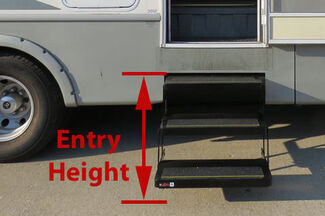
How Many Steps Do You Need?
To decide on how many steps you'll need, measure from the mounting point to the ground. This is called the entry height. The entry height should roughly match the height of the steps when they're fully extended, plus 6" to 8" to account for the drop from the bottom step to the ground. This measurement will also tell you how many steps you need.
The chart below displays mounting bracket widths in the first column and entry height measurements in the second column. The third column shows the corresponding part numbers. Use the mounting bracket width and entry height measurements you took to determine which part number will fit your RV. Choose the bracket size that is closest to your measurements without going over.
This page's step assembly is in bold text.
| Mounting Bracket Width | Entry Height | Part Number (Complete Assembly) | Part Number (Replacement Assembly) |
|---|---|---|---|
| 24-3/4" | 15-5/8" - 17-5/8" | LC3747453 | LC3747452*, LC3747451** |
| 25" | 16-3/4" - 18-3/4" | LC3724742 | n/a |
| 25-1/2" | 27-7/8" - 29-7/8" | LC3658373 | LC369552*, LC365837* |
| 25-1/2" | 20-1/8" - 22-1/8" | LC372261 | LC3722615*, LC3722617**, LC3722616*** |
| 25-1/2" | 20-1/2" - 22-1/2" | n/a | LC3725791* |
| 25-1/2" | 12-1/8" - 14-1/8" | LC3723383 | LC372338** |
| 25-1/4" | 13" - 15" | LC3711363 | LC371136*, LC3711361** |
| 25-3/4" | 22-7/8" - 24-7/8" | n/a | LC372558* |
| 25-5/8" | 11-7/8" - 13-7/8" | LC3691461 | LC369146*, LC3691462** |
| 25-5/8" | 13" - 15" | n/a | LC3726041* |
| 25-7/8" | 23-1/4" - 25-1/4" | LC3726892 | LC3726891** |
| 26-5/16" | 27-1/4" - 29-1/4" | LC3694042 | n/a |
| 29-3/8" | 18" - 20" | LC3722661 | LC372266*, LC3722662** |
| 30-1/4" | 15-1/4" - 17-1/4" | n/a | LC372779* |
| 30-3/8" | 17-1/4" - 19-1/4" | n/a | LC427247* |
| 30-5/8" | 20-1/2" - 22-1/2" | n/a | LC375632* |
| 31-1/2" | 28-5/8" - 30-5/8" | n/a | LC375821* |
| 31-1/2" | 12-3/8" - 14-3/8" | LC3756271 | LC3756272** |
| 32-3/8" | 20-1/4" - 22-1/4" | LC3722862 | LC3722863** |
| 37-1/4" | 18" - 20" | n/a | LC3694112*, LC369411*** |
*Motor and control unit
**Motor and switch kit
***Motor only
How Do You Install the Steps?
To install the steps:
-Set aside steps before drilling
-Make sure bracket is backed up fully against the I-beam on the chassis
-Hardware not included
California residents: click here
Videos are provided as a guide only. Refer to manufacturer installation instructions and specs for complete information.
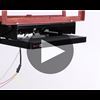
Speaker 1: Today you're going to be taking a look at the lifter components quickie 36 series single electric step. Stepping up into your RV can be a bit of a challenge. Especially if the steps aren't working. That's where our replacement steps are going to come into play. With our step installed, when we open the door it's going to automatically come out allowing us to step in easier getting in our RV but at the same time when we close the door, they're going to automatically retract making sure they're not going to catch on anything when we're driving down the road.Now from the top where it's mounted behind this panel, our step is going to drop down a total of five inches. In our application and the step we're using is going to be 24 inches wide by 10 and three quarter inches deep.
There is another step that is available that's going to be 30 inches. To see our website for your specific application and it's going to be made of a nice solid steel construction and have a nice black powdered finish for long lasting durability.The hidden amber light underneath our step is going to make it a lot easier for us to find that step in low light situations and have confidence when we're getting in or out of our RV. The included motor on our step is going to have a solid steel drive rod as well as stainless steel bushes for extended life of the motor. Our steps come with a door switch allowing it to know when to open up and when to close.Now our step is also going to come with a rocker switch in case you choose to manually turn it on and off and not use that door switch. Now that we've seen our steps and gone over some of the features, we do realize that every RV is going to be slightly different but we'll go ahead and give you a brief overview of how to get them in place.To begin our installation, you're going to need to remove your steps and disconnect al the electrical components that are on the steps themselves.
So I got our new step here and we're going to have our pigtail that we're going to wire into our motor home. Then the pigtail is coming off the step as well as the ground wire.So to get our step extended to make it a little easier to work with, I'm going to go ahead and plug in our pigtail and then I have a jump box here which is going to provide my power and grout. So I'm going to take the green wire with the ring terminal on it. I'm going to hook it to ground. I'm going to take my red wire, hook it to power, and then now we're going to take our jump box and turn it on and that should extend the step out.
We've made it a little bit easier to get access to our mounting holes.It's a good idea to have something underneath the step to support it. I'm using a floor jack to help me get the new step in place. It takes a little bit of patience to get everything lined up because it is rather hard to see but once we get the holes lined up, we can put our hardware in hand tight so that step will support itself and we can come back and tighten it all down.Typically you're going to have four bolts, one on each corner holding your step in place. There may be more but you just want to make sure that you replace them all and get them all nice and tight. Now these are the wires that we cut and as you can see they have some inaudible 00:03:15 connectors on them.
That's because it was hardwired into the motor. Now we're going to use the other end of the pigtail and then just connect our wires here so we can have a quick disconnect and if any issues arise we can disconnect it. It would be a little bit easier rather than cutting and splicing every time.So we'll go ahead and cut back these butt connectors and strip the wires and start attaching everything color for color. We're going to take a heat shrink butt connector and now these don't come with our kit but if you need some you can pick some up on our website. Then we can take the other end of our pigtail and we'll find the brown wire. It's already prestrippe.d So we can just put it into the other end of our butt connector and crimp it in place. Now we're going to do that for each one of our wires and we're going to connect them color for color. You should have a white, a yellow, and a red left on the motor home end as well as the pigtail end.We'll be using a heat gun to shrink down the connectors. I just want to mention if you are using an open flame you want to be extra careful not to burn the wires or the connectors themselves. Now this is where our ground from our previous step was installed. I'm going to go ahead and remove that bolt, take our new ground wire, slide the bolt and washer around it, and line up the hole and reinstall that bolt. With the jack out of the way, we can go ahead and shut our door. We can go ahead and go back underneath and start cleaning up all those wires.That'll finish up your look of the lifter components quickie 36 series single electric step.


Great product. Thank you
Vicki took care of me getting this order together. It arrived early and without any issues, damaged boxes, etc. Thanks!
Amazing product
After a year it severely rusted and I had to repaint it
It’s like we have a new motor home. Sturdy and great functionality.
Easy and simple replacement.
Fast shipping and good product.
Good company and good customer service.
All of the pieces did not come in the initial box but once I called you and then received all of the remaining pieces, it was easy to install. Great customer service. Thank you.
Step went on very easy... works fantastic. Box was a little beat up so we have a few scratches on the step but overall happy with product.
Product arrived on time and packaging in excellent condition. Installed easily however there’s no instructions, especially for the door switch.
Do you have a question about this RV Step?
Info for this part was:
At etrailer we provide the best information available about the products we sell. We take the quality of our information seriously so that you can get the right part the first time. Let us know if anything is missing or if you have any questions.


Thank you! Your comment has been submitted successfully. You should be able to view your question/comment here within a few days.
Error submitting comment. Please try again momentarily.