
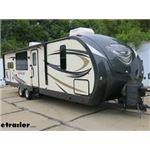
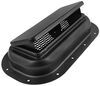
LaSalle Bristol XTRM PVC RV Roof Membrane - White - 30' x 9-1/2'
(5 reviews)
Price: $632.95
In Stock
LaSalle Bristol XTRM PVC RV Roof Membrane - White - 30' x 9-1/2'
Item # 3441700534142711430
Retail:$1,029.69
Our Price: $632.95
You Save: $396.74
In Stock
Thank you! Your comment has been submitted successfully. You should be able to view your question/comment here within a few days.
Error submitting comment. Please try again momentarily.


Need help with installation?
Locate installers near me- All Info
- Reviews (5)
- Q & A (0)
- Videos (1)
- Photos
LaSalle Bristol RV Roof Repair - 3441700534142711430
- Roof Membrane
- White
- 30 Feet Long
- LaSalle Bristol
Replace or upgrade your RV roof with this lightweight, rubber roofing membrane. Elvaloy-based PVC material is puncture- and tear-resistant. Flexible design makes it easier to install than other roof membranes. Measures 30' x 9-1/2'.
Features:
- Roofing membrane replaces or upgrades the roof of your RV
- Works with most Class A motorhomes and up to 30' travel trailers
- Single-ply XTRM membrane is lightweight, flexible, and UV-resistant
- Elvaloy-based PVC material is more puncture- and tear-resistant than TPO
- Additional flexibility compared to TPO makes it easy to install
- Energy efficient reflectivity protects your RV and keeps the interior cooler
- Seamless, 1-piece design means less opportunity for leaks and cracks
- Smooth surface won't create build-up of dirt and debris in membrane
- Maintenance free construction doesn't require special treatments or special cleaners
- Won't leave streaks on the RV's sides or develop black spots
- White color matches your RV
Specs:
- Application: most Class A motorhomes and travel trailers up to 30'
- Dimensions: 30' long x 9-1/2' wide x 0.027" thick
- Covers 285 sq ft
- Solar reflectivity index (SRI): 109
- 15-Year warranty
How Often Should I Clean My RV's Roof?
It is recommended that you clean the roof at least 2 to 3 times per year. LaSalle Bristol membranes do not require any special cleaners for maintenance. You can use typical household cleaners - something non-abrasive, used with a medium-bristled scrub brush. It's also a good time to check the seals around the rooftop accessories and edges of the roof. If you find damage or something that may compromise the integrity of the structure, you can apply more sealant until it is either time to take something down and reseal it entirely or time to replace the whole RV roof.
How Often Should I Replace/Reseal My RV's Roof?
Most RV roofs will last around 20 years, but after about 10 years, it's a good idea to start looking closely for leaks, cracks, or other damage that may lead to replacement of the entire roof. For the best results, and the longest-lasting roof, it's best to check the seals and edges of the rooftop at least once a year.
How Do I Replace My RV's Roof?
You will need a few tools to install the membrane on your RV's roof. These include butyl tape, adhesive, sealant, a neoprene head squeegee (for no streaks in membrane surface), and a utility knife.
To begin, remove all your rooftop accessories - A/C units, vents, fans, etc. - and clean off the rooftop. After you have applied the adhesive and laid the membrane flat, squeegee out the air bubbles that will inevitably form, and cut off any extra material hanging from the sides of the RV. Using a utility knife, cut out the areas where your rooftop accessories will be installed and place them in their respective positions. From there, you can apply butyl tape, self-leveling sealant, and non-sag sealant to finish off the installation process.
1700534142711430 LaSalle Bristol XTRM Roof Membrane - 30' Long


Video of LaSalle Bristol XTRM PVC RV Roof Membrane - White - 30' x 9-1/2'


Videos are provided as a guide only. Refer to manufacturer installation instructions and specs for complete information.

Video Transcript for LaSalle Bristol Roof Membrane Install - 2016 Forest River Salem Hemisphere Lite Travel Trailer
Today on our 2016 Forest River Salem Hemisphere light travel trailer, we're gonna show you how to install the LaSalle Bristol extreme roof membrane. This is what our roof membrane is gonna look like when it's installed. What are some of the reasons that we would need a new roof One, maybe we have an old camper that's got some leaks in it. Another reason, we're restoring a camper and we want to make sure that the roof we're putting on or the roof membrane that we're gonna be putting on is a good material that's gonna last. A third reason, what if we bought a camper and maybe the old roof was not properly maintained It's got cracks. It's dried up.
It's gonna cause leaks, leak into the inside of the camper, mold, mildew is gonna cost a lot of extra money if we have to start replacing everything inside.What are some of the reasons to choose a PVC roof membrane over some of the other materials A lot of your campers are gonna come out with a rubber roof or rubber like roof that have to be treated once every one to two years. That means you're gonna have to get up on your roof, clean it, and then put a conditioner on it so it doesn't dry out and crack. Unlike some of the other membranes out there, once you install your PVC membrane, it's gonna be maintenance free. You can rest assured you're gonna have years of coverage backed by a 15-year warranty.Another benefit to the PVC membrane is let's say you're camping and you have a tree branch that falls on the top and maybe put a tear in it. You take an extra piece, take some PVC cement, put it over the top, and you can chemically weld that piece to your top to give it a permanent bond unlike some of the other roofing materials out there that will only accept a temporary patch.
As far as the insulation goes on this, it's not a difficult task. Just keep in mind that it is not a one-day job. It is gonna take a couple days. It's monotonous and a little time consuming.Another great benefit to having a PVC membrane over some of the other materials out there is your roof is gonna stay on average up to 20 degrees cooler which means that it can keep the interior of the camper up to two to three degrees cooler. One downside to the PVC material is once you tear off your old roof, if you have particle board, this material, the PVC membrane is gonna show any underlying imperfections.
Now that being said, this is roof, this is maintenance free so you're not gonna have to get back up here but if that is a concern for you, suggestion is to maybe lay down some inaudible 00:02:36 over top of your particle board to give it a nice clean smooth look.Now that we've gone over some of the features, let me show you how I installed it. Before we start our installation on our roof membrane, we need to prep our area which means we need to remove everything on the top of our roof and everything along the sides of the roof. Anything that's holding our roof or our membrane down we need to remove. We're gonna start with our tracks here on the side. Our rooftop or our membrane actually rolls down and is underneath the back side of it.
We're gonna start taking this off. There is a plastic piece that runs right down here that covers our screws. Probably gonna have some sealant on the ends that we're gonna need to remove also. To get the track off or our rubber insert here, what I want to try to do is save this so I can use it after we get our new roof on. Peel out this end here. You can see here I'm just using a putty knife. We're gonna have a square bit. Use a square head. Actually it looks like on this trailer, most of your travel trailers and RVs use square bits. It looks like you could use a Philips head screwdriver too the way they have it made. We'll go ahead and take that screw out.Then we're gonna pop this piece off here just like that. This stuff should just pull right out. You can see we have screws that are gonna go all the way down the side of the trailer. Go ahead and pull our plastic out and then take our screws out and pull this piece off. You're gonna have some sticky stuff on the back. It's not real real sticky but it is back there. It's called beetle tape. You can see here when you run your screw in it gets a little bit on the threads and it seals that hole to keep any water from getting inside. Where our gutter comes on to the end, you can see a roof rubber actually goes underneath of it. There's a piece of aluminum cap that kind of comes over this corner. Actually it comes over both corners in the back. We're gonna have to peel up all this. There's some screws and then that plastic trim piece that was inside is inside this. We're gonna peel it back kind of down this edge a little bit to get a few of those screws. The rubber part of the roof is gonna come down. You'd be able to see it where this back track and this one meet. This stuff here is just self leveler. It comes off pretty easy. We're just gonna bend this up enough that we're able to get to a roof.As you're taking the stuff off, take note because there's a couple different sealers you're gonna be using. Anywhere that you have caulking down on like the sticker pieces, make sure you don't just start pulling it off because you will peel off the stickers. On this particular camper, this piece that our awning is attached to is one piece. What I'm gonna try to do is because my awning is electric, it's not the pullout one, I rolled it out a little bit. I'm gonna take this rail off. Hopefully I can leave this attached on here and not have to take it off and the arms will support it. You can see here what I've done is I've actually tied a piece of string here so that when I pull this off, the weight of this is not pulling on my canopy. I can let it rest on top of the string. I'll put another one down at the other end just to support it. Now we'll go ahead and take this rail off and we'll go from there.Now we've got the back and the two sides done. Here at the front, we have two trim pieces that run across the front. I was hoping I would only have to take off the back, but the front actually runs under about halfway under that front one so it looks like we're gonna have to take off both of them. We're gonna take them off the same way. Peel off the self leveling sealant on the top and then you're just gonna have some screws that hold that down.Now as far as removing our vents and air conditioners on top of our roof, all you need to do is pull that stuff off. You pull the screws out and there's some sealer tape underneath of it that runs along the edge. You can take it and just pull it off. These are pretty easy to get off and then you'll have your opening and your top or your rubber top actually folds down inside and it's probably stapled inside.As far as our smaller vents here that are for our bathrooms, you're gonna have some screws that go around the edge. Again clear off your self leveling sealant. Pull out your screws. You should be able to pull this off. You can see here where the membrane rolls over to the side. There is butyl tape underneath of there. You need to make sure when you're pulling this off, you take the butyl tape off also. We need to make sure that our sides are clean so when we lay the new stuff down, it lays down evenly. Once you have everything removed, we're gonna start peeling off the membrane. Keep in mind that not all the membranes are gonna peel off the same. Some of them may be a little bit tougher. As long as you take your time, you'll get it off. We'll start here in the back. We're just gonna slowly start pulling it up.What we're gonna do is we're gonna lay out about a four foot section. Before we lay it down, if you have paneling like this underneath what we need to do is we notice this spot here how it kind of pulled up some wood when we pulled up our old top We need to kind of fill that in and smooth it so that when we lay our new membrane down we don't see it dip. We're gonna use a low sag to no sag sealant. We're just gonna squirt a little bit in there. I like that. What you want to do is smooth out those edges. Once we've filled all of our imperfections, we're gonna take our adhesive. We're gonna dump a little bit on. What we're gonna try to get is about two by two circle, something like that. You take a roller, just a regular paint roller, and we're gonna start spreading it. You want a milky white film. This tape that runs down your seams here, if there's any part of this tape that may be damaged, you want to make sure you put some new tape on it. This tape here is just some drywall mesh tape and you can find this at any hardware store.If you remember, we had a cord here. There's a couple holes. What we need to do is when we get to a spot like that, all we're gonna do is we're gonna cut an X in it. Take our squeegee. Make sure it's a white squeegee. We're gonna start working the air out. It may be easier, it may go a little bit quicker if you have a second person maybe that can start squeegeeing one side while you're squeegeeing the other. All we're trying to do is we want to work out these air bubbles. Another good tip is if you kind of get here right in the middle, if you don't want to get your top dirty put you a piece of cardboard like this and just do it like that. You're just gonna start working everything out to the edges.As you're rolling your membrane out, anywhere you had your air conditioners, the openings in the roof, you're gonna want to cut them out. How we're gonna do that is if you can see my cut here, what I'm doing is I'm going corner to corner. Take a knife. Push down on the corner just a little bit. You can find it. We're basically cutting an X so that these sides will roll in and eventually we'll staple them down. Another cutout that we're gonna have to do is on your vent pipes that are coming from your bathroom that look like this pipe here. What you're gonna need to do is have somebody hold the roll up. Go ahead and get it to that spot. You want to cut big enough that it's gonna go over the top of it. I'll cut it out here. We'll go just outside of that. Lay that down and then we can make minor adjustments to our top. We want to make sure we're getting the air bubbles and that it's sitting pretty flush around it. We are gonna have a cap that goes over it. We're gonna seal around that too. We just don't want air bubble under there. Let's see if we can get this out.If for some reason you get an air bubble in there that won't come out, what you may need to do is grab the end of it, lift it up, stretch it, and then lay it back down. It's easy if you have somebody here. Take your squeegee and run right up the center and then work to the outside on both sides.What we've done here up on our nose, you'll notice this front part. We've actually cut our top about an inch past it. What we want to do is we want to take that part and we're gonna lift this and we're gonna tuck this underneath because this is the direction of travel. We don't want any wind to get under there because it will lift the top up. What we'll do is we can take a putty knife. You can also see our adhesive here. We didn't go all the way up. Take a putty knife and if you lift, we'll take this and kind of roll it down in there. Then another you can use a screwdriver too. I don't want to poke a hole in it so I'm using a trim panel tool. All we're gonna do is we're gonna work it down to the outside edges.Once you get your adhesive all on your back half, you get your top pulled down. Get all your air bubbles out. Take this back half and you're gonna roll it up to this edge just like this. That where we're gonna take our butyl tape that comes in our kit. We're gonna have a couple different sizes. They're gonna be a wider width. We're gonna use the skinnier width first. What we're gonna do is we're gonna run it about you can kind of see the line here where the old butyl tape was. It's gonna go right up along this edge, top edge. We're just gonna peel it off. You can kind of push it into place as you're going. You can work with it. When you stick it on, it's not gonna stay there right away. This is more of a water barrier sealer between your two pieces. Just work it as you go. Take your time.Now what we're gonna do is peel the paper off or butyl tape that we just put on. We're gonna take our membrane and we're gonna pull it over. Pull it down. Pull it taught. Make sure you don't have any air bubbles. Where your butyl tape is, we're gonna put a staple right underneath of it. I'm gonna start right here in the center. All we're doing with the staple is making sure that this stays tight. Just like that. We'll just work our way to each side. Again make sure your air bubbles are out. Make sure you don't have any creases or anything like that in there. We'll just throw a few staples in.Now we'll take our termination bar. We're gonna put our adhesive butyl tape on the back. You want to make sure you use an adhesive butyl tape and not putty tape. The difference, putty tape is gonna break apart. Adhesive butyl tape it will actually stretch. We're gonna find our existing holes. You can see I have a little punch here. I found a hole here from where this piece was on before. I poked it through. I'll line up a piece here, find out which hole it's gonna be. I'm actually gonna poke it through that hole. Next, we're gonna line up our holes. I'm gonna take our screws and just start reinstalling. I'm gonna start from the center here because our piece kind of has an angle to it and just work my way to both sides. Just kind of bend it as we go.Now what we need to do is we need to run, just like we did here on the back, we need to run our butyl tape from front to back or back to front. What we're gonna do is we're gonna show you a little strip here. It's better to do it in one solid strip, that way you don't have to try to mend two pieces together. I'm gonna show you with a small piece. You can see this white metal cap here. The screw holes, we actually want to cover those screw holes with our butyl tape. What I'm gonna do is I'm gonna put it over the edge of this metal strip and as long as I'm covering both, I'm good. Our trim piece that we're gonna be putting on top, it's gonna have another piece of butyl tape on the back of it and it will actually sit on top of this one. This one will sit down like this underneath. The top one will sit on top of this and what they're gonna do is basically they're gonna but together and our membrane is actually gonna run in between them.We'll go ahead and put this on first and then once you have your strip that goes all the way to the front, peel this off. I'm gonna reiterate again, even though I showed you on the back, what I would do is pull before you put the butyl tape on pull this down a little tight and go ahead and mark your holes where your existing holes are. That way, when you put your piece up, you can line them up and just go through and put your screws back in. You can see here I've already done that. Now we'll go ahead and get our butyl tape on. We'll get this pulled down and then we'll show you the next step.Next thing we want to do is your end gutter pieces here, these need to be installed before you install your trim piece that's gonna go in between. The reason is is that trim piece actually sits inside of here to make sure I get it lined up in the right place. We'll pull this down and kind of stick it to your butyl tape. That'll also help hold it tight for the time being. Get that in. Then go ahead and put your screw in. Some of these may only have one. Some of these may have two screws in them.Next what we're gonna do is pull down just a little bit on your top and then stick it to your butyl tape as you go. Then you're gonna take a staple and you're gonna put it in between each screw hole. You want to make sure that it's on the butyl tape. I've gone ahead and set my trim piece inside of the end of my gutter here. What I'm gonna do is I lined up one. I'm gonna skip a couple and I'll throw a few screws in as I go. This is gonna help me rather than hitting every single one. If I get a couple of them in place, my other ones will line right up. We're just using the same screws that we took out. Once you get it up, you get all your screws in, just take your knife and pull this out a little bit away from the side and just all you gotta do is make sure you have a sharp blade but all you gotta do is just run it along there. Run it right along this bottom edge and you'll cut it right off up to that.Once we get our trim pieces back in place, we need to seal them. We're gonna put self leveling sealer on top of these. There's a couple different ones. There's one that comes in your kit. It's gonna look like this. This can only be used on PVC roofs. It cannot be used on any other type of roof because it will not adhere to it. This is another self leveling. This one will work on any roof. We're actually gonna be using this on this part here so it adheres to the fiberglass top. You're also gonna need non-sag. You can see the difference here. Self leveling when you put it on it will actually spread out where the non-sag is more like a caulk. You put a bead and this is gonna be used for your outside edges along the sides.If you remember how the manufacturer had it when you took it off, they kind of go up the sides and kind of go over the screw holes or the screws. You can see this edge. They kind of put a piece of tape on there so that when it falls on they can rip the tape up and it leaves a line. What I'm gonna do is I'm not gonna follow exactly how they did it. I just want to make sure my edges are covered, my centers are covered, and my screws are covered. However you do that, as long as it's sealed, you'll be good. I'm gonna run it about right on the inside of this screw or this backside, let it fall down. When I run this outside edge, then I'll run one in the middle and make this one a little thicker so that they meet. You can see how our self leveler kind of is spreading out but it's not getting enough to cover my screws. I'm just gonna put a glob of it on each one.Now what we need to do is seal our ends. We're gonna go about to the second screw in. We're actually gonna cover this whole thing. We're gonna go back and forth over both sides and both pieces to about right here. What we want to make sure we don't do is put enough down here where it's gonna sag because it is self leveling where it sags and drips down onto the side. Just like that and as we leave it sit, it'll start to sag a little bit over this edge.Before you start putting your air conditioner and your vents back in place, take your top, pull it down inside your cutouts. Pull it taught and throw a couple staples in it just to hold it tight. Anything that you're putting back on your roof with the exception of the air conditioners you want to make sure that you're putting butyl tape around the screw holes before you put it down on the top. You want that seal on the bottom and then what we're gonna do is we're gonna take some self leveling sealer and we're gonna put it over the edge, so it will cover the whole thing. Another thing I want to mention is for a vent like this, you want to make sure and install it the correct way. If you notice that my where the hinge is is facing the direction of travel. You don't want this facing direction of travel because you're either gonna get this or you're gonna potentially break the lid off and we don't want to do that.Now what we're gonna do is we'll go ahead and put our self leveler on. We're gonna go around this edge first. Don't be afraid to squirt it on there. The more coverage you have, the better seal you're gonna have. Now we're gonna put a real thick bead around the inside. All that is gonna start flowing and kind of level itself out somewhere outside of that. You can see how our self leveling sealant is starting to kind of run together. It's starting to flatten out a little bit. The longer it sits, it's gonna start leveling out even more. I've gotta couple other vents that I did earlier that I can show you what it looks like when it starts settling even more. This right here is a vent to one of the bathrooms. You can see how it's starting to really look nice once it settles really good.Now what we're gonna do is we're gonna start sealing the top of our trim piece here and all around the edge of our gutter to make sure no water is gonna get in behind it. For this application, we're gonna use non sag because we don't want it to run down the side of the camper. Before I start, a little bit of advice. The way I'm gonna show you how to do this. Grab yourself a wet towel and a dry towel. Start here. We're gonna fill this in good. Get it all along the edge. Up in here. We don't want any water to get in. You can kind of see where the old stuff was. I'm gonna come out a little bit past that.Now we'll start doing the top of our trim piece here. This is where your wet and your dry towel is gonna come in. Dry one's just basically when you're not using your caulk gun you can set it down and it's not dripping on anything. The wet one is gonna be to keep your finger wet. If you've never used a caulk gun, cut your end in an angle kind of like that. It's gonna make it easier to put it on. Don't cut a huge hole in it. What you're gonna do is you want to turn that angle kind of diagonal right in the corner of it. We're just gonna lay fairly thinly. Don't make it real, real thick. I'm gonna show you a trick to make it smooth like this. Just run you a bead right into that corner. Take your finger to get it wet. You don't want to push. All you do is want to rest it and rest it right on the edge of your trim piece here in your roof. You're just gonna drag your finger. This is if you feel comfortable doing it this way. If not, just run you a bead up there and just make sure that it's sealing the gap between the two.One thing to keep in mind is on your side pieces there's gonna be two separate pieces. Where those two pieces meet, you want to make sure you fill that in with your sealant. We're gonna do the same thing with our gutter down here. Just make sure you cover all your seams so now water came behind and then our end caps at least cover your screw holes, your edges, and the front edge. Make sure you cover it good. You can kind of see how I have it here. Again you're gonna use a self leveling on this top part.Then our final couple steps outside here is once you have your sealer on, go ahead and put that plastic trim piece in that covers up all of your screws. Then you want to seal the end of that and the screw holes that are holding it in place. Now we've let our camper sit overnight. It's a good idea to come back and check over anywhere that you put sealant down. You can see right here along these edges there's an air bubble right there. We want to make sure that we fix that spot because if we don't, we're going down the road, the wind may pop that open and then you have a hole and you'll have the chance of getting water in there. Just make sure you go over everywhere, check it out, and fix any spots that need to be fixed. That'll do it for a look at an installation of a LaSalle Bristol extreme roof membrane.
Customer Reviews
LaSalle Bristol XTRM PVC RV Roof Membrane - White - 30' x 9-1/2' - 3441700534142711430
Average Customer Rating: 3.8 out of 5 stars (5 Customer Reviews)
Replace or upgrade your RV roof with this lightweight, rubber roofing membrane. Elvaloy-based PVC material is puncture- and tear-resistant. Flexible design makes it easier to install than other roof membranes. Measures 30' x 9-1/2'.by: Michael03/04/2024
Good so far
by: Michael 09/05/2023
easy to install, nice to work with
by: Michael07/27/2021
It is not as tear resistant as lasalle bristol claims also not a fan of there glue next time will maybe try the dicor glue. However the best part is how much cooler it stays than epdm. My rubber roof would get so hot it would burn your hand and make my rv an oven. This stuff stays much cooler
by: Luis06/02/2022
when you remove the old roof be prepare to do more unexpected repairs but it is all worth it at the end. the new roof looks clean and feel this will last another 10-15 years.
by: John02/24/2023
5
5
See what our Experts say about this LaSalle Bristol RV Roof Repair
- What Packaging Does The LaSalle Bristol Roof Membrane Ship In?The LaSalle Bristol XTRM PVC RV Roof Membrane # 3441700534142711430 ships in a tube. This tube will be approximately 10'6" long, 10" in diameter and weighs 86lbs. Due to the length and weight it requires to be shipped on a freight style truck.
view full answer... - Solution for Leaking Roof on 2005 Pop-Up Camper That is not a fun thing to walk into when opening up your camper for the season! Based on the damage shown in the picture you attached I recommend simply replacing the affected ceiling inside the camper with a whole new section of material. Then to repair the roof and prevent this type of leakage from happening again I recommend installing new roof membrane with the LaSalle Bristol # 3441700534142711430. You can then add the LaSalle Bristol Roof Installation Kit # 3442703414KIT that includes...
view full answer...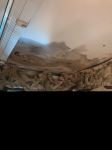
- How Wide is the Roof Membrane That Comes in the LaSalle Bristol RV Roof Repair KitThe LaSalle Bristol RV Roof Repair Kit # 344270KIT30 uses the 30 foot long membrane roll- part # 3441700534142711430, which is 9-1/2 feet wide. If your roof is 9'-6", then this will be the exact width of the roll.
view full answer... - Best Way to Protect Fiberglass Roof on Pop Up Camper with Fine Hairline CracksWhen it comes to applying solutions we have the RoadMaster Voom Gold Auto and Marine Polish # RM-9940 but this is more for making your roof shine, not necessarily fixing damage. I took a look at the Dicor coating you mentioned and it looked like some of the reviews said that it didn't work well for the hairline cracks that you mentioned. Your best option would be to add a LaSalle Bristol XTRM Roof Membrane. This basically sits on top of your roof and becomes your new "roof". The material...
view full answer...
Do you have a question about this RV Roof Repair?
Info for this part was:

Updated by:
Wilson B

Updated by:
Cody B

Edited by:
Amanda M

Written by:
Halie H
At etrailer.com we provide the best information available about the products we sell. We take the quality of our information seriously so that you can get the right part the first time. Let us know if anything is missing or if you have any questions.
Product Experts Available Now!
Call 1-800-940-8924
Jenny N.
2/25/2023
I am sorry to see that your experience with us was less then ideal. I am happy to help you in any way that I can.