


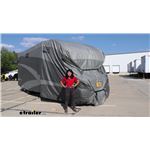
Throw this storage cover over your Class C motorhome to protect it from rain and snow while you're storing it in between camping trips. Cover wraps around the bottom corners of your RV and secures with straps so it won't flap in the wind.
Features:
Specs:
You're worried about your Class C motorhome getting wet and dirty in storage before your next camping trip. Whether you're storing your RV in the rainy northwest, snowy north, or humid south, this weather-resistant cover is designed for use in extremely wet climates so your RV will be protected. When you keep your RV covered, you are less likely to need to wash and wax it in between trips. And if you want to trade your RV in for a newer model later down the road, this cover will help maintain that resale value.
The 3-ply SFS AquaShed top panel reduces moisture buildup that can damage your RV over time. It also beads water when it rains to stop it from pooling or freezing, which eliminate the black streaks and corrosion you tend to see on the sides and roof of your RV. And when the rain stops, the fabric dries quickly to minimize the development of mold and mildew. The top panel blocks the roof of your RV from mild sunlight as well, protecting the cover from cracking and fading.
How to Measure Your Class C Motorhome
To determine if this cover will work for you, measure the overall length of your RV from the front bumper to the rear bumper, making sure you're accounting for any spare tire carriers and ladders on the back. Then measure the overall height from the bottom of your RV to the top. Do not include any AC units, vents, or antennas in your height measurement, as the cover is already designed to accommodate them.
Securing the Cover onto Your RV
The included ladder cap and rain gutter covers help prevent the cover from splitting on those areas of the RV, so install those first. Then unroll the cover and carefully spread it evenly around your RV, making sure you don't pull too hard and tear the fabric. The cover is labeled with "front" and "rear" to help you position the cover correctly on your RV.
Once the cover is in place, wrap the elasticized hem on the cover around the bottom corners of your RV and pull on the cinch ropes on the front and rear until the cover fits snugly around the contours of your rig. These remove any excess slack in the material, especially if your RV is slightly shorter in length. Then toss the weighted straps underneath your RV to the other side and buckle them together, which keep the cover secure on your RV and prevents it from flapping in the wind and damaging the paint job.
And if you still need to winterize or access one of the cargo compartments, you can use the zippered panels on the passenger's side to easily access the interior of your RV without having to completely remove the cover.
Videos are provided as a guide only. Refer to manufacturer installation instructions and specs for complete information.
Hi everyone, it's Evangeline here at etrailer. And today we have the ADCO AquaShed RV cover for your class C motor homes. We're gonna take a look at how it fits our 2019 Jayco Redhawk motor home. If you are looking for something that can protect your motor home, maybe you're ready to winterize it or you're in between camping trips, and you know it's gonna be sitting for months at a time, well that's when RV covers like this can come in handy. The SFS AquaShed is going to be an entry level RV cover though, but provides your base protection. So it does filter out mild sunlight to help prevent sun rays beating down on your motor home.
Plus it allows for water to bead upon contact. So for like snow or for a slight rain shower, this is gonna be good for creating that protection. So this is gonna have the three-ply SFS AquaShed material. So that's gonna be this lightweight material. It feels similar to what you would see on a hospital gown, touching and feeling it so it's not so much canvas as it is more of a papery feel.
Now that three-ply does mean that it's durable and sturdy though. Pulling at it, tearing at it, it's not coming apart. So that is gonna be good. Now on the other hand, it is designed with all these different holes in it and that's gonna be for breathability. So it's not waterproof.
Water can still go through it but this does prevent moisture from building up. This has seven straps that go underneath your Redhawk motor home. Now with how it fits on this motor home, I did notice that there's some billowing around where the door is. You do have these zippers here but it creates a panel that folds up and then you can secure it up top. I personally am not the biggest fan of how it fits because if I unzipped this one zipper here, in order to get access to where the door of the motor home is, I would not be able to access it unless I undid this buckle.
And then I can bring this panel over to the side and enter that motor home real quick. I'm also able to get access to the cab door, but if I wanted just a cab door then I would unzip that other zipper. So there is a little bit of a process. It's not a quick and easy access but ideally if you are parked, you shouldn't need to get into your motor home or into your cab that often anyways so it's worth those extra seconds of unbuckling straps. There is no access on the driver's side of our cover, so if you did need to get into the driver's seat to make any adjustments there, then you have to go in through the passenger side. This does really well with covering our spare ladder and there's still a little bit of space back here. So if I happen to have a tow bar in the back of the hitch, I would still be able to cover it with this cover. If I had something like a bike rack though, I'm not as confident with this extra space to fit over a platform rack or a hanging rack. So start your setup by finding your things. For the first time, you are gonna have to find your vent cover, your instructions, as well as your storage bag. It's going to be rolled up inside the RV cover. So I do recommend just laying it out beside your RV and that way you can find all of the things you need to get yourself set up. Going to find the front tag. So it's gonna be bright yellow, it's going to say front, and this is gonna be the most important part because now you can roll the rest of the RV cover over, but leave this out. You are going to have some zippers in the side. I like to undo the zippers right away. That way it's easier to uncover over the RV but that's gonna be up to you. There's also some straps especially near the front that I do recommend undoing. Holding onto the front tag, you're then going to start climbing onto your roof. Let's get started. I have a cool time-lapse to check out. Once you've finished the bulk of the setup, the next step is to get everything strapped down, tightened down, and zippered up. Underneath your cover are going to be these straps. They're all going to be along the driver's side. The straps are actually kind of short and the buckles are very light. So I tried, but you probably will not be able to just throw the buckle on its own, which is okay because that's what these weighted straps are for. You're gonna get two of these. So you buckle one strap to the other, and then you get that weight, and you toss the weight along the ground where it pops out on the other side. There are these cinch straps in the front as well as the back. And this is gonna make a tighter fit around your cab as well as around the rear of your motor home. You also have these grommets. And the instructions say not to use the grommets for ropes or cables, so I personally just use them for the excess strap so it's not whipping around, but that's also just an extra little feature you may wanna take advantage of. And like that we we're able to set up our RV cover onto our Jayco Redhawk. Now there is a little bit of billowing of the cover around our motor home so I am gonna go around and just double-check that all the straps are secure before I call it a day. If you are doing this on your motor home I do recommend doing the same thing and just double-checking that everything is good and testing for if a breeze kicks up, if everything's gonna stay in place. And if it does, then you are good to go.

Do you have a question about this RV Cover?
Info for this part was:
At etrailer.com we provide the best information available about the products we sell. We take the quality of our information seriously so that you can get the right part the first time. Let us know if anything is missing or if you have any questions.


Thank you! Your comment has been submitted successfully. You should be able to view your question/comment here within a few days.
Error submitting comment. Please try again momentarily.