

 Arrives before Christmas
 To see if this custom-fit item will work for you please tell us what vehicle you'll use it with.
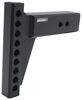
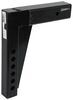
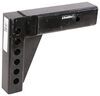
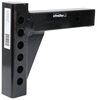
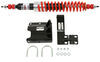
These custom-fit, stylish nerf bars are the perfect solution for accessing your truck or SUV. The 4" drop and die-stamped design provides strong traction. Steel tube with black, electrostatic base coat is made to withstand the elements.
Features:
Specs:

California residents: click here
Videos are provided as a guide only. Refer to manufacturer installation instructions and specs for complete information.
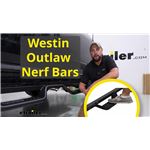
Howdy there, neighbors. Ian with etrailer here, excited to bring you the Westin drop nerf bars on our 2013 RAM 2500. Let's get into a few features and then that install. And these drop bars are gonna be a great option even if you don't have a lifted vehicle, or in our case with the oversized tires and the lift, they're still gonna give you plenty of clearance from the ground, and they're also gonna look really great on the vehicle. I will say we've installed quite a few of these drop nerf bars from different brands, and I really like this set from Westin. I think the footing and where you step up into the vehicle comes more naturally here.
And again, with our lift here and the oversized tires, we really wanted that drop on this particular vehicle, and this is a good amount of drop to me. And when stepping out of the vehicle, you'll find there's more than enough room to get your entire foot. I've got a size 12 boot, and there's more than enough room on each side still. Now, regardless of whether you've done a lift or not, you're gonna find one common wear point on your vehicle is gonna be right here in the center of the driver's door. So, the owner of this vehicle, when he's getting in and out, has worn this down to the bare metal even past the paint, past the clear coat.
So all that's gonna start to rust. So now that needs to be repaired. With these steps, this is gonna get your feet far enough away from the vehicle that you'll use this as the point of contact to help kind of bring yourself up to the seat opposed to having to have your feet dragged on the side. And for durability on these, I will say with it being just a bolt-on design, it is extremely sturdy. These feel great on this vehicle.
There's no play or give. Doesn't seem like there's gonna be any issue with these ever coming off. Now, as far as the coating on them, they do have a matte black powder coat finish on them, which matches really well with the rest of this vehicle. We've got a couple racks on here that have the same finish, and so it all blends together. The other thing with this is it does have an electrostatic coating underneath that powder coat finishing.
So that's gonna extend the life of this and keep any corrosion even if that powder coat is damaged throughout the lifetime of your nerf bars. And as far as the install, I had mentioned this is a bolt-on kit, and I'm gonna walk you through that. It's really not that bad or time consuming, and it can be done on the ground as well. Even if you don't have a lifted vehicle, I would believe you'd have more than enough access to those mounting points that you won't have to have this up on a lift. I'm gonna walk you through that install. But if it seems like something after watching the video you don't feel like tackling, please do check out our dealer locator on the website, and we'd be happy to help you find a trained professional to get these thrown on for you. But for all those DIYers, let's go ahead and hop into the install and get that taken care of. We're gonna begin our installation here on the passenger side. We're gonna need to find the mounting locations for our brackets. My suggestion is before you get going, make sure you read all the way through the instructions because there is going to be a particular instruction that talks about the orientation of these brackets. And then one on the driver's side is going to be slightly different than all the other brackets. We're gonna be mounting a total of three on each side. Now our location for each bracket is going to be this larger hole here, and then there should be a set of two smaller holes below it. You'll have one at the rear, one here in the center, and one up at the front. Now, for the smaller holes down below, you're going to find that some of the models are going to have a welded nut in one of these locations, and in that case, you would use that, but for us, since we don't have those, we're gonna be using the Zerk inserts that we inchesre included with the kit. We're going to take that Zerk insert and go ahead and get one of the M8 bolts threaded all the way down to the bottom on it. This is just gonna help us kind of have a head to drive that into the hole. You may find they're a little rusted if the paint's been worn away from that hole. And so it may be a little difficult to get it down to the neck where the bolt would line up here. So we'll just start by inserting that into the hole, getting it down to the neck and lining up the flat spots on each side. Once that's lined up, just go finger tighten with that, and then you should be able to tap it into place. (hammer taps) Once it's in place, remove the bolt. And you only need to do this on one of the two holes. It does not matter which one. I did try to keep consistency when putting these up. So we're gonna pick the left hole on each side just to make it a little easier so we know which position it's in if it ever needs to be worked on or removed. Now we're going to take the bracket that's got the welded bolt to it and also this welded nut end, and that's gonna be inserted into this hole. It can be a little difficult to get it into place, especially if there's a lot of rust on the vehicle, but you should be able to just get that lined up with the center and then you'll take your plastic spacer and thread that onto it, and that's gonna hold that in place for us so that way we can get the bracket held up. And there is a welded nut on that bracket that needs to line up with this hole. We're not too worried about it until we go to mount the bracket up, but I wanted to mention if the welded nut from the factory is in this hole, you won't have to worry about that part of the bracket. You can just have it sit off to the side and use the weld nut already in the frame. Now we'll take the bracket and slide that top hole over the studs sticking out, and then we're going to add a flat washer and then a lock washer and then a nut right on top of that. We'll just leave that loose and finger tight for now so that way it helps hold it in place while we get the other two lined up. Now we'll take one of the M8 bolts, slide on the lock washer first, followed by a matching flat washer for that. Hold the bracket in place to line up our Zerk and just get that in there a few threads so it holds it in place. Now the instructions talk about using this bracket in order to tighten up the Zerk behind this. I found when doing the other side, we didn't need that to happen for the simple fact that once everything's centered here, we're gonna tighten that down last, and so it'll have plenty of grab back behind this bracket to set that after we get the other two hardware tight first. We'll take one more M8 bolt again with that lock washer, the flat washer, and then we're going to line up the plate. You can just kind of twist this bolt until that lines up with the hole there, and we'll take the hardware and line that up. And again, we're just gonna go finger tighten for the moment to get it into place. And for now we're gonna repeat that exact same process with the other two brackets. Let's go ahead and hop over to the driver's side 'cause I've got one more bracket that was a little bit different that I wanted to go over with you. We've got all our brackets on the passenger side on, but I wanted to come talk about this front bracket on the driver's side. It's only slightly different than the other ones in the sense that you won't use the insert bracket here. It's gonna be another Zerk fitting. So both of those holes are gonna be Zerk fittings. And then along the pinch weld, you'll find that there's either going to be or not be, and the instructions, kind of give you a direction on that as well, these two small quarter inch holes here for the smallest hardware that comes with it. So those two smaller holes, the bolt is gonna come through the face of that into the pinch weld through the bracket, and then there'll be a small black flat washer followed by the nut. To identify which rail is gonna go on which side, they've made it pretty easy to do that. There's a small notch that will be oriented towards the front of the vehicle, and then your number plate will be towards the rear. And another good way is if we look at the entire rail, the back section where the decal is is gonna be longer than the front section. So that's a good way to know the orientation between the two. It does look the exact same way on the other side where the decal's at the rear and the longer part's at the rear. Now we're going to take three of the M10 bolts and flange washers, and we're gonna be putting that in the top hole of each one. And then that bracket, we're gonna wanna make sure is back behind the bracket on the truck. So just kind of get those roughly oriented in that position, making sure you pay attention to any paint that might get scratched. And just take that bolt. We're gonna go from the front of the vehicle through the bracket, and then add that flange nut back behind and just do that for all three of 'em so it's hanging in place and can't fall on you. (bolt squeaks) And with all three of those into place, you can rock it up into position to add the lower bolt on all three of the brackets the exact same way. Now we're gonna begin our tightening sequence for all of these. I'd like to start with the stud that's got the larger bolt. That's gonna be a 16 millimeter on that. So we'll start there and just kind of go through and snug those down first. (ratchet clicks) Once that one's snug, we're going to come to the welded nut that was either in the body or attached to the bracket for this. So in our case, it's the lower right, and that's a 13 millimeter. That'll be the next one we snug up. That's gonna help draw this bracket to the body. (ratchet clicks) Then that Zerk nut, if you just run the bolt all the way down by hand just to make sure you're gonna have a good seat when we go to tighten that up, that's gonna help that Zerk expand the proper way and grab onto the body back behind there. (ratchet clicks) And now we'll do the exact same thing on the other two brackets right before we do our torque sequence. Now we're gonna go back through a torque wrench. If you don't have one, you can either rent one from your local auto parts store, or you can pick one up from etrailer.com while you're ordering all your parts. And that'll be a 16 millimeter for the largest hardware and 13 for the smallest. They are two separate torque specifications. So make sure you read through that instruction manual to find those. (wrench beeps) (wrench beeps) Now to get the adjustment and our placement for the rails, just snug these up enough to where you can still adjust up and down on the rail without it getting stuck. So we're gonna look for level with the cab for the step. And then you do wanna push this as far back as possible on the bracket and make sure that's all seated evenly the whole way across. And once you've got the positioning that you want, just tighten up that bottom bolt a little more so that way everything stays in place, and we can go back and use that torque sequence. It is the same measurement as far as torque specification as the larger bolt for the brackets underneath. And with everything torqued down and in place, that's gonna conclude our installation and look at of the Westin Outlaw drop nerf bars on our 2013 RAM 2500. My name's Ian with etrailer. Appreciate you watching.

Instructions that came with the package did not work. The video you posted online helped alot.
Amazing service amazing help amazing professional and understanding people who help me get what I want fast.
And it’s fit beautiful, just as it said. Can’t be more happy.
Very happy with product! Quick delivery and easy-peasy install! Thank you Etrailer for another fine product!
Perfect fit, looks great, and easy to i nstall.
Exact fit, looks great!
Nice running boards. Fast shipping. Excellent pricing!
I really like the nerf bars but I’ll have to try and touch up the scuffs from damage incurred during shipping.
The running boards are of good quality and all of the parts arrived to completed the installation. It was relatively easy to install. I would recommend having a second person to help put the running boards onto the support brackets. The instructions were flawed, and the brackets for the center two supports need to be swapped from passenger side to driver side to make everything line up correctly. Other than that, happy with the purchase and quality of the product.
Item arrived quickly, was exactly what I ordered and fit perfect. Very happy with how these running boards look on truck, the eTrailer video was very helpful.
Fast shipping, great communication and fit and finish excellent!!!

Love these nerf bars most functional best looking I've ever bought
Great quality steps that fit my vehicle perfectly. My only suggestion is a minor addition in the instructions from Westin that would show the difference in driver and passenger step assemblies. Maybe a subtle "D" or "P" on the backside of the tube assembly.
The Nerf Bars were excellent. Installation was very easy, instructions were perfect. The issue I have is Etrailer’s customer service. When I ordered the bars, it showed in stock and I would have them the next day. They didn’t show, so I called that evening and talked to a representative who informed me that they were not in stock and they would have to be shipped from the manufacturer. I understand this, as inventory numbers can be off, but the original salesperson could have called back to inform me of the situation, but they didn’t. The representative I spoke with that evening said she would call me the next morning to let me know what the status was. No phone call. So I waited an additional day and left a voicemail for the sales manager because now my order online says pending with the manufacture. So do they have them, are they going to be shipped, when will they arrive? No email or phone calls on the status. Finally, 5 days later they showed up. If they would have informed me this, I would have been okay with it, but I had already had a time set up for help to install them and I had to cancel. Again, the product was excellent, customer support was not.
Arrived in excellent shape. Very well p acked.
Info for this part was:
At etrailer.com we provide the best information available about the products we sell. We take the quality of our information seriously so that you can get the right part the first time. Let us know if anything is missing or if you have any questions.


Thank you! Your comment has been submitted successfully. You should be able to view your question/comment here within a few days.
Error submitting comment. Please try again momentarily.