
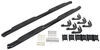
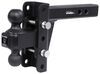
etrailer Trailer Hitch Receiver - Custom Fit - Matte Black Finish - Class III - 2"


To see if this custom-fit item will work for you please tell us what vehicle you'll use it with.


Hit the road with confidence! Whether towing a camper, hauling gear, or getting the job done, this hitch is built for adventure. A fourth layer of matte black powder coating resists corrosion, ensuring strength and durability for every journey.
Rated for 8,000 lbs of gross trailer weight (GTW) and 800 lbs of tongue weight (TW), this hitch is built to handle large trailers, campers, multi-bike racks, and cargo carriers. Whether you're heading out for a weekend getaway or hauling extra cargo, this hitch provides the durability and security needed for worry-free towing.
Unlike standard glossy hitches, etrailers hitch features a matte black carbide finish, making it more resistant to scratches and better at hiding dirt and scuffs. The added fourth layer of powder coating ensures superior corrosion resistance, making it ideal for long-term use in various weather conditions.
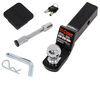
No drilling or welding required - this hitch mounts directly to your vehicle's existing frame attachment points. The included complete hardware kit and straightforward instructions make it a great DIY-friendly option.
Designed to accommodate a wide range of hitch-mounted accessories, this 2-inch receiver is ideal for multi-bike racks, cargo carriers, and a variety of towing setups. The standard sizing ensures compatibility with most hitch accessories on the market, making it a go-to choice for adventure and utility needs.
The square-tube construction enhances durability and provides a clean, streamlined appearance. This design ensures a strong and stable connection while integrating seamlessly with most vehicles for a factory-like fit.
Built with precision robotic welding and high-quality steel, this hitch ensures long-lasting strength, a precise fit, and consistent performance. Designed for reliability, it meets rigorous quality standards to provide a dependable towing solution for years to come.
When you purchase a hitch from etrailer, you have access to lifetime technical support from towing enthusiasts. Whether you need installation guidance, troubleshooting tips, or advice on accessory compatibility, our team is here to help every step of the way.

California residents: click here
Videos are provided as a guide only. Refer to manufacturer installation instructions and specs for complete information.
How's it going, everybody It's Thomas here at etrailer and today we're gonna take a look at, and I'll show you how to install, the etrailer Two Inch Hitch Receiver here on a 2026 Chevrolet Colorado. The Colorado is a really popular mid-size truck, especially for small business owners and contractors out there across the country. And if you're not looking close enough when you're at the dealership, you might see the two factory safety chain tabs hanging down underneath and think, "Yeah, it's got a hitch, I'm ready to go." And when you get to your work trailer, or your trailer for just going on a small adventure with the family and kids on a weekend with your small camper, you might not realize that you didn't have a spot to put your ball mount and now you're outta luck. But that's where the etrailer two inch hitch receiver comes into play because it's gonna give you that two inch hitch receiver, which is gonna be compatible with most accessories and ball mounts out there, especially the ones that you probably already have. And it's gonna give you everything you need to get ready to tow. Any kind of accessory or a small trailer.
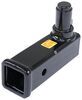
The first thing you might notice or might not notice is actually gonna be the matte black finish on here. A lot of the hitches that are out there that you can get for your Colorado aren't gonna have a finish. I think this blends in really well, especially with all the plastics bend to the bumper and especially around some of the trim. It just blends right in. And now, like I said before, it is gonna have this two inch by two inch receiver tube opening, which is gonna be perfect for most ball mounts out there.
And then it will have a five eighths pin and clip hole for securing those ball mounts or other accessories. For our safety chains, we're gonna have these plate style loops down here, and they're gonna be great if you have a clevis hook style. They're gonna fit right in there. It is kind of best to approach it from the side because it is a little thicker on the front. But even for your smaller S hook style, they fit in there, they're not gonna bind up at all.
Now as you're gearing up and getting ready to figure out exactly what your Colorado's gonna be able to do for you, the etrailer hitch is gonna help it handle an 8,000 pound trailer. That's gonna be the weight of the trailer plus everything loaded on it, as well as an 800 pound tongue weight rating, which is gonna be more than enough for any cargo carrier or up to a four bike bike rack fully loaded. Now if you do want to use a weight distribution hitch with this vehicle to make it a little better when you're hauling a big enclosed trailer with a car in it or something like that, that will bump your weight capacity up. You're gonna be able to have a gross trailer weight rating of 10,000 pounds, and a gross tongue weight rating of 1000 pounds. Now to get an idea of the clearances that you have, for any kind of cargo carrier bike rack, a lot of the newer ones and a lot of the nicer ones are gonna be able to fold up in a stowed position, so that way they don't take up as much space when they're unloaded.
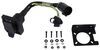
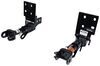
And we're gonna find out our clearance for that by measuring from the center of our hitch pin hole out to the edge of our bumper, and we're looking right just over three inches for that. And that's honestly really good. I don't think you're gonna have any clearance issues. The only thing that's gonna come to mind is when you go to drop your tailgate down, you will want to remember to drop those accessories down or else you're not gonna able to access your tailgate if you have a tonneau cover. And now for ground clearance, we're gonna measure to the top inside edge of our hitch receiver tube. That's gonna give us 18 and a quarter inches. Now that measurement's gonna come in handy when you are picking a ball mount. If you're going with a fixed ball mount or if you're trying to figure out your measurements for a weight distribution hitch, you're gonna wanna take that and then compare it to the coupler of your trailer. You want your trailer completely level and then you're gonna measure from the ground to the top of the coupler where the ball is. And you're gonna take that and measure the difference here. And that's gonna tell you whether you need X amount drop or X amount rise to be able to make everything tow nice and flat. So far in this video we've talked an awful lot about hauling trailers with the Colorado, but for the eagle eyed viewer, you might notice that there's a dummy plug here, not wiring. You're gonna need wiring so that way you're safe and legal, whether you're pulling a small trailer and you need that four pole connection, or if you're pulling up a larger trailer with brakes and you need that seven pole connection. You know, thankfully GM has the most Colorados prepped with the plug right underneath that will tie into this. You just uncouple it from the dummy plug, slide this in place, and you're all ready to go with your wiring. You just wanna do a quick function check before you hit the road. This option from Curt is pretty sleek. It matches a lot of the newer aggressive body lines of the 2026 Colorado. I really like it and I think it'd be a great fit on your Colorado as well. If you scrub along through the rest of the video and kind of check out the installation and you think, "Eh, that might not be for me," maybe it's a little too much, you don't have the tools or you don't want to take the time to go out and find and get everything all set up and then try and tackle it and then find out you need something else, run out halfway through the job, you can use our dealer locator and find a professional in your area that can get it all done and knocked out for you, so that way your Colorado's ready for your next job or your next trip. And the nice thing about that is the dealer locator cannot just install your hitch, they can also do your wiring. They can do your weight distribution set up. So if you need that full package, you can just punch in your zip code, find a shop, give 'em a phone call and set it all up. That way your truck is ready for your job or trip. Now with all that being said, follow along and let's get to the installation. First things first for our installation is we need to get ourselves room to work underneath the vehicle. And to do that we're gonna remove the spare tire. Now to access the mechanism for lowering it down, there's this plastic panel right here on the bumper. And now we can grab the spare tire removal tool. There's gonna be a kit in your vehicle for roadside emergency and you can use the tool from in there. We have this different set of rods from around the shop for removing the spare tires off of different vehicles. We're just gonna use those, and we're gonna lower it down. (metal creaks) Now we need to remove our electrical connections to free up the bumper. And to do that, there's these two connections right here on the driver's side frame rail. This one's just a round style connector. So we'll wedge up on this locking tab. And then it pops right out. And for this one, it's more of a traditional automotive connector where it's got the locking tab pressing on the middle and so then we can jostle it free. Depending on the condition or age of the vehicle, these can kind of get bound up with dirt and debris, so they can be a little tricky to get undone at times. It kinda helps to push in, then shove it on your tab and then wiggle it loose. Okay, now we have two more in the middle just behind the license plate. It's another of that round style connector and then another locking tab one. But we push up on that, pop it out. There we go. And our last thing here for the bumper before it's ready to go is getting the US car connector out of this dummy plug. And it's the same thing with a locking tab, and then a lever to press and it pops right out. Now for this US car connector, you might have a dummy plug like we do, or you might have the real thing. Either way it's gonna work exactly the same with the release tab, press in on the lever and then pop it right out. With all the connectors out of the way for the electrical, we can now focus on the hardware itself. And we have this bracket here that protects the spare tire and we're gonna knock this end loose, but we're not gonna take it off all the way. And then we'll come back over to this side and remove this bolt entirely, so that way we can swing this bracket out of our way. It's gonna be a 15 millimeter socket for both sides of this. (metal creaks) There we go. Next step is gonna be removing the bumper. And to do that, there's two bolts on the outside of each frame rail. Those are gonna be 21 millimeter. And then there's gonna be a nut on the end plate of each side of the frame rail as well. But we're gonna start with our two side bolts. Now these are gonna be torqued on there pretty good 'cause this is securing the bumper to the vehicle. So a half inch wrench is probably gonna be the way to do it, just to bust it loose. And then you can come back in with an electric ratchet later to zip these out. All right, so these are tightened in there pretty good. So you'll be cranking at it for a while by hand before you get to a point where the electric ratchet will do it. But once you get there, I'm gonna zip it right out and continue that with the second one here, then the two on the other side on the outside of the frame as well. For this next step, you're gonna need an extra set of hands. I have Daniel here. For you at home, you can grab your neighbor and maybe a couple of beverages for convincing. We have two more nuts on the other side of here to remove before this bumper's ready to come off. But Daniel's job is gonna be to catch this, cradle it, and get it down out of the way safely without damaging it. On the outside of each frame rail, there's gonna be these two nuts holding this on. They're 15 millimeter. So grab a 15 millimeter socket and we can zip those off. (drill whirls) All right, with this last one almost ready to come off, we got Daniel ready to catch the beam, and it's not too heavy so it it should be all ready to go. (drill whirls) Now I can pull the bumper beam up and out of the way. We can get this cross member out of the way. And it's gonna be four more 21 millimeter bolts. Two on each frame rail going into some weld nuts. (drill whirls) All right, you can grab your extra set of hands again to get this down, but if they ran off on you, that's all right, it's not too heavy. You can get this last bolt out. (drill whirls) Pull it down and get it out of the way. If your first set of hands ran off on you, go ahead and round up another guy with the promise of beverages, and then we can get this lifted up in place. And we're gonna be using the same hardware that we used for that factory cross member just going up into the bottom of the frame room. We'll get these all started by hand, but once you get one on one side, it'll kind of help support it and you can get 'em all in all the way around. So just a tip for getting the bumper beam back on. You can see the gap here. We're gonna snug up the hardware on both sides and just get it real close, but you don't want it to actually make contact with the bottom of the frame rail just yet, because there is some front to back movement here. Now it's real tight up on this, so it's gonna be hard to show. But that's to help get the bumper beam set in place on top of the hitch. (metal creaks) Get this lifted back up over the top and get those two studs for the 15 millimeter nuts lined up. With the stud popped through, we can throw that 15 millimeter nut right back on. Now we can start working on the rest of the factory hardware. So those two side bolts on each side of the frame rail. With all of our factory hardware back in place, we can go around and start snugging stuff up. I'm gonna do the side ones first and then come back and do the ones for the hitch receiver. I'm gonna start out with this electric ratchet, just try and save some extra turn in on the wrench, but with the thread locker on these bolts and then the torque spec, we gotta come back for later. You're gonna be pushing pretty hard, so take it where you can. (drill whirls) As we're going around, don't forget your two 15 millimeter nuts. (drill whirls) Now you're gonna need a half inch drive torque wrench to get these bolts down to the spec into the instruction manual. Now with a torque wrench like this, chances are you're not really ever gonna use it again after you do this, so the best thing to do would be to go to your local auto parts store. They should have a tool rental program where you just put down a small deposit, take this back, torque your bolts, then drop it off, and you should get the deposit back as long as you don't have an accident or break it along the way. But with that being said, we'll get up under here and start torquing these down. One more step, putting all this back together is our spare tire bracket. That's gonna come back over here. And we actually have new hardware from our kit for this one. So we're gonna have a small carriage bolt. That's gonna drop down through the slotted square side on the hitch receiver. And then we're gonna have a serrated flange nut that goes on underneath on the spare tire bracket side. One thing that kind of helps with carriage bolts is to apply a little bit of side pressure just to keep 'em from popping back up. 'Cause as you're spinning this and you push up, the square head might pop out and then it'll just spin around on you instead of tightening up like it should. So now we can come back and snug that up. For this, there's not a torque spec. You're just gonna tighten it up, and then the serrations on that flange and it'll bite in and keep it from backing off. And don't forget to tighten up this end too, again using that 15 millimeter socket. Now we can come back around and reconnect all these electrical connectors, and get any of the Christmas tree fasteners that we popped out put back in place. Thank you for sticking along this far in the video. Hopefully the installation portion was able to help you get your Colorado set up if you are doing the job. Now with all that being said, if there are any other things that you have any questions about or things that you think we might have missed in our video, feel free to reach out, leave a comment. We have a team of experts ready and waiting to answer any of all those questions and get back to you. And any kind of feedback you have for our videos helps us make 'em better for the next time, so that way neighbors like you are equipped with everything they need to get the job done. I'm Thomas. Thanks for watching.
Customer Satisfaction Score:
97% were satisfied with this product
3% of customers were not satisfied
Ratings & Reviews

Exact fit for a 2025 Chevy Colorado. The rear bumper has to be removed because the factory bumper hitch setup is connected to the bumper bolts. I didn't have to remove all of the wiring on the bumper, just the rear camera, trailer lighting, and main supply had to be disconnected. The light and sensor connections stayed on the bumper!
I love my new trailer hitch. The installers had no problems putting it on.
fit perfect, super easy to install
great price and shipped quick
Perfect fit!
Easy to install on chevy colora WT 2025
Excellent Product!
Fits great, works great! Thank you
Very well made, easy to install.
Easy to
Info for this part was:
At etrailer we provide the best information available about the products we sell. We take the quality of our information seriously so that you can get the right part the first time. Let us know if anything is missing or if you have any questions.


Thank you! Your comment has been submitted successfully. You should be able to view your question/comment here within a few days.
Error submitting comment. Please try again momentarily.