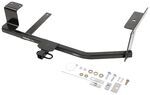
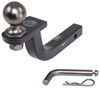
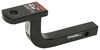
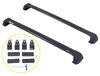
Draw-Tite Sportframe Trailer Hitch Receiver - Custom Fit - Class I - 1-1/4"


To see if this custom-fit item will work for you please tell us what vehicle you'll use it with.
Thank you! Your comment has been submitted successfully. You should be able to view your question/comment here within a few days.
Error submitting comment. Please try again momentarily.


This fully welded, corrosion-resistant vehicle trailer hitch receiver is perfect for your light-duty towing needs. Draw-Tite's Tested Tough guarantee ensures that this hitch exceeds industry standards. Drawbar sold separately.
Features:
Specs:
Draw-Tite's Tested Tough program provides testing standards far superior to those outlined by the Society of Automotive Engineers (SAE), the go-to source for engineering professionals.
Each Draw-Tite trailer hitch receiver undergoes extensive fatigue testing and static testing with the ball mount that is either supplied or recommended for use with that particular hitch, thus ensuring results that are applicable to real life use. Fatigue testing is also conducted on hitches rated for use with weight-distribution systems.
In addition, Draw-Tite performs static testing on a simulated automobile, as opposed to the rigid fixture used for SAE testing, resulting in a more true-to-life scenario.
At etrailer.com we're committed to the products we sell, and to our customers. Our experienced and knowledgeable staff are available via both phone and email to address your questions and concerns for the lifetime of your hitch. The technicians at etrailer perform hitch installations on a daily basis, making them a valuable resource for do-it-yourselfers. The one-on-one, personal service you'll receive comes straight from an expert in the towing and automotive field. We've installed it, we've wired it and we've towed with it, so whatever your question, we can answer it.

California residents: click here
Videos are provided as a guide only. Refer to manufacturer installation instructions and specs for complete information.
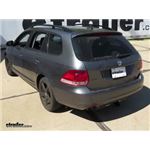
Today on this 2012 Volkswagen Jetta Sportwagen, we're going to install part number 24866 from Draw Tite. This is what the hitch looks like, when it's installed on a Sportwagen. Next, we'll give you some measurements to help you out in selecting some accessories, such as a bicycle rack or a cargo carrier. The top of the receiver opening, down to the ground, is about 10-1/4 inches. From the center of the hitch pin hole, to the edge of the bumper is about 3-3/4 inches. Now we'll go ahead and show you how the hitch is installed.
There's a pannel underneath the vehicle that we have to remove, to install the hitch. The bits we used to remove the hardware is a T25 Torque's bit, and a T30 Torque's bit. Now we're going to remove these two plastic fasteners with a 10-millimeter socket. We should be able to remove our pannel. Now for this particular install, that pannel will not be reinstalled.
I do like to reinstall this back. Next, we need to go ahead and lower the exhaust. There are two bolts we need to remove for the exhaust hanger going to the frame. We use a 13-millimeter socket on that. We're not going to lower it too much. There's plenty of tension on there, still, but we need to rotate this around the exhaust hanger, and these two tabs, we have to bend up this way, to make room for the hitch.
Just use a pair of pliers to go ahead and just move them up and out of the way. We need to get inside the trunk area and down in the spare tire. We need to remove the spare tire, to get down to the sheet metal, where the grommet eventually will have to get access to it. There's the grommet, right here, we have to remove. Typically, there is some sound-deadening material around here.
You may have to use a utility knife to work your way around it. We got lucky, in this case. At this point, we can go ahead and start installing our hitch. To do that, we're going to install this hardware inside the frame of the vehicle. We've got this block with the oval hole, and a 7/16 carriage bolt. We'll use this pull wire that comes with the kit, to run it through to the inside. This will go on the passenger side of the vehicle, from the inside of the frame, out through that hole in the hitch. Also on the hitch, on the outside of the frame, will be an extra spacer block. The spacer block will go on this side of the hitch. While we're at it, we'll go ahead and use some electrical tape to help hold it in place. You've got to leave some flexibility in there. This is the hole we're going to use. We'll go ahead and take a bolt leader, run it through and toward the front of the vehicle, out the large oval hole here. This will be our access hole. We'll take our block, run it through, push it into the frame. Now we'll put on our bolt. Then we'll use the pull wire to pull it through. It will probably get caught up in here, so you'll have to rock it back and forth to make it eventually pull through. Now that we have this pretty much set, we'll push it back in. We'll leave our bolt leader in place. We need to use that to pull through the block and the hitch. Now we'll take our exhaust bracket from earlier, and rotate it back into its original position. It might be a good idea to push it forward a little bit, because the hitch will go off and over it this way. Now we can go ahead and put the hitch into place. Definitely want to have an extra set of hands to help hold up the hitch. When we set it up, we'll go ahead and take a wire and put it through our block and our hitch. We'll just get it started up there for now, and then on our driver's side, we'll rotate the hitch into place. Make sure the hitch sits on top of the exhaust bracket. We'll take our bolt leader off, and then we'll put on the rest of our hardware, which will be our counter-tooth washer, . Make sure the teeth always facing towards the hitch. Now we'll go ahead and work on our fasteners on our driver's side. This is replacing bolt, another counter-tooth washer that will replace the hardware that we took down from the exhaust hanger earlier. This will go through the exhaust hanger first, then through the hitch, and then into the inaudible 00:05:05 inside the frame. This is going to be a really tight fit. We're using a screw driver to align the hitch and the exhaust bracket in the frame in one hole, and then we'll use an extension on our bolt for the other one. It works better to use an alignment tool or something with a tapered end. We found out when we put this second bolt in, that the hitch is actually sitting against this pannel right here, to prevent it from lining up. We took the hitch and rocked it back and forth this way, to help push that pannel out a little bit. That gave us just enough room to get our second bolt in. We'll go ahead and return our attention back to the passenger's side. We're going to install a piece of hardware here. This handle nut and block will go on the inside of the frame, and will attach the carriage bolt and our matching hex bolt. This hex bolt is a little bit on the short side, so you definitely want to make sure to have the hitch pushed up to help engage it. You can bend the handle as needed to work the block inside. We'll go back in the trunk and install our final fastener. On the inside of the trunk, we'll install our large block and our half-inch carriage bolt. That will go through the trunk pan and through our hitch. Then on the bottom, we'll get our counter-tooth washer and nuts. Now we'll go ahead and tighten down our hardware and the torqueables down, as sited in the instructions. Once our hardware's installed, it's a good idea to go back and seal up any cracks in the trunk area. We're using part number Lt37467 from Lock Tite. Then reinstall all our interior components; the spare tire, the tools, and floor covering. With that, that will finish it for our install, part number 24866 from Draw Tite, on our 2012 Volkswagen Jetta Sportwagen. .

Installed without much Problem
I got a jetta hidden hitch. The product is great, installation was relatively easy, but too twice as long as I expected. Would buy from strainer again.
A friend had given me her old Thule bike rack after she'd bought a new one. Problem was it needed a hidden hitch and my VW Jetta didn't have one installed. Always been skittish about working on newer cars especially when I need it to work properly. Finally took the plunge and searched for a source. etrailer.com had the most resources for completing the job that I had a pretty good idea of how to install a hidden hitch even before I had ordered it. The online training videos were the key, and the reason why I ordered from your site. Granted the guys in the video made things look too easy, but I was able to install it without any problems in about 90 minutes. Couple things I did differently: I cut a slot in the plastic panel which had covered the fuel vapor absorber so I could reinstall it. Also drilled a hole in the plastic grommet in the spare tire wheel well so sealant was not as necessary as it would have been had the grommet been outright removed. Very happy with the result and look forward to a great bicycling season.
Exceptional service!! Product was affordable, high quality and arrived way ahead of schedule. Keep up the good work!
I have ordered 5 trailer hitches from Etrailer.com and been pleased with there process and merchandise, I haven't opened the one I received today for my Jetta
Watch the video. It makes installation so much easier than looking at the directions. Otherwise the installation is fairly simple.
Good ProductThe produce installed quickly. etrailer was extremely fast at shipping my order.
Amazing! I thought it was gonna be kinda difficult but actually very easy. I found an install video on YouTube and that help out so much because the directions seemed very vague. After watching the video it explained it all! Great product. Make sure you order the wiring harness.
Jetta HitchEverything with this hitch was great. To tell you the truth etrailer video on attaching the hitch was great. I have watched a lot of there videos in the past and they are all of great valve. I get a good look at what I am buying and these videos help me decide on what product to purchase.
Installed this on 2011 Jetta Sportwagen TDI. Installation was well documented (read the instructions). I did the prep of the parts and setup for the install (matching parts, fishing bolt, detaching exhaust) in about 45 minutes. Actual install, with a helper, took about 20 minutes. Unit seems well built and expect it to perform well. Reduces rear clearence about as little as possible.
I haven't installed the hitch yet however, I wanted to say this is my second order with Etrailer. It has been an excellent experience so far. I ordered the hitch Saturday and received it today. I am sure the hitch will be great.
The product was very good and fit with just a bit of coaxing. I found the instructions quite lacking however and the Youtube video I watched was not accurate for my car. I would have watched the video provided on this site but it wouldn't load on my computer. This made the installation somewhat more difficult than it should have been. Clearer instructions with better photos would have made this product excellent and not just very good.
The install was not as simple as described I was glad I went to a professional to get it installed
Etrailer was great to deal with the hitch arrived on time with great emails from etrailer
Wonderful buying experience
Be sure to watch video of Jetta installation, before and during your installation. Directions alone are confusing. I bought longer bolts to snug in the hitch where the exhaust bracket is just to get it close enough to use the supplied bolts. Wiring from battery back also time consuming because most of Jetta SW underneath is covered.
I felt the directions and the pictures used for representation were insufficient. My call for service was useless. The person I talked to couldn't help me and was told a technician would contact me. I worked it out myself and the tech called me an hour after I finished the job. I've installed two trailer hitches from etrailer previously and have had no problems.
Works fantastic. Installation did not took longer than expected. Like other have said WATCH THE VIDEO FIRST! But installation is very simple and etrailer sends you everything you need except sealant. Overall, very pleased and would order again if I ever needed another hitch.
I received my hitch from ETrailer in very good time. Their order support and shipping was great. They have a great selection, pictures and even installation instructions. Some of the hitches even have good videos showing how to install.
The Drawtite hitch I bought had really marginal instructions. One page, small font and poor diagrams. I looked at the other hitch brand instructions and figured I could still do the job. I had a friend and we worked for five hours to complete the job. The first issue was getting the bolts on the pull string to line up inside the frame. Then getting the bolts to line up in the muffler hanger holes was a huge hassle.
I have not tried it out yet, but am looking forward to it soon.
Once mounted, this seems to be a very solid unit. It is well built out of heavy stock. The time estimate of 1 hour for install was quite a bit less than what it took for me to get the hitch mounted up. Watching the install video helped although it is for a slightly different model and the instruction sheet was not all that clear on the first few readings (it made sense once I was done). My hitch took close to 3 hours for the complete installation. The two bolt holes on exhaust hanger bracket needed to be enlarged in order to align with existing mount on the car and longer bolts were needed to initially draw that side up to a point where the bolts included with the hitch would thread into existing holes.
Here's a picture of my new trailer hitch from etrailer.com on my VW Jetta, it was awful to install , but after 3 1/2 hours my cousin and I figured out what the instructions were attempting to mean
This is a review on the installation only. Have yet to drive test with a bike rack. As far as installation went - smoothly. I used a YouTube video to install which was much better than the instructions. Seeing is much easier than reading. As can be seen by my included photo - the hitch is very hidden and blends in well with my car.
Finish Quality: The finish of the part that shows was very good. The parts that you only see if you install this hitch yourself were not so good. There were chips on some of the corners where bare metal was showing. I was disappointed, but didn't want to hassle with sending it back, so I ended up repainting most of the hitch.
Design Quality: I had a lot of trouble getting the 2 bolts on the muffler side started. I had started the bolts on the other side because fishing the bolts through seemed the harder task. Even with that side loosely bolted, it took a while to get enough alignment to start the bolts on the other side. I wonder if the dimensions were off just enough. Also it looks a tad crooked compared to the bottom of the bumper. Not awful, but enough that you notice if you look closely.
Direction Quality: With the exception of suggesting starting the muffler side bolts first, the instructions were fine.
Hitch doesn’t fit at all, I’ve been sent the wrong hardware for this numerous times after having to call and get what I thought was the correct one but no they are all incorrect and it doesn’t even fit the exact specifications.
etrailer makes installation so easy with their great videos! this is my 3rd hitch purchase from install for various vehicles. I have never had any issues.
Good hitch pretty easy install came with paint chipped off so hello rust right away.

The ease of installation was by far the big selling point for the purchase. The issue I had with this particular hitch was that the receiver angles downward and when the tow bar was installed there was insufficient clearance when going in and out of drive ways causing the tow bar to drag with my Teardrop trailer attached (empty).
On a positive note staff at etrailer.com were quick to to follow up. Another hitch was sent yet construction of the hitch was the same. They accepted the hitch back on a full refund and I ended up purchasing the ECO-hitch, much more time needed to install, yet provided the ground clearance.
Completely satisfied with the service provided by etrailer.com.
Info for this part was:
At etrailer we provide the best information available about the products we sell. We take the quality of our information seriously so that you can get the right part the first time. Let us know if anything is missing or if you have any questions.


Victoria B.
11/20/2019
Im glad to hear the Eco Hitch is working well for you! I have linked all of the trailer hitch fits for your 2014 Jetta SpotWagen to check out all of the options available.
Helpful Links
hitch-2014_Volkswagen_Jetta+SportWagen.htm