

 Arrives before Christmas
 To see if this custom-fit item will work for you please tell us what vehicle you'll use it with.


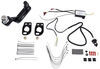
We're talking a seamless connection here—No cutting, splicing, or tapping into your vehicle's wiring needed! The T-One Connector from Tekonsha plugs right into your existing harnesses. It's engineered as a custom fit for your ride, making the setup process a breeze, especially for vehicles like the 2023 Mazda CX-5. Just plug it in and you're on the fast track to towing!
Worried about overloading your vehicle's electrical system? Not a problem! The ModuLite Powered Converter ensures your trailer's lights draw power directly from your car's battery, leaving your tail light circuits untouched. This means your vehicle’s three-wire system converts seamlessly into a two-wire setup that your trailer understands, without putting any extra stress on your wiring.
Never worry about your trailer's signal lights being out of sync with your vehicle's. The 4-way flat trailer connector provides a dependable link that powers your trailer’s signal lights, facilitating clear communication on the road. It’s compatible with 5, 6, and 7-pole adapters too, so you're covered no matter what kind of towing setup you’ve got.
Concerned about the nitty-gritty of connecting to your car battery? Included in the package is a fuse holder you connect to your battery's positive terminal. It even comes with a pre-measured wire to connect swiftly, and a fuse to get you set up with minimal effort. You can stash the connector in your rear cargo once installed for easy access.
It’s all about making things last. The recommendation to use a small amount of grease on all electrical connections ensures that your setup fights off corrosion. This little step can protect your connector’s longevity, keeping you on the road with fewer hiccups.
We know you're looking for durability and cleanliness! The T-One Connector includes a dust cap to keep dirt and debris out of your connector when it’s not in use. This protects your connections, ensuring they remain clean and functional each time you tow, maintaining those nice reliable rides everyone needs.
This will not affect how the tail lights on your vehicle operate.

California residents: click here
Videos are provided as a guide only. Refer to manufacturer installation instructions and specs for complete information.
Hi, everyone, Jesse here with etrailer. Today, we'll be taking a look at, and I'll show you how to install, the Tekonsha Custom-Fit Trailer Wiring on our 2024 Mazda CX-50. Trailer wiring is one of those things that's absolutely essential if you wanna be safe and legal while you're towing out there. And what it does is it will send a signal from the taillights on your vehicle to your trailer or even your accessory to make those signals work properly, so that means your taillights, your turn signals, and your brake lights. Here's a closer look at our trailer wiring installed on our neighbor's vehicle. This is what it would look like when you are ready to hook up to your trailer.
But what I really like about the way this wiring installs is that when you're not using it, you can just simply stow it away back here where it's safe from the elements and also just out of your sight and out of the way. But then when you are ready to hook up, it's as easy as pulling it out and closing your hatchback up. And the wiring is designed to do this, you don't have to worry about damaging at all. And Tekonsha, I really like their kits, especially with the built-in dust cap that doesn't slide down your wiring or get lost or break. It just seems to work a little bit better than some of your other options.
But as far as the plug goes, it's just your standard 4-pole plug that's gonna plug into any 4-pole trailer or accessory. If you have any questions or concerns about this wiring or anything else we offer here at etrailer, feel free to reach out to us. We'd be happy to get you pointed in the right direction. As for the installation, it does involve removing of some interior panels, and then you'll have to route a wire from the back to the front of the vehicle to make that battery connection. So if it's not something that you're looking to do yourself, check out our dealer locator.
You can find someone local to you that would be happy to help you get this set up. If you are looking to see how this gets installed, then follow along and I'll walk you through the process. We'll begin our installation inside of our cargo area here. We need to remove anything out of the back, and then also our floor covering. Take that out and set it aside.
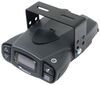
Then we'll start by pulling up on this threshold piece here. May help to get this foam out of our way. It's just held in by some clips, so just get a grip under it and pull straight up, and we'll set that aside. Now, starting on the driver's side, we're going to need to kind of peel back this panel to access our wiring back there. So there's a push-pin fastener right here. If you get a small flathead screwdriver under the centerpiece, you should be able to pop it right up. And then, back here behind this panel where this cargo hook is is a 10 millimeter. So, once again, I'm using that flathead screwdriver to pop the lid off and I'll remove that screw. There's another hidden bolt behind our rear seat fold-down lever. Once again, we'll just use that flathead to pop the lid off. (drill whirring) So we'll undo that screw and pull it out. Now, we'll just start working this panel out. It should just be held in by some clips now. So I just ended up using this plastic trim tool to kind of peel back and get my hands under it. I'm gonna firmly pull it away from the side of the vehicle. And it looks like there's one more push-pin fastener right here. So we'll get that topped out and that's gonna help us pull this out just enough so we can access the wiring behind it. Now, it's gonna be hard to show you, but we're gonna kind of look back, identify our taillight plug, and then there's a tab. And if we push that tab down and pull it out, that gives us our plug that we need to plug into. So we'll grab our new wiring harness and I'll show you how to plug that up. So on our new wiring harness, we have a female and a male connector. And since I have this connector here, now I'm able to show you this is the same as the factory one. There's the tab that you push on to release it. So what we'll do is plug that end into our taillight wire, and then we'll plug the other end into our factory wire. So on the driver's side, make sure that you're plugging in the yellow and brown wires, 'cause the green and red wires will be running over to the passenger side taillight. Now, before we get everything tucked back in there and kind of secured, I'm going to extend out my power wire, which we'll need to run to the batteries. So we'll take our extra black wire that was in our kit, strip off the end of it. I've already crimped on the butt connector to the black wire coming off of our box. And we will crimp this end onto there. Now, with our white wire, this is our ground wire, so we need to attach it to some solid metal, which is actually a 10-millimeter bolt right here. That's kind of a brace of some sort. But if we remove that, so if we take that off and slide it through our ring terminal, and then tighten it back down. And then, all we need to do is secure our black box, which we can just use zip tie, (drill whirring) we can use zip ties and attach it to some of the wiring back here to get it out of the way. Now, with the rest of our black power wire, there's actually a vent back here that I just sent it down. And then, I was able to pull it through the bottom side of the vehicle. So we'll run that up to our battery. But, first, we will route our passenger-side connector over here, just keeping up with this wiring harness here. And then, we'll have to remove this panel, it's gonna be very similar to the driver's side. Now, I'll walk you through how I routed our power wire. So, as I said, I sent it down to the vent and it comes out somewhere in here inside of our wheel well. Then, from there, I routed it up our wheel well and down. And we're just trying to stay away from any hot or moving parts. From that point, I followed this fuel tank cover, or whatever this is covering, and this is held up by some 10-millimeter bolts. I just removed those to make it easier for me to route my wire. So once we button our panel up, that'll be nice and hidden. It's just gonna follow that until here, and we needed to send it to the middle in order to route it up into our engine bay. I pulled this heat shield down, there's just two 10 millimeters and a couple push-pin fasteners. Now, what I'll do, I'll lower the car down, I'll send some airline tubing down, and tape the end of our wiring onto that so I can pull it up into our engine bay. So, as I said, I just fed some airline tubing down, got underneath, taped it up. And whenever you're routing up to the engine bay, you wanna stay as close to the firewall as you can. I always try to work around some wires to make sure that it's not gonna fall towards my exhaust or anything like that. But, once we get up here, we can cut some slack off, and strip this back. We are going to be connecting to our positive terminal. But before we can make that connection, we need to tie in our fuse. So your fuse is gonna come as a circle here. We'll just cut that in half, and we'll strip off one end. That end will be connected with a heat-shrink butt connector to our power wire. On the other end, we'll have a ring terminal on it, which will connect to our battery. So once you have that crimped on, we'll flip our top of our battery here. Then there's a 12-millimeter nut that we can remove. Take that nut off, and slide our ring terminal over this. You do wanna make sure that the fuse is not installed while you're making that connection. Once we make the connection, that'll be the last thing we do. We'll tighten that back. And with our fuse, it's very simple to install. Just line those tabs up, firmly push it in, and close your cap. Now, we've plugged in our 4-pole tester, which is available here at etrailer. Or you could use a test light or just hook up to your trailer. Whatever way you have to test, you just wanna make sure it's all working before we hit the road. So I'll just run through our lights real quick. This is our taillights, left turn, right turn, and our brakes. Now, that we know everything is working as it should, we're ready to hook up to our trailer or our accessory and hit the road. So that's gonna do it for our look at and installation of the Tekonsha Custom-Fit Trailer Wiring on our 2024 Mazda CX-50.


Only one thing, I take the power from the outlet 12 volts 15amp from the cargo. I split the positif wire and use it for supply the power box. My small trailer use less then 4 amp led lights and I put a 7.5 fuse on the supply positive wire line.Be alert to not use more then 8 amp cooler or something else thing when you plug your trailer. Not like the way of supply the box from under the car to the direct car battery. Thank You.
The youtube video explained step by step to install the wiring harness and how to remove the plastic covers. The OEM wiring harness uses tap-splice terminals to connect to the OEM wiring harness. I wanted a system that did not damage the OEM wiring harness. This system is clean & neat!
This is the second time I’ve used this brand on a vehicle and it’s just simple. Having a CX 50 hybrid , the battery and fuse box are in the trunk area of the vehicle making wiring that much easier!
I have not installed this yet, but have done several without these connectors, and this will be much easier and more reliable in the long run, I am sure. The etrailer excellent video was extremely helpful for learning what to do on my specific vehicle. The video is very detailed.
Harness was easy to install, and works as advertised.
Fit perfectly!
Great hitch. Instructions pretty decent, though they don’t have every step covered. I bought the wiring controller and harness as well. One challenge was getting the power wire from the controller to the battery. I get every vehicle is different, but if they offer instructions for this vehicle, that step should be included.
Install went well. Hitch looks great and functions great also.
Fast shipping. Great packaging. Everything you need included.
Grest product and easy to install! Great service with the team also!!
Great product! This worked well for my 2023 Mazda CX-5. The installation video was very helpful. If you have a 2023 CX-5 you should remove a couple of small trays on either side of the spare tire. The clips will release if you pull the trays straight up.
Faster and easy everything was great. Always love buy here
Well designed. Most importantly, it wor ks.
Do you have a question about this Custom Fit Vehicle Wiring?
Info for this part was:
At etrailer.com we provide the best information available about the products we sell. We take the quality of our information seriously so that you can get the right part the first time. Let us know if anything is missing or if you have any questions.


Thank you! Your comment has been submitted successfully. You should be able to view your question/comment here within a few days.
Error submitting comment. Please try again momentarily.