
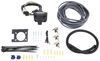
Curt T-Connector Vehicle Wiring Harness with 4-Pole Flat Trailer Connector


To see if this custom-fit item will work for you please tell us what vehicle you'll use it with.


Thank you! Your comment has been submitted successfully. You should be able to view your question/comment here within a few days.
Error submitting comment. Please try again momentarily.


Running trailer wiring doesn’t have to mean cutting into your vehicle’s wiring. The Curt T-Connector plugs directly into existing factory connectors, giving you a clean, plug-and-play setup with a 4-flat trailer connector. No splicing, no wire tracing—just plug it in and you’re ready for lights that work every time.
Even if you don’t turn wrenches often, this harness is made for an easy install. Just follow the included instructions and take your time. The plug-in design lets anyone with basic tools get the job done without special equipment or advanced electrical skills.
This harness includes a powered converter that delivers consistent power for trailer lights while protecting the vehicle’s sensitive electronics. It’s designed to supply the proper current for running lights, brake lights, and turn signals through the 4-way flat connector so your trailer lighting stays bright and steady.
Once installed, the wiring stays tucked away behind panels using existing factory grommets and trim paths. The result is a factory-style finish with no dangling wires or exposed connections—just a neat, reliable hookup ready for towing whenever you need it.

Videos are provided as a guide only. Refer to manufacturer installation instructions and specs for complete information.
Today on our 2017 Chevrolet Volt, you're going to be taking a look at, I'm going to show you how to install, the CURT T-Connector Vehicle Wiring Harness with 4-Pole Flat Trailer Connector. This is what our wiring looks like when it's installed. You can see it's going to live inside of the vehicle. When you're ready to use it, you just want to make sure, you want to over top this rubber seal inaudible 00:00:19 from any connection points. Take out as much as you need, close your hatch, hook it up to your trailer.When you're done using it, simply roll it up. You can either store it right back in your back hatch area or lift your floor coverings up and store it right down in a compartment.
That way, it's out of the way. This wiring kit is going to give us all the proper lighting functions to safely tow our trailer, all turn signals, your brake lights and your running lights. It's also going to give us a nice dust cap. It's going to help keep any dirt and debris from getting on our connection points.What's nice about this is you're going to have a converter box that's going to mount right here on your driver's side. What the converter box is going to do, it's going to protect your factory wiring in your vehicle from any backfeed from your trailer if your trailer has a wiring issue.To begin our installation, in the back of the vehicle, we're going to take out all of our floor coverings.
We're going to need to remove all of our foam. We're going to have some plastic fasteners. You're going to have one here and you're going to have one right over here. I'll just pop those up. We can loosen that, we'll just lift it out like this.
We'll just set this aside for now.Next, we're going to remove our scuff panel, going to have a piece right here in the center that will need to come off. We're going to pull out on the bottom just like that, let's set this aside. Next, we need to loosen this panel. You're going to have a little plastic cover here on your tie down loop. We'll pop that off just like that.
Then, this one here, this one just unscrews. You can do that same thing on the other side of the vehicle. Once you get those two off, you're just going to pull out on your panel. It'll pop it loose.Next, we're going to take a T15 Torx bit. We're going to have a bolt here and a bolt here we need to remove. This is on the outside of our tail lights. We're going to have a Phillips head screw right there. Then, we're going to gently pull our light back. It might be a good idea to take a plastic trim panel tool, if you have one, and stick it right here in this corner, and down here in the corner light, and kind of gently start to pry it out. There's a fastener right up here that your light fits around. These pins go inside these rubber grommets.Now, we'll remove our tail light. We're going to pull up this red tab and then push down on the black one just like that. We're going to repeat that process on the other side of the vehicle. Behind our tail light, we're going to remove this grommet. Then, we'll take our plugs with our yellow wire, red and brown. We're also going to send the ground wire through too. Where we took the grommet out, we're going to pass it from the inside out just like that.What I'm going to do is I'm just going to slice it right in half. Then, we'll take our wires, feed them right under there like that, get our grommet back in place just like that. Going to go ahead and ground my wire with my self-tapping screw. I'm going to put it right here inside this housing, just want to make sure it's on metal, not on any plastic. I'm going to take some dielectric grease, going to put it on my connections here, help keep any moisture build up, help keep them from corroding. We'll connect our new plug and do the same thing here.We'll take the RTD silicone that comes in our kit and make sure we cover this here inaudible 00:05:19 help keep any type of fumes or anything like that from getting inside the vehicle. We're going to reinstall our tail light. Next, we need to mount our converter box. You need to find somewhere flat to mount it. Take our two-sided tape and going to stick it on your box.Wherever you decide to mount it, just make sure it's clean. There's not a whole bunch of dirt or dust or anything, because we want it to stick good. Other side peeled off, stick it down like that inaudible 00:06:18 down here, make sure our panel is going to slide in good. Now, we can reinstall our side panel.Then, you're going to inaudible 00:06:22 your green wire across over to your passenger side and repeat the same process with installing your wires behind the tail light. This comes pre-assembled for a Volt. We're going to go right here to the battery in the back. We're going to take our wire, going to go right through this front edge here, pull it out, slide over like this with our cap.I'm going to take this wire, feed it up like that, going to slide this right back down into place just like that. Once you've made your connection, you can install your fuse. Then, we can test it out, make sure everything's working correctly.Now, we'll test out our wiring using part number I26. Left turn, right turn, brake lights, running lights. Once you've tested it, you know everything's working correctly, you can reinstall your floor coverings.That'll do it for a look at and installation of the CURT T-Connector Vehicle Wiring Harness with 4-Pole Flat Trailer Connector on our 2017 Chevrolet Volt.
Customer Satisfaction Score:
99% were satisfied with this product
1% of customers were not satisfied
Ratings & Reviews



Darin

7/8/2024
Still working great, no issues so far!
Rinley
10/24/2022
wiring used about 20 times this year and no problems connecting. it looks like new.
Do you have a question about this Custom Fit Vehicle Wiring?
Condition: Like New
Notes: May have damaged packaging or minor cosmetic blemishes.
Info for this part was:
At etrailer we provide the best information available about the products we sell. We take the quality of our information seriously so that you can get the right part the first time. Let us know if anything is missing or if you have any questions.


























Brooke M.
6/10/2022
Normal, run of the mill use of the wiring harness will not drain your battery.