
You don't want to get pulled over just because your bike rack hides your license plate. This light kit and plate holder keep you visible and street legal, so you can focus on the adventure - not flashing lights in your rearview mirror!
California residents: click here
Videos are provided as a guide only. Refer to manufacturer installation instructions and specs for complete information.
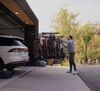
Hey everyone, I'm Evangeline, right here at etrailer. Today we're taking a look at, and I'll also show you how to install, the Thule taillight kit and license plate holder. This is gonna be something you can add onto your Thule Verse bike racks, and that way, as your lights are on on your vehicle, the lights are on as well on your rack, so that people on the road can see your bikes, see the bike rack, adding for more safety as you drive around, and in certain places allow you to carry your bikes legally as well. Thule is a company that's been around for a while. They've made bike racks for years, and not just for the North American audience, but also a lot of racks for the European market. And because of that, a lot of areas in Europe require that you have lights and you have a license plate holder whenever you carry a rack.
While those rules and laws might not apply the same way in America, some areas are starting to pick that up as well. So if that's gonna be the case for you, well good to know that Thule definitely has had lots of experience with making sure you have bright visible lights, as well as your license plate holder. Your lights mimic the lights on your vehicle, so whether you are turning left and turning those blinkers on, or maybe you step on the brakes, this will show that as well. But the big thing is definitely gonna be the license plate holder. So this is designed to fit license plates of different shapes, different sizes, 'cause I know some of them are thick metal and some of them may be a little thinner.
And you can still attach your license plate, no drilling involved. This also includes all the hardware, as well as little tools that you may need to get this installed. The only thing I brought to the table was a flathead screwdriver, which you can check out in the installation later in the studio. That's because this utilizes just a series of levers or buttons, things that you can just flip around in order to adjust to different scenarios. So when you're out driving with your bikes on, you flip your lights out to the ready and drive position.
When you have your bikes off, and you need to stow the rack, you can always just flip these lights back over, and it'll also work in your compact position. With our bikes off, this is what it's gonna look like. You just flip those lights over. For the license plate holder, there are some levers that you have to pull in the back, and then you can flip the entire system down, and then this gives you access to your handle so that you can bring this up into the compact position. This is when I would recommend just making sure that this is in the down and stored position before driving off with your bike rack now, and it's ready to go.
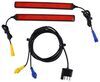
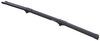
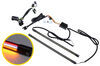
The way this connects to your vehicle, is you're gonna have a four-way flat or four-way harness. This is gonna have your four pins, which gives you your brake lights, your turn signals, and then your direct power. So this is gonna work with the four-way connection on your vehicle. If you don't yet have a wiring harness on your car, you can actually find a custom-fit harness for your vehicle right here at etrailer. You can feel free to reach out and make sure you get the right fit for you. If you happen to have a seven-way harness, or a seven-way plug, you can always get a four way flat adapter, and pretty much anyone will work with this since it is a standard connector. The length of those wires are slightly adjustable as you install them. So this will work with most vehicles with four-way wiring harnesses. However, if your vehicle has just a special spot for your wiring, and I'm talking to you 4Runner owners, then you may be interested in the tail light kit extender, which is designed specifically for the setup and for those vehicles. You can find that right here at etrailer. For those that have the Thule Verse, or are interested in getting the Verse, it's a great rack. It has all those features. It's straightforward, simple to use, but it also grows with you where you can add things, whether it's a ramp, or wheels, or this taillight kit for the different situations you might be in. Now as I was installing this, I actually install this yesterday, just 'cause I was working through all the different accessories for this rack. The main comment I was getting is that these are huge lights. They're much larger than any other taillight kit that we're used to working on. And that's not a bad thing, because that gives you that extra peace of mind and knowing that you truly are visible on the road. And Thule does also account for the largeness of their kit with things like the stand that they include with this kit, in case you have a vehicle that's really low to the ground. This will prevent you tilting down the rack and damaging the light. They also do things like add little tracks throughout the bike rack, so that you can hide these larger cords. They're still going to be visible, but as long as you install things correctly, they're not gonna be as visible as a do-it-yourself taillight kit with some random wire and some random LED lights. Now some people do go that route, and that's totally fine, but if you want something simple where you don't need to pull out some extra tools, it'll take just an afternoon to work. You can then transform your Thule Verse bike rack into one that lights up and extends your license plate. So if you're curious about that installation process, stick around for that install. If you have any questions at any point, please feel free to reach out to us right here at etrailer. We love getting you set up with the right fit for you, your bikes, and your vehicle. Now I'll show you how I got this installed for installing these lights on your rack. Most of everything you need is included with your kit. The one thing I do recommend grabbing is a flat head screwdriver, 'cause you'll need this to pry off different parts. So the first thing you need to pry off are the end caps. Removing this is probably the trickiest part. So what I recommend doing is just pushing your flathead screwdriver into that end cap, because there's gonna be a tab in there that you're gonna have to lift up. Once you have that tab lifted up, you can then carefully pull this off of the rack. We may need to give it little push, there we go. And then you're gonna do this on both sides of our top tray. Then remove these side panels. There's gonna be one on both sides. And for this next step, which is attaching your components, I just lift the whole box over to the bike rack just because everything is connected and pretty bulky. And we're gonna go look for the left and the right light. So this is gonna be the left or the driver's side light, and this is gonna be the right one. So that's what they're gonna look like. And this left one is going to slide onto that tray, remember where you took that end cap off. That will go right on there, sliding into those grooves. Now you do have to make sure that the wiring is out of the way of the bike rack so that it can slide on through until it can slide no more. Next up is your license plate holder. This is gonna fit onto your handles. They're gonna sit very nicely contoured there. Now these arms are adjustable. Don't worry about securing it just yet. The main thing you have to think about is your wires, and making sure that you are set up for the next component, which is gonna be the other taillight. So what I'm gonna do here is I'm actually gonna run this taillight around the back, and then get this up over to the other side, and slide this through just like how we slid through the other light, making sure that the wires are out of the way. Go on and slide that through the tracks. Now is a good time to also plug in your wiring, just because you'll want to double-check that everything is oriented in the right spot, and that everything works. Good time to confirm whether your left and right and license plate. The lights are on. Now to start the cleanup process, we're gonna start by securing our license plate holder. We're going to use these two small bolts and then the included T-25 tool. And these will thread it down, securing the holder to the rack. You'll then want to zip-tie your cord around the back here. I actually won't be using the zip tie, since this is just a video demonstration, but that's real secure. You're also gonna have these twist knobs to put two of them each into each light. They just fit into place. And then twist to close. Make sure you're leaving space. You can still put the end caps back on. Then using these small clips. You are gonna have two of them. Use them for each side, for each taillight. And these are gonna push into the rack. And what will really help with hiding the side wires is with putting the side panels in. Now, on the inside you have these tracks, and you wanna make sure that your wires are sitting within those tracks, so that they're less likely to be pinched as you push the different parts of this panel in. This is a little bit of a trickier job, so you are gonna have to be more patient with this, and finding good spots to bring wires in or leave wires out. You'll find different entry spots along the trays. What might help you out is knowing that this is the side panel that you removed, and this is the other panel that usually stays on there. This has a track along it, as well as a little opening underneath. So if you can fit your cable in, it'll come out that opening, and then that's when you can put your side panel and clip that on and over. So this is just like a little tricky hidden part that will make things a lot cleaner. Now bring your license plate holder down. Grab your license plate. Usually this is the one you take off of your vehicle. And your license plate will fit in first through these tabs up above, so slide them up from below. And then you're gonna have two included screws, and these will screw in the bottom. These will use the same T-25 torque key that you used earlier in this installation. Now let's move it into our upright position, 'cause we'll just pretend we're about to bring this down so we can load some bikes up. You do have these two metal stands included, and these are here in case you have a lower vehicle and you're worried about your rack making contact with the ground. So these will fit right in at the end of your trays. There's gonna be two notches in there that these will fit into. So just slide that in on both sides. One and two. And that way, when they're on there and you tilt the whole rack down, I can get out of the way of our latch here, that will then be the first thing that hits the ground and not your new taillights. While everything does adjust for your different configurations that you may find your bike rack in, moving things around does take a little bit of a learning curve. But once you got it, then you now have a license plate as well as a taillight extension of your vehicle now on your bike rack. It is pretty bulky, but it is nice to know that you are safe when you're on the road, and legal in the areas that require this. Hopefully this installation process just helped guide you through that process. It could be a little tricky getting different parts out, or keeping some parts hidden with how everything is designed. Again, if you have any questions, please feel free to reach out to us right here at etrailer. But today, this was a look at your license plate holder and your taillight extension for your Thule Verse bike rack at etrailer.com. My name's Evangeline. I hope you enjoyed this journey.
Customer Satisfaction Score:
80% were satisfied with this product
20% of customers were not satisfied
Ratings & Reviews

Do you have a question about this Accessories and Part?
Info for this part was:
At etrailer we provide the best information available about the products we sell. We take the quality of our information seriously so that you can get the right part the first time. Let us know if anything is missing or if you have any questions.


Thank you! Your comment has been submitted successfully. You should be able to view your question/comment here within a few days.
Error submitting comment. Please try again momentarily.