
To see if this custom-fit item will work for you please tell us what vehicle you'll use it with.


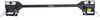
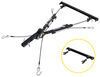
Roadmaster's crossbar-style brackets are virtually invisible, easy to mount and simple to remove. Brackets install on your vehicle's frame to provide attachment points for your tow bar.
Features:
The drawbars, or front arms, on the crossbar-style series base plate kit are supremely easy to mount and remove. Just insert them into the brackets and twist to lock them in place. To remove, simply twist the arms back and pull them out. Once the drawbars have been removed, the remaining brackets are virtually invisible. On most automobiles, the brackets are mounted within the grille, where they remain not only unseen, but protected from scrapes and scuffs, as well.

California residents: click here
Videos are provided as a guide only. Refer to manufacturer installation instructions and specs for complete information.
Hi, everyone. Jesse here with etrailer. Today, we'll be taking a look at, and I'll show you how to install the Roadmaster custom-fit baseplate for crossbar tow bars on our 2025 Ford F-150. There's gonna be five major components to look into when setting up your vehicle to be flat-towed. Starting with our base plate, that's gonna be the structural mounting point for which everything connects to. And then your tow bar, that's gonna be the physical link between both towed vehicle and motor home.
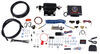
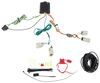
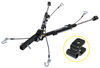
And we have our braking system which will keep you safe and legal in all 50 states. And what it does is allows you to not only rely on the brakes of the motor home to come to a stop, but also use the towed vehicle's brakes. Then we have our diode wiring, that's gonna keep you safe out there by sending a signal from the taillights on the motor home to the taillights on the towed vehicles to make those function properly. And last, we have our safety cables. These are here in case of a catastrophic disconnect.
If anything we inchesre to fail that we set up today, these will be here to hold everything together so you can come to a safe stop. Additionally, you may want to look into a high-low adapter, especially if you have a motor home of this size. The hitch does sit up quite high, as opposed to where our base plate sits on our towed vehicle, it was about a difference of six inches. So we got a six-inch high-low adapter because we want those to be as even as possible. As I said, this is a crossbar-style base plate, so this is really nice.
If you already have a crossbar style tow bar, and you're looking to put a base plate on a new car, you don't have to go and buy a whole new tow bar. You can just get this particular base plate and transfer everything over. Another thing I really like about Roadmaster base plates in general is this one, they really think about your wiring and your breakaway switch mounting. This came with a bracket that you just simply bolt into some factory bolts that are already there on our bumper, and it's really convenient to have a mounting point for both of those things just because it takes a lot of time, sometimes to get maybe a custom bracket made and get it all fit in there. Whereas with this right out of the box, you can bolt it in and you're ready to go.
If you're looking into this base plate, you probably already have an idea of how these crossbar tow bars function. So usually, you can just unbind it and lift this off after you take your pin and clips out. Ours is a little bound up, but that's fine. We can just take it out just like any other base plate by removing our pin and clip here on both sides and getting our arms out of the way. Here's how it looks once your tow bar is disconnected. As you can see, the base plate arms have a spot for you to bolt on your tow bar bracket. And if I pull this pin on the back side, give it a quarter turn, these are removable. That way, when you're just driving your truck around, you still have a nice, clean factory look. It doesn't look much different than the tow hooks that we removed. Then, of course, when you are ready to hook up and flat tow your vehicle away, it's just the opposite of what I just did. Get this slid in, you'll kind of feel it slot into place. Then quarter-turn it down and that's gonna lock it into place. Our neighbor today has these safety cables that are designed to go into this bracket for their tow bar. But this base plate does come with some loops in case you have some regular safety cables. Those are there, and you can hook right onto 'em. If you have any questions or concerns about this base plate or anything else we offer here at etrailer, please feel free to reach out to us. We'd be happy to get you pointed in the right direction. And when it comes to installation with this base plate, it is quite a handful. You have to remove the bumper, and also you're probably installing other flat tow components at the same time. So I'd understand if it's not something that you're looking to do yourself, check out our dealer locator. You can find someone local to you that would be happy to get this set up for you. If you are looking to see how this gets installed, then just follow along, and I'll walk you through the process. We'll begin our installation by removing this plastic panel that goes across the top of our grille here. So it's just some plastic pushpin fasteners, helps to have a tool like this to pop 'em off. But if you don't have one, you could just use a flathead screwdriver. But we'll just work our way through, get 'em all removed until we can pull this off. So I just work my way down while lifting up. That way I know I'm taking off the fasteners that I need to. We got that last fastener removed so we can pull this up, and get it set aside. There's actually one more on the corner here. That one removed. Now we can work it out of place and set it aside. With that out of the way, we can remove our four 10-millimeter bolts. (tool buzzes) (tool buzzes) (tool buzzes) (tool buzzes) We have two plugs here that will unplug. This one just has a push tab that you'll have to push down and pull out to separate it. It's kind of tricky to get your finger in there, but you just wanna push that down and you can pull it out. This one has a locking tab. Just lift it up, and then you can push the pin and separate it. And with this wire, it's also attached by pushpin fastener, so we'll just pop that off for now. Now, on both sides, inside of our wheel well here, we'll have two seven-millimeter bolts to remove. (tool buzzes) (tool buzzes) Now, with those screws removed on both sides, we can pull out on this little strip that goes across the front. It's just held in by some clips here. So just carefully work your way towards the center. And this inside clip seems to be the trickiest one. Just pull it out, and then we'll just work our way to the middle, and we can take this off and set it aside. So all these clips are pretty hard to get out. They do take quite a bit of force, but just be patient with it and work your way around. And try not to bend this too much because it is not a lot of plastic, but just working my way one clip at a time. (strip clicks) Now, once you get all those worked loose, we can set this piece aside. With that out of our way, we have to remove this 10-millimeter bolt that's tucked in here, that's gonna be holding our grille in place. So there's one on each side. (tool buzzes) So your grille may be different than ours. Ours wraps around our headlights here, so we have some more pushpin fasteners to remove. But on other models that I've seen, you can just pull up and out on the grille and it'll come out. As I said, ours is slightly different. So I'm gonna remove all these pushpin fasteners going across, and that should loosen it up for us. With all those pushpin fasteners removed, we should just be able to pull it out. I'm pretty sure it's just held in by clips now. If there is any more hardware or anything that I need to remove, I'll make sure to come back and show you, but just gonna work from one side to the other, and get this popped up. So the hardest clips to get removed are these corner ones. But I found that if you just grab it right here towards the inside of our headlight and give it a good tug, it'll pop loose. Just have to be wary because this is plastic. So if I start down here. Now, we have all the clips removed, we just have to work it around this rubber's kind of holding this up. And make sure you pull everything straight out so you don't thin the plastic at all. And we'll pull that off and set it somewhere safely aside. Now, we have some wiring harnesses to unplug. It looks like there's three of them that we'll need to get unplugged so we can get everything separated. This big one here, just push in on this tab, and then this gray lever will pop back, and that will separate our wires. And we have one tucked down in here. It's just your standard pushpin, and pull out. There's that pushpin. And we have one more here, has a locking tab, pull back on that. Push the tab in and separate it. And we'll also use our trim tool to pop this off so it's not connected to this plastic piece. Now, we have three 21-millimeter nuts that are holding our bumper in place. They're tucked on the backside here. Let's get those removed on both sides, and then we can take our bumper out. (tool creaks) And before you take the last one off, what I did was I just threaded on one on the other side, just a couple threads, just enough to hold everything in. But I'll go back over here, take that nut off. Now, we can take our bumper assembly. You may want an extra set of hands because this thing is kind of awkward and heavy. Pull it straight out. And we'll make sure there's nothing else that's connected. So this wiring harness is actually attached somewhere inside of our bumper here. So what I'll do is just pull off these fasteners that are holding this up. And now, we'll be able to get our bumper completely off and set aside. We need to remove our tow hooks on both sides. So there's two 15-millimeter bolts on the bottom. (tool buzzes) Get those both removed. (tool buzzes) And set those aside. (tool buzzes) (tool buzzes) Now, we're ready to get our base plate installed. So we'll take this plate here that has the two nuts welded on it. We're gonna line that up with the two holes that our tow hook mounted up to, and then we'll get this into place. You wanna make sure to have the one on the right side. This angled bracket is gonna go to the outside of our frame. So we'll slide this up. We'll start with the back bolt, which is the shorter of the two, it's two inches long. And I did put some blue threadlocker on there with a split washer. So we'll have to hold our base plate up in place. We'll get that first bolt threaded onto the plate. It does take some finesse to get everything to line up. Once we get that hand-tight, that should hold that there for us. And our front hole here, we'll get the four-inch long bolt, of course, with the threadlocker and split washer, I'll take a 19-millimeter socket and tighten those two bolts down. (tool buzzes) (tool buzzes) Once we have that bolted up, we will have to drill through our frame here. And it kind of works as a template here, so we can just kind of guide our drill bit. The instructions say to use a 17/32 inch drill bit. All I have is a half inch, so I think that'll be fine. I'll just kind of have to waller it out when I'm done. Make sure that you're putting something like a license plate or a piece of wood in between your frame here and your inner cooler because we are are going to go through both layers of the frame. (tool buzzes) And once you're through the first hole, you can just kind of get it as level as you can and start drilling the second hole on the inside of the frame. (tool buzzes) Once you have both the holes drilled out, I like to take the hardware, and just make sure it'll slide all the way through both holes. And then what we need to do is loosen up this bracket because this plate washer needs to go in between the bracket and the frame. So we'll just loosen those two 19-millimeter bolts up just a bit. (tool buzzes) Just enough so that we have space to get our washer in. (tool buzzes) So now, I can put that washer through, and I put some threadlocker on our long bolt. This be tricky to get lined up. Get that lined up, get our bolt pushed all the way through. Then on the other side, we'll put another plate washer, a split washer, and a nut. Now, with that all set up, we can re-tighten down our two bottom bolts, and also tighten down that long bolt. And this bolt is 19 millimeter like the rest, but you will need a wrench to hold the nut. (tool buzzes) (tool buzzes) (tool buzzes) With that tightened down, we'll just repeat that same process on the driver's side. Now, we'll take a torque wrench and torque everything down to the specifications in the instructions. So now we can install our bracket that's gonna hold our six-pole and our breakaway switch or anything else that you need to mount on the front of the vehicle. It's actually gonna go in here just like this, and it's gonna use these factory nuts. So we'll remove those. Those will be 10 millimeters. (tool buzzes) (tool buzzes) (tool buzzes) (tool buzzes) Get those taken out, and slide our bracket into place, and reinstall our nuts. And we can tighten those back down. (tool buzzes) (tool buzzes) (tool buzzes) (tool buzzes) Next, we'll be cutting out our air dam here. So I've kind of marked it out on the outside. We're gonna cut this section off, and then we're gonna cut all the way to here and out. So essentially, we're cutting this whole half of it off and leaving this half on. I'm just gonna use a reciprocating saw. You could probably cut this up with some tin snips, just whatever you have. (tool buzzes) Now, we're also going to cut this lower air dam on the bumper. So you just wanna come down about a half inch and try to follow that angle. And once again, I'm using the reciprocating saw. (tool buzzes) I got that cut out. I will come back over and clean up my edges with a razor blade, and then repeat that process on the other side. Now, once you've installed the rest of your flat tow components, that's gonna do it for our look at an installation of the Roadmaster custom-fit base plate for crossbars on our 2025 Ford F-150.

deffinetly will use again!
Info for this part was:
At etrailer we provide the best information available about the products we sell. We take the quality of our information seriously so that you can get the right part the first time. Let us know if anything is missing or if you have any questions.


Thank you! Your comment has been submitted successfully. You should be able to view your question/comment here within a few days.
Error submitting comment. Please try again momentarily.