
Roadmaster EZ Base Plate Kit - Removable Arms


To see if this custom-fit item will work for you please tell us what vehicle you'll use it with.



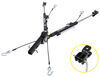
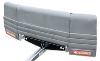
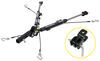
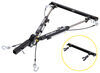
When you’re not towing, the Roadmaster EZ Base Plate Kit keeps the front of your vehicle looking uncluttered. The hidden bracket design tucks neatly within the grille, so nothing sticks out or catches your shin when you walk by. Once you twist and pull out the removable drawbars, the brackets are virtually invisible and protected from scrapes or scuffs.
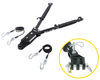
Getting ready to tow is quick and simple thanks to the EZ Twistlock feature. Each drawbar slides into the bracket and locks in place with a quick twist—no pins or clips needed. When it’s time to disconnect, just twist and pull them out. This twist-to-lock design means less fumbling and a more secure, repeatable connection every time you set up.
This base plate kit uses computer-cut, all-steel construction for exceptional strength and long-term reliability. The black powder coat finish resists rust and corrosion, so it stays solid and clean even after years of use. It’s made to handle the stress of towing while keeping a professional finish that holds up through weather and road grime alike.
Installation is simple and doesn’t require welding. The kit bolts directly to the frame for a secure fit, and comes complete with instructions and mounting hardware to guide you through the process. It’s designed for a precise fit with your tow bar setup so you can get everything aligned and ready without guesswork.
If you already own Roadmaster towing equipment, this base plate fits right in. It’s compatible with all Roadmaster tow bars as well as Quick Disconnects, so you can build on your existing setup without needing extra adapters or new hardware.

Videos are provided as a guide only. Refer to manufacturer installation instructions and specs for complete information.
Today, on our 2010 Hyundai Elantra, we'll be installing the Roadmaster base plate mounting bracket kit part #521624-1. Now, to begin our installation, we'll need to remove the two 10 millimeter bolts that hold the air intake to the core support. We'll then remove the plastic fasteners up here. Now, we'll work our way down on the vehicle here to the front fender well on the driver side and we'll remove the eight millimeter screw that holds the corner of the facet to the fender. We'll do this on both the driver side as well as on the passenger side. We'll then work our way underneath the vehicle where we'll need to remove the three plastic fasteners on both sides.
We'll now remove the five 10 millimeter bolts attaching the center splash panel to the radiator support. Now, on the inside of the subframe, you'll find two splash seals. We'll need to remove these as well. With those all done, we're now ready to remove our facet. We'll pull outward on both corners where we can then pull it away from the vehicle.
With that done, we'll now cut the air deflectors on both sides to allow clearance for the main receiver braces. With them cut, we'll now remove the two lower bolts that attach the bumper core to the ends of the frame rails. We'll do this on both sides and set them off to the side as they will not be reinstalled. We'll now take the driver side main receiver brace, put it over our bumper core, rotate it ,making sure we take the pipe spacers and put them behind the bracket but infront of our bumper core support. We can then rotate the receiver brace up until it lines up with our holes.
We'll then take the long hole included with the kit and slide it through the bumper support, through our sleeve and back out the support on the back side. We can then put a lock washer on it and finally a nut. On the two smaller holes where we removed the 12 millimeter bolts, we use the bolt flat washer and lock washer, replacing the two 12 millimeter bolts that we removed previously. With those in place here, on the driver side, we'll repeat the same procedure and attach our passenger side. Now, with both upper brackets on, we're ready to move on to the lower brackets.
We'll now take the lower bracket here on the driver side and put it into position where we can run the bolt and flat washer through the bracket, through our upper bracket and finally put a lock washer and nut on the other side. Once we have the driver's bracket in place, we'll take our U-Bolt, slide them around our subframe and back through the bracket. We can then put the washers on and secure it with the nuts. Now, we'll repeat this same procedure for the passenger side bracket. Now, with both lower brackets in place, we can work our way around tightening up all the bolts that we've just intalled, torquing them to specification as indicated in the intructions. Now, with all our hardware torqued to specification, we're ready to reinstall our front facet. Now, before we can do this, we'll need to cut a hole in the facet for each of the two braces. We'll first measure out from the center of the verticle rib. We'll then use a two inch hole saw to drill directly through the center of the horizontal rib. Once we've done that, we can now reinstall our facet. With that done, we can reinstall our lower panels again trimming them to fit our new brackets. That will complete our installation of the Roadmaster face plate mounting kit, part #521624-1 on our 2010 Hyundai Elantra.
Ratings & Reviews

Great installation instructions and video. Was an interesting and fun project installing in our Mini-Cooper
I installed this base plate system on my 2014 Jeep Grand Cherokee Limited this weekend. My Jeep had tow hooks which were basically removed and replaced by the base plates in the same location. No modifications to the grill were required and the base plates are no more noticable than the tow hooks were.
Installation was straight forward. Roadmaster forwarded a PDF file of the excellent color instructions with my order confirmation. I was able to view the photographs on my ipad and zoom in where necessary to get more detail.
Overall I would rate the Roadmaster product, instructions and customer service 5 star in every way.
Very good product at a great price. Instructions and video are for a 2013 terrain and things were a bit different on my 2015. When all screws and clips are removed the front piece cannot be just pulled forward. There is a rear facing clip and you have to pull to the side to remove from this piece. (pics attached)There was no PS cooler attached in front on mine. Remove washer bottle totally which consists of 2 nuts and 1 bolt otherwise you will never get back up plate for top brackets in. If you remove horns it also makes installing the top brackets much easier.
Easy to install for the do it yourselfer. Good quality and fit. etrailer customer service was great too.
Very well constructed. Fitting right side took some adjustment, I had to clearance the lower member hole in order to fit the bolt.
I installed the base plates myself, after the prospective mechanic claimed this was the incorrect fitment. Subsequent calls to Roadmaster produced a "No Fit" pronouncement, in spite of the lookup and even the printed instructions. Undaunted, I proceeded, and the fit was successful. YES, this DOES fit a 2007 Mini Cooper S Convertible.
Installed on 2005 mini cooper convertible. Choose this base plate for our mini since it provided highest attachment height for tow bar (12 inches off ground, only requires 3 inch drop from back of RV), and attaches to mini frame more substantially that blue ox. Installation directions are nearly perfect, we had to widen holes on passenger side to line up with frame. Modification was approved by Roadmaster.
The installation on this was surprisingly quick on my 2011 Fit (base/non-sport version). Everything fit well (no pun intended).
A few minor changes over the video as my car was slightly different:
- I didn't have to trim anything on the air dam -- the tubes lined up perfectly with the slots on my grill.
- There was a in the wheel on each side where the plastic bumper meets the steel body panel. I didn't realize they were there (they're hidden somewhat) so I ended up cracking the hole this screw was in, but everything came back together nice and tight anyway.
It does what it's supposed to do, which actually seems to be special these days. In all seriousness we purchased this for out Liberty, which blew it's ending the first time we tried to go on a big trip. We had it taken off of that Liberty and put on another and that's what it was on for our tip from AZ to Chicago. We have connected and disconnected probably a dozen times and took the arms off to drive around Chicago. It works just like it should and it is nice to not have to worry about at least one item. Hightly recommend this system.
Even I had to wait almost 2 months, I'm so grateful that I got the Roadmaster base plates and tow bar..:) It is so easy to be mounted and to operate with it... Thank you for the good product.... P.S You don't need to cut anything from the bumper plastic facial...so you can just skip that part from the instructions!
The Roadmaster base Plate kit does what it was designed to do. A difficult install as the Smart ForTwo did not lend itself to an easy base plate engineering design.
Installed it myself though with help from the instructions and etrailer on line instructions. I like the finished base plate. It is barely visible protruding only slightly from the black lower radiator grill (see photo)
Very happy with this product. Installation was pretty easy. I see no reason to pay someone to install this. True you have to take the bumper off and a large metal support beam but it was pretty easy. You just have to take it slow and not get frustrated. The bumper on the Honda Fit is held on with a gazillion little plastic clips and snap joints. Everything fits tight on a Honda so you have to be patient. My only complaint is they don't give you the exact torque settings. I had to consult a shop manual to get the correct torque values. They give a table at the end of the instructions that gives common torque values for various bolt sizes. I thought that was lame they could have given the correct value from the shop manual. Certainly not enough to lower my rating. This bar is awesome and when the drawbars are removed the base plate is almost completely hidden. My wife wanted nothing to show on the front of the car. She was very pleased with it.
In the picture attached the bar is almost completely hidden. All you see are two small black circles. It takes about 2 seconds to mount the drawbars, just twist and go. VERY sturdy. I tow my Honda behind the motorhome with confidence.
I had my tow car blow its engine in South Dakota while on vacation. It needed to be replaced. I bought a used car and ordered a tow bracket for it and had it shipped to one of my destinations so I could install it there.
Unfortunately that car also broke down but I was able to return it. I asked to return that bracket and etrailer accepted it back.
I found a different car and ordered the bracket for it plus a wiring kit. etrailer shipped those and they were there when I got there.
They were easy to install and fit exceptionally well. After having my wife drive the new tow car for 1000 miles we were happy to get back in the motor home while we traveled.
Parts came very quickly. The base plates are really well make and of heavy material. If you watch the video it is a breeze to install. Make sure you have some new clips for your bumper as the old ones will break, not all but some. I ordered clips from Amazon. I used a vibrating saw with cutting blade and it did nice job cutting plastic bumper cover.
very well made and just getting pickup ready for flat towing. Fast shipping and excellent service. Highly recommend.
I received the base plate for my Miata at 4:30 Monday by 7:00 it was installed and ready to go.A great product fit very nicely.Ordering and follow up went great can’t wait to try it out Just need to decide on the tow bar we will use.The Falcon or Sterling .Thank you for a great product and service.
It was a very easy install and it did great. Only got to use it for 2 months though before a semi drug his trailer across the back on my toad and totaled the vehicle.
Installed on 2014 GMC Acadia. Very sturdy and heavy duty base plate. I installed it myself. You will need a little automotive knowledge and more tools then the average do it yourself-er. It took about 6 hours, by myself. It looks more intimidating then it turned out to be. You can't see it when not in use which makes it nice for the wife, since it's her car.
Pictures show the tow bar adapter. Sorry, no pictures of adapter removed.
Roadmaster base plate for 2010 GMC Terrain. Very detailed instructions, great videos. Product was as described, no holes to drill, just replace factory parts with Roadmaster parts. Everything went together very well. I used the instructions supplied along with the video on my laptop. Hardest part was popping the bumper shroud back on due to colder temperature. I have a fair bit of experience with rebuilding classic cars so have lots tools and reasonable mechanical ability.
Purchased the towing adapter for my GMC Terrain a few week ago, received it on time & boxed not damaged. Watched the videos’ about three time on how to do it myself and started one evening and finished it the next morning about three hours with Beer Breaks, LoL. All the parts fix perfectly, had no problems with any of the parts, Product is real sturdy and if you don’t know where to look at the bumper you will not see the hide away receiver brackets. Very nice product, do it yourself and save
Up loading two photos if it will let me one is with hide away brackets installed and the other one you can see is my complete tow bar attached to the hide away brackets
easy to follow instructions, took about 3 hours to install. paper template for holes in facia would be great .
Seems like a very well-made sturdy product. Instructions were good however the holes did not quite lineup like they were supposed to so I had to do some mild to moderate modification. I like the way it looks without the towbar on the base plate. It’s fairly well hidden.
The baseplate fit perfectly and the video was very helpful
Thanks for being a great knowledgeable person about this tow set up. It fit perfect and the directions made it a no brainer
Installed without a hitch! Matches up perfectly with the Roadmaster Stowmaster towbar we already had. Beautiful!
Many reviews for this base plate said they could not hook up the U bolts. I had no problem using the U bolts. I did not tighten any bolts until I had them all in place. Then, I tightened all the nuts and bolts. I marked them with paint so I could see if any of them backed off. After a year, all of them are still tight. We towed our mini 4,000 miles in the first year.
Do you have a question about this Tow Bar Base Plate?
Info for this part was:
At etrailer we provide the best information available about the products we sell. We take the quality of our information seriously so that you can get the right part the first time. Let us know if anything is missing or if you have any questions.















Thank you! Your comment has been submitted successfully. You should be able to view your question/comment here within a few days.
Error submitting comment. Please try again momentarily.